Green Beans and Fire

For most of us, the warmer months are something we await eagerly. As soon as the central heating of the nation is turned up, we dust off our beach towels, ditch the scarves and plan holidays, picnics, barbeques and the like.

Beans 1

But for those in some parts of Australia the anticipation of Spring and Summer is not so positive. The Australian heat brings with it a natural disaster that is devastating and uncontrollable. Every year like clockwork, fires rage through the Australian countryside, fueled by the dry vegetation that is typical of a nation that is in drought more often than it is not. The fires originate when they are lit either by accident or by pranksters who surely have no concept of the level of devastation they cause with the act.

Families evacuate on advice of the authorities, scooping up pets, food supplies and valuables. Inevitably hundreds of homes are lost and with them, all that their previous inhabitants owned and loved. So far in my state of NSW, the lives of two people as well as countless animals, including pets and wildlife, have succumbed.
For me, the bushfires are something that we hear about daily as hour by hour, more and more homes are engulfed despite the courageous efforts of the Rural Fire Service. Whilst close to home, we must be deeply grateful that we are not the ones who stand to lose everything to something that is beyond our control. And in our gratitude, we should try to provide whatever support we can to help the families get through yet another season of destruction.

If you would like to donate to the bushfire appeal, try here or here or to donate to help affected animals, try here. I’m sure if you choose to, it will come back to you one day a million times over.

Beans 2

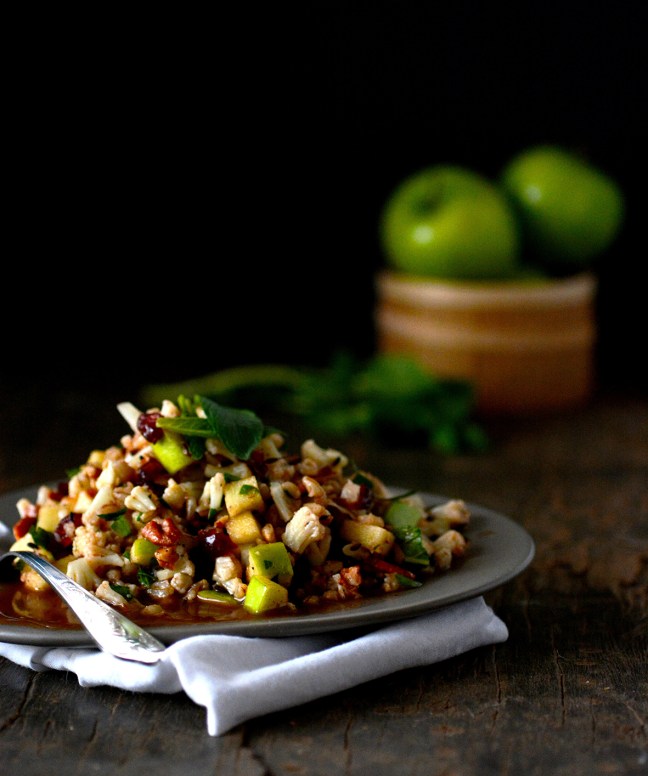
On a slightly brighter and simpler note, here is a simple green beans dish that is the perfect combination of low effort and high yield, a welcome thing in the heat. Freshness of the beans is paramount and it also helps if the tomatoes are a little over-ripe. For the most part, you can chop everything up and throw it in a pan after tempering the spices, then cover and forget about it for a good twenty minutes or so. Serve with your favourite Indian flat bread, in a wrap or as a side for meat dishes.

Beans 4

Simple Green Beans Curry

Serves 3-4 as a side dish

Get:
500g fresh green beans, topped and tailed
2 over-ripe tomatoes, diced small
1 medium white or brown onion, finely chopped
2 tsp cooking oil
1 tsp cumin seeds
1/2 tsp cumin powder
1/2 tsp coriander powder
1/4-1/2 tsp chilli powder, according to taste
2cm ginger, finely grated
Salt
Water
Small handful fresh coriander, roughly chopped

Make:
Chop or break the beans into roughly 4-5 cm lengths. In a large non-stick fry pan, heat the oil and temper the cumin seeds. Reduce to a low-moderate heat and add the spice powders and fry for about 2 minutes. Add the ginger and onions and saute until the onion is a little tender. Then, in go the tomatoes, 1 tsp salt and about 1/2 cup water. Cover and cook on a low-moderate heat for 7-10 minutes, until the tomatoes yield easily when pressed.

Throw in the beans, stir through and add another cup of water. Cover and cook until the beans are tender with some bite (about 20 minutes). At this point if the mixture is still quite watery, uncover and cook on low heat until most of the water has evaporated. When the mixture has almost completely reduced, taste and add more salt or chilli powder if desired, then stir through. Stop cooking when the water has evaporated such that the tomatoes and onions cling onto the beans.

Before serving, garnish with the fresh coriander.

Beans 3

Advertisement

Black Cat Pumpkin Cheesecake bars and 5 Tips for Safe Pets this Season

Halloween is coming!  And in anticipation, I present you with these Pumpkin Cheesecake bars which I assure you, you will love as much as I do.  The base is one that refuses to play second fiddle to the fresh, tangy topping.  It is packed with nuts and shredded coconut, providing a roughage that contrasts nicely with the smoothness of the cream cheese and pumpkin.

I used melted dark chocolate to pipe these funky little black cats, and adorned them with shiny edible pearls for eyes.  You can of course choose whatever design you please; witches hats, bats, evil eyes……the world is your cheesecake!

Pumpkin cheesecake bars ingredients

Speaking of cats and holidays, for those of you who have four-legged family members, I thought I’d put together a list of ways to care for them during this season.  Our beloved furry friends can get a little neglected during the festivities and that, as well as the insanely hot summers we experience here in Oz mean that vet hospitals are the busiest during this time.

Here are a few important ways to look after our creatures over the next few months…….

1.  Watch what they gobble: Our pets love a Christmas feast as much as we do.  In fact, we often see patients that have eaten something silly, causing them to become sick.  Nothing ruins a holiday like having to spend an hour in a busy waiting room of a vet hospital!  When pets eat fatty foods such as bacon, sausages and sweets, it can trigger a condition known as pancreatitis.  This is a very painful and debilitating condition whereby the pancreas becomes inflamed, causing vomiting and a lack of appetite leading to dehydration and illness.  Most cases are treated with hospitalisation, antibiotics and IV fluids, but severe cases can be fatal.

Fatty foods aside, certain foods such as onions, chocolate, raisins and many others are actually toxic to pets.  So while you enjoy your meal, treat your pet to something pet-friendly such as a raw bone or doggy treat, and ask visiting relatives nicely not to feed the pets human food or leave it lying around within reach.

Pumpkin cheesecake bars ingredients2

2. Remember that things that are not food can seem edible:  In addition to eating inappropriate foods, some dogs (think Labrador!) have a knack for eating things that really shouldn’t be eaten by anybody!  While you are celebrating the holidays, your pooch may do the same by gulping down something that may get stuck in his or her gut causing an obstruction.  Some holiday related things that I have had to fish out of doggy intestines include wine corks, skewers, fish hooks and corn cobs.  Believe me, spending Christmas eve elbow-deep in a dog’s abdomen is no fun for the vet, the dog or the anxious owner!

3. Protect against nasty critters: In Australia, the heat tends to bring out some of those nasty creepy crawlies that we are well known for.  Paralysis ticks are a horrible little bug, and if I could choose one species to be extinct, it would me this one.  They latch onto an unassuming animal and proceed to inject them with a poison that paralysis first the legs and then the respiratory muscles.

There are one or two good products available from vets to protect dogs against these ticks and they should be used in high risk areas such as national parks and near water bodies.  Unfortunately none of these products are highly reliable and you should search your pet after visiting these areas, focusing on the head and neck.  If you notice any signs of paralysis such as weak legs, a change in bark or breathing difficulty, veterinary care should be sought immediately.

Snake bites are also more common during summer and this should also be treated as an emergency.

Pumpkin cheesecake bars 3

4.  Stay on top of routine treatments: Ensure your dogs are fully vaccinated.  Diseases such as Parvovirus and Canine Cough (Kennel Cough) are more frequently transmitted in the warmer months.  Parvovirus occurs mostly in young, inadequately vaccinated dogs and causes severe vomiting, diarrhoea and dehydration.  It is also a condition that can be fatal due to the profound dehydration and weakness it causes.  Vaccinations and worming can often be overlooked during the excitement of the holiday season so stay organised!

Pumpkin cheesecake bars 1

5.  Beat the heat: Keep your pets cool during the scorching summer months.  Keep them indoors or provide plenty of shade outdoors.  Ensure there is plenty of clean drinking water within reach, and add ice cubes to it on hotter days.  Pets should not be left in cars on hot days and if this must be done, leave a couple of windows open a notch, don’t leave them for more than a few minutes and park the car in the shade.

So with a bit of care and vigilance, your furry friends can enjoy the holiday season while staying happy, healthy and out of hospital!

Hoping I haven’t put you off your food with all this vet talk and on a brighter note, here’s the recipe for my Black Cat Pumpkin Cheesecake Bars for October’s SABH.  The lovely JJ from 84th & 3rd is hosting this one.  These bars are gluten-free, vegetarian and fructose free (not including the decoration).

Happy Halloween to you and your pets!

Pumpkin cheesecake bars 2

Black Cat Pumpkin Cheesecake Bars

Makes 8

Recipe for the base is from Sarah Wilson’s Blog

Get:

For the base:
1/2 cup nuts- hazelnuts, almonds, pistachios or macadamias work well
1/2 cup shredded or dessicated coconut
1/3 cup nut meal- I used almond
2 tbsp unsalted butter

For the topping:
1 block (200g) cream cheese
1/2 cup pumpkin puree*
2 1/2- 3 tbsp rice syrup or honey
1 tsp allspice
1/3 cup almond meal

To  decorate:
About 10 squares dark chocolate
Sprinkles, pearls, et al
A piping bag or homemade version (try this tutorial)

Make:

Preheat the oven to 160 C.

Use a food processor to grind the whole nuts to a very coarse meal with some small chunks.  Place in a large bowl and add all the other ingredients.  Using your (clean) hands, rub the butter into the dry ingredients until the mixture forms a sort ok kneadable dough.  Press the mixture into a grease-proof paper lined loaf tin or a deep baking tray if you decide to double the recipe.  The base should be about a centimetre thick.  Bake on the middle shelf for about 15 mins or until firm and very slightly browned.  Allow to cool before adding the topping.

Place the topping ingredients in the bowl of the food processor and pulse until well combined and smooth.  Pour the mixture over the cooled base and spread evenly.  Refrigerate for at least 2 hours before slicing into 8 even squares.

Line a tray with grease-proof paper or a silicon mat.  Melt the chocolate in a double boiler or in 20-30 second bursts in the microwave.  Place in the piping bag and pipe shapes of your choice.  At this point, I placed the edible pearls to make the cats’ eyes.  Place the tray in the fridge till the chocolate sets.  Once the cheesecake bars are set and sliced, decorate with the chocolate shapes and any other decorations you wish to use.

*I make pumpkin puree by placing a chunk of pumpkin, skin and all, on a tray in an oven preheated to 180 C.  Bake until the pumpkin is quite soft, about 30 min.  Scoop out the flesh and mash by hand or using a food processor.

White flowers

Powered by Linky Tools

Click here to enter your link and view this Linky Tools list…

A Crumble for Comfort

I had serious arguments with myself before I finally made my mind up to post this recipe.  After all, who needs yet another recipe for baking fruit covered in a simple flour and oat mixture?  Especially when we are solidly in spring here in Australia, decidedly not a time for hot baked desserts.

Apple Blueberry Crumble 1

What finally convinced me to post was the reminder that this blog is as much for me as it is for the ten or so of you who regularly read it.

It is a place for me to chronicle my recipes, so that when I am old and senile, I will still be able to whip myself up a quick dessert, a dhal that tastes like home or my palak paneer.

As soon as I remember where I left my glasses so that I may read the screen.

It is a place for me to share my thoughts, memories and experiences.  To excitedly show you what I whipped up in my kitchen that made us happy over here.  I decided that perhaps a classic recipe with some equally sweet memories attached is the perfect thing to share in this, my corner of cyber-space.

All that and the fact that I had some sad, softish looking apples trying to die a slow death in my fruit bowl which simply had to be used up.

Green apples 3


I learnt the original version of this from a housemate during my time in Glasgow.  We were interns then, poor for both money and time.

As interns, our days were a blur of hospital duty, scrubs and pagers.  There were weeks of nightshifts where day became night and night was day.  A unique form of jet-lag without the fun parts like aeroplanes and cocktails by the pool.  Amidst it all we did all we could to absorb information from our seniors while attempting to appear knowledgeable in front of the students.

We ate when we could and coming home to a prepared meal was a luxury we never took for granted.  The local pub knew us well as making our way further afield to eat out in the city was a trip we seldom had the time or energy to make.  Piled into a big house together, we found that sharing meals was the most economical, not to mention most enjoyable way to go about things.

When my housemate made this crumble, an enormous dish of this would stretch to be both dessert and breakfast for several days.  During the busier times, it might have served as dinner as well.  We would store it in the cooled oven, which in the Glasgow winter was not too different from a fridge in any other place.

Apple Blueberry Crumble 3

You can make this your own as I did.  I usually use Granny Smith (green) apples but just about any apple will work.  The blueberries do that thing they do, exploding in the heat and covering everything rather dramatically in their purple juices.  Feel free to use whatever berries you like, or even raisins.  The crumble can only be enhanced by add-ins such as shredded coconut, pecans or hazelnuts, but I quite enjoy the way pepitas swell with hot air and go all crunchy.

Apple and Blueberry Crumble

Serves 6-8 for dessert or 4 hungry interns for dinner

Get:

For the fruit layer:

6 apples
1 punnet blueberries
1/2 tsp cinnamon powder
1/2 tsp vanilla extract
2 tbsp rice syrup, honey or brown sugar

For the crumble:

3/4 cup wholewheat plain flour
3/4 cup quick oats
3 tbsp pepitas
1 tsp cinnamon powder
1 & 1/2 tbsp rice syrup, honey or brown sugar
1 & 1/2 tbsp butter
8 cloves

Make:

Preheat the oven to 160 C.

Core and dice the apples to a 1 1/2 to 2 cm dice.  In a mixing bowl, mix the apples, blueberries and the rest of the fruit layer ingredients so that the fruit is well coated in the other ingredients.  Distribute the fruit mixture evenly in a medium sized deep ceramic dish.

Place all the crumble ingredients, apart from the cloves, in the same bowl.  Use your (clean) fingers to massage the butter and syrup into the other ingredients.  Stop when it is well mixed to a moist crumble consistency.

Scatter the crumble mixture evenly over the top of the fruit mixture.  Dot the cloves into the crumble.

Bake on the middle shelf of the oven for 40-50 minutes until the apples are soft and yeilding.

Serve warm with vanilla ice cream, cream or Greek yoghurt. The latter is probably a more sensible option if you are having leftovers for breakfast but if you opt for ice-cream it’ll be our little secret.

Apple Blueberry Crumble 2

Chocolate Orange Macadamia Truffles

Choc Orange Mac Truffles 1

The universe has a way of leading you towards things, doesn’t it? There are suggestive powers out there that not always subtly lead you towards a decision.  You may discover a new holiday destination that you want to try out, and suddenly there are references to that destination in every magazine you read.  Also three other people in your workplace have just been there and are full of stories about how amazing it is.

They show you pictures of their bare knees propped up on a beach with the ocean in the background (anyone else baffled by that trend??).  Then you get an email about holiday deals to the very same place and that decides it for you.

Sometimes, there really is no point arguing with the Universe.

Choc Orange Mac Truffles 6

Over the past couple of weeks, the Universe has been throwing balls at me.  Not the type that are made of hard rubber that people more athletic and co-ordinated than I kick around on a field on purpose (also baffling).  These are the very same type that for some reason seem to be magnetically attracted to my head and will come flying through the air to give me a concussion, even if I am no-where near the field in question.

Choc Orange Mac Truffles 3

No, the balls I’m talking about are the smaller, softer chocolatey variety. Truffles, if you will, although I’m sure you’ll agree that ‘balls’ is infinitely more fun to say.

They are all over the internet, these little spheres of goodness.  Here, and here and here. Ohh and these ones!  Last weekend my parents had people over and I was asked  to make these date truffles, so of course I was already in balling mode.  Then there was lunch at Ungaro Raw followed by their divine chocolate truffles.  And that did it for me.

If the universe wants balls, who am I to deny it?

Choc Orange Mac Truffles 2

As a lover of texture in my balls (too far?), I decided to make some chocolatey truffles that were creamy with avocado and studded with shredded coconut and crushed macadamias that would make the eating experience that much more interesting.  These are only mildly sweet as I preferred the choc orange flavour to dominate, but you can add more sweetener if you prefer.

Before you say anything or make that face, I promise you can’t taste the avocado so don’t let that stop you.

I have a box of these in my fridge and I still can’t get them out of my mind.

So, I want to know…… what has the universe been telling you lately?

Choc Orange Mac Truffles 5

Chocolate Orange Macadamia Truffles

Makes 23-25 truffles

Get:

1/2 cup raw, unsalted macadamias
3 tbsp raw cacao or cocoa powder + 2-3 tbsp for dusting
4 1/2 tbsp dextrose powder (fructose-free) or icing sugar
Flesh of 1/2 a large, softish avocado
1/2 cup shredded coconut
1/2 cup skim milk powder
Finely grated zest of 2 oranges
1 tbsp orange juice

Make:

Pulse the macadamias in the food processor until they are very coarsely crushed.  I stopped when some of the nuts were in a coarse powder but there were still lots of small un-powdered pieces.

Place the avocado flesh in a large bowl and mash well with a fork.  Sift in 3 tbsp of the cacao or cocoa powder.  Add the other ingredients.  If using icing sugar, this should be sifted as well.  Mix well with a spoon, then with clean hands like a dough.

Place the bowl in the fridge for about 30 min.

Have a tray or a large plate lined with grease-proof paper.  Place 2 or 3 tbsp of cacao or cocoa powder in a food-safe plastic bag, such as a sandwich bag.

Oil your hands a little- I used coconut oil.  Roll the mixture into balls.  I like truffles that are about 3 cm in diameter (roughly a tbsp).  Drop 3 or 4 truffles at a time into the bag of cocoa powder.  Hold the top of the bag closed and shake to coat the truffles.  Dust off the extra cocoa powder and place the balls on the plate.  When all the truffles are done, place them in the fridge for at least an hour or so before serving or devouring.

Choc Orange Mac Truffles 4

OSP @ Ungaro Raw, Rozelle

When it comes to the raw food movement, I have always been somewhat of a sceptic.  I suspect it has something to do with my ethnic background.  After all, us Indians are known for cooking things to within an inch of their lives.  So for me, going to a restaurant and paying for a meal that isn’t cooked seems preposterous to say the least.

20130830_134954

When a dear friend announced that she had quit her job and was going travelling indefinitely, I was insanely jealous but also keen to catch up with her before she left.  When she suggested we do lunch at Ungaro Raw, the sceptic in me was seduced by her description of their Mint & Coconut Chocolate Truffles.  She promised they would be an explosion of flavours in the mouth (her words, not mine) and I was sold.

20130830_133726

Ungaro Raw is nestled in the fun end of Darling Street in Rozelle, opposite the markets.  This place is so shiny and new that even tracking a phone number down for them is difficult and their website promises that it is the ‘future home of something cool’.  Don’t let that put you off from trying out their mouth-watering menu though.  Not everything on it is raw but it is all vegan, organic and made up of wonderful, fresh produce.

My friend and I were initially drawn to the display of desserts in the front glass cabinet, which I thought was an excellent tactic on their part.  We convinced each other we should really eat something sensible first and sat at one of the insanely cute vintage tables outside.  The rustic vintage decor stretched throughout the little restaurant, and sunshine streamed in the two huge doors, giving the place a gorgeous feel.  The sunshine must have been contagious as we found all the staff to be bubbly, very helpful and incredibly welcoming.

20130830_13441020130830_133911

A vege burger was ordered and devoured- fragrant crusty bread, scrumptious lentil pattie and all.  There was a plate of corn and millet fritters which my friend seemed to almost inhale, assuring me that it was delicious.  A berry smoothie was had; thick, filling and not over-sweet as so many other smoothies seem to be.

20130830_141557

And after what seemed like an eternity, it was time for dessert.  We decided to order two very different  dishes.  The lemon cheesecake had a cashew cream filling that meant it was not only gluten free, but lactose free as well.  The filling was unlike anything I’ve had before, leaving a satisfying, nutty flavour in my mouth that I wanted to savour every second of.

As for the Chocolate Mint slice, it’s beautifully textural layers were just what I was hoping for with just the right level of sweetness and refreshing mintiness to satisfy that sweet tooth.

20130830_144122

Don’t think I had forgotten about those Mint & Coconut Chocolate Truffles!  One of those babies as well as its’ neighbour, a Chocolate Orange ball came home with me in an innocent looking paper bag.  Both of them may or may not have reached home in a half-eaten state.  And as for these  after dessert desserts, I can think of no better way to describe it than the incredibly chocolaty taste explosion I was promised.

Ungaro Raw may make a convert out of me yet.  And you? Well, all I can say is, you’d better get in there before the rest of Sydney hears about the new kid in town.

Ungaro Raw is on the corner of Darling St. and National St. in Rozelle.  They do breakfast and lunch 7 days a week and dinner on Fridays and Saturdays.

Tel: (02) 8964 9223

ungaroraw.com (coming soon)

20130830_135023

<a href=”http://www.urbanspoon.com/r/70/1777782/restaurant/Sydney/Ungaro-Raw-Rozelle”><img alt=”Ungaro Raw on Urbanspoon” src=”http://www.urbanspoon.com/b/logo/1777782/minilogo.gif” style=”border:none;width:104px;height:15px” /></a>

Cauliflower and Apple Salad with Tamarind Dressing

When I was asked by the Australian Jewish Newspaper to contribute a recipe appropriate for the upcoming Jewish festival Rosh Hashanah, I got to thinking about food with respect to religion.  Food is so complexly linked to our culture which in turn influences the way we choose to celebrate important religious festivals.

From the universally known bread and wine of Christianity to the more complex dishes I was raised with that are linked to the multitude of Hindu festivals, I am fascinated by the basis for why certain foods are considered auspicious.

Green apples 2

This is a month that is heavily concentrated with important Hindu festivals.  Krishna Janmasthami, or Gokulashtami is next.  Traditionally, many sweet and savoury snacks are prepared as an offering to the cheeky Lord Krishna, known for his mischievous thieving of home-churned butter as a child.  It is easy to see why this festival was a childhood favourite of mine, and it wasn’t just because I was always quite fond of Lord Krishna.

Barely have our waistlines recovered from the excessive consumption during Gokulashtami before Ganesh Chathurthi arrives, a celebration of the elephant headed God.  Little steamed or deep fried pastry parcels with a coconut and jaggery filling are a traditional staple.  There are many stories associated with the auspiciousness of this dish, variations of which are called the modakam or kadabu.  The simplest explanation is that the sweets were a favourite of Lord Ganesha and he is often depicted with a plate of the delicacies at his feet.

cauliflower

What especially strikes a chord with me is the significance of bevu bella, a mixture of bitter neem leaves and caramel-sweet jaggery.  A spoonful of bittersweet that is distributed during Ugadi, the Kannada New year.  It is a reminder that life brings with it both happiness and sorrow and one must begin each year prepared to handle both with equal grace.

Green Apples1

Rosh Hashanah falls in September and is the Jewish New year.  It is believed to be the anniversary of the creation of Adam and Eve, and a ‘day of judgement’ for those that follow Judaism.  Foods such as apples, honey and dates are offered and eaten to symbolise a sweet new year.  Pomegranates are another auspicious food with their many seeds representing a fruitful year ahead.

cauliflower apple salad 1

I put together a salad that was inspired by one I had at a trendy Sydney cafe, Kepos Street Kitchen.  There, hubs and I hipster-watched as we devoured a large bowl of an incredible cauliflower and pomegranate salad.  I couldn’t source any pomegranate for this recipe so I’ve used apple but pomegranate would also work well.

This is a salad that combines the bite of cauliflower with the tartness of green apples and cranberries.   The dressing is tamarind based, sweetened with honey and perfectly balanced with the warmth of cumin and paprika.  It is a dressing that will collect at the bottom of the bowl but this is far from a problem because you will find yourself sipping spoonfuls of it long after the solid ingredients are gone.  Crunchy toasted pecans, tossed in right before serving lend a final textural surprise.

cauliflower apple salad 2

Cauliflower and Apple Salad

Serves 2-3 as a side dish

Get:

For the dressing:

Small ball of dried tamarind (ping-pong ball sized)
1/2 cup boiling water
1  1/2 tsp cumin seeds
1/2 tsp paprika
1/4 tsp salt
1 tsp honey
1/2 tsp lemon juice
1/2 tsp olive oil

For the salad:

1/4 cup pearl barley
1/4 tsp salt
1 1/2 cups boiling water
1/2 cup pecans
1  1/2 cups cauliflower in tiny florets
1/2 a green apple diced or 1/3 cup pomegranate seeds
1/2 cup dried cranberries, roughly chopped
1 tbsp mint leaves, finely chopped
2 tbsp parsley (flat or curly), finely chopped

Make

Preheat the oven to 160 C.  When heated, place the pecans in the oven on a tray for 8-10 mins or until toasted.  Allow to cool and chop roughly.  You will not be needing the oven after this.

Soak the tamarind in 1/2 cup boiling water for about 10 minutes.  Mash the tamarind in the water with a fork and drain, reserving the water.  You can discard the tamarind pulp.

Place the pearl barley, 1 1/2 cups boiling water and 1/4 tsp salt in a saucepan or pot.  Bring to the boil and simmer for 30-40mins until the barley is cooked but still a little chewy.  Drain and set aside.

In a small non-stick pan, toast the cumin until a little browned and fragrant.  You could probably also do this in the oven.  Using a mortar and pestle or spice grinder, grind 1/2 tsp of the toasted cumin to a powder.

Chop the stems off the cauliflower just at the base of the florets and divide into tiny florets.  Wash well.  Blanch in boiling water (enough to completely cover the cauliflower) for 5 minutes.  Drain and set aside.

Dice 1/2 a green apple into roughly 8-10 mm pieces.

To make the dressing, combine tamarind water and the rest of the dressing ingredients except for the whole cumin seeds in a large bowl.  Whisk to combine well.  Taste and add more salt or lemon juice if desired.

To the bowl add cauliflower, apple, barley, whole toasted cumin and herbs.  Toss well to coat in the dressing.  Just before serving, toss through the pecans.

Notes:

Dried tamarind is available at all Indian grocers.  You could also use tamarind paste- dissolve about 1/2 tsp in 1/2 cup boiling water.

Pomegranate seeds would also work really well in this salad either instead of or in addition to the apple.

Walnuts would also work well instead of pecans.

Want more salad? Try:

Quinoa Salad
Zucchini, Carrot and Fennel Salad
Warm Lentil Salad with Goats Cheese and Walnuts

cauliflower apple salad 3

Speaking of lemons….

…..there are still a few kicking around in my fridge.  They are a little softer than they were a week ago and I finally made myself throw out their leaves and thorns.

The thorns just amp up the coolness factor of all this.  Don’t think you can just reach in and grab the luminous fruit whenever it pleases you.  As lovely as they look, the tree doesn’t give them up without a fight and you are likely to get jabbed in the finger by that crafty defence mechanism.

You won’t see it coming of course, not with your eyes fixated on those shiny skinned lemons.  They will be yours eventually but don’t expect the tree to give in without a fight.

Nankhatai 2

I squeezed and zested as many as I could and although I can use the juice gradually, I was aware that I needed to use the zest pretty quickly.  Lemon zest, by the way, is my current favourite ingredient.  There is only so much lemon curd one needs to have in the fridge so that wasn’t an option.

Nankhatai 1

With perfect timing, the August Sweet Adventures Blog Hop was announced, hosted by Sophie from The Sticky and Sweet.  Cookies are the name of the game this month and I decided to try and make a biscuit that has been on my mind lately.

(Let’s just pretend for now that it’s perfectly normal to have baked goods on one’s mind.)

The biscuit in question is nankhatai, a traditional Indian cookie that is almost shortbread like in texture.  The chickpea flour gives it it’s richness and mouth-coating quality.  Semolina provides little spots of crunch and substance in an otherwise buttery crumbly world.  That lemon zest found it’s calling in my version and joined pistachio and cardamom to flavour what turned out to be a gorgeous tea-time biscuit.

I just love it when a plan comes together.

Nankhatai 4

Lemon and Pistachio Nankhatai

Modified from this recipe

Makes 28-30

Get:

180g butter at room temperature
3/4 cup brown sugar
Zest of 1 1/2 lemons, finely grated
Insides of 8-10 cardamom pods
1 tsp white sugar
1 1/4 cups besan (chickpea) flour
1/2 cup plain flour
1/4 cup coarse semolina
1/2 tsp baking powder
1/4 tsp salt
1/4 cup pistachio kernels

Make:

Preheat the oven to 175 C.

Using a mortar and pestle or spice grinder, powder the cardamom and white sugar together.

In a large bowl, cream the butter and lemon zest with the sugar and the cardamom/sugar powder.

In a separate bowl, sift all the flours, baking powder and salt together.  Grind the pistachios very coarsely so that there are still lots of small pieces rather than a powder.  Add this to the flours and stir through.

Add the flour mixture to the butter and sugar mixture and combine with a spatula.  You will then have to get your (clean) hands in there to form a dough. Knead the dough for a couple of minutes until it is smooth.  If it is too sticky, put it in the fridge for about 10 mins. Knead again for a minute.

Form tablespoon sized balls.  Roll between your palms and flatten a little.  Mine were 3-4 cm in diameter and about 1.5 cm thick.  Press down in the middle with your thumb to make an indentation.  Lay the cookies out on baking trays lined with baking paper.  Leave 2-3 cm between cookies as they will spread.

Bake on the middle shelf of the oven for 16-20 mins.  The cookies are done when they have spread a little and are browned at the top and bottom.  They will be soft initially but will crisp up after they cool.

Nankhatai 3

A Bowl of Red

Beetroot Fried Rice 2

Beetroot does this thing where it colours everything around it crimson with its juices.

My fingers, the wooden spoon, the new(ish) tea towels……et al.

I can’t decide whether it’s very cool or very obnoxious.

Beetroot and peas

And rice…..well rice doesn’t stand a chance against beet juice, what with being white and all.

It’s a blank canvas for redness.

This is a super simple, quick weekday meal.  My solution to having nothing in the vegetable crisper drawer except a single lone beet, and a container of cooked rice that needed a good home.

Peas

I think we’ll keep this one on the dinner rotation.  The beets provide fibre and a touch of sweetness which is nicely contrasted by the chilli.  The rice makes it a filling weekday meal which is super quick to make.  Did I say that already?  Well it is……it took me longer to take photos of this dish than it did to make it.

Super quick.

Beetroot Fried Rice 3

Beetroot Fried rice

Feeds 2-3

Get:

500g beetroot, peeled and julienned
1/2 cup fresh or frozen peas
2 tsp vegetable oil
1 tsp black mustard seeds
1/4 tsp turmeric
1/2- 1 tsp chilli powder
1/8 tsp asafoetida
1/2 tsp urad dhal (uncooked)
1/2 tsp channa dhal (uncooked)
8-10 curry leaves
1-2 large hot fresh red chillies, finely chopped
Salt
3 cups cooked rice (I use basmati)
1 tsp lemon juice

Make:

If you do not have rice which is already cooked, cook the rice using your favourite method.  Spread the cooked rice out on a large tray to cool.

Peel the beetroot and julienne- I use a mandolin for this.

If using fresh peas, cook in boiling water for 5-10 minutes.  If using frozen peas, just soak in boiled water for a few mins.

Heat the oil in a non-stick wok or fry pan.  Turn the heat down and add the mustard seeds and cover while they pop.  Add the dhals and fry until they are slightly browned.  Add the spices and fry for 2-3 mins.  Then, add the chilli and curry leaves and fry until the leaves are browned.  Read more about tempering spices here.

Throw in the beetroot, 1 tsp salt and about 1/2 cup water. Stir through and cover the pan. Cook on low to moderate heat for 4-5 mins until the beetroot is tender but still firm.  Drain the peas and add to the pan, as well as the rice.  You may have to break up the rice with your fingers.  Continue to toss everything together until it is all coated in the spices and oil, and heated through.  Be gentle with the rice so it doesn’t go squishy.  Taste and add more salt if needed.  Squeeze about a tsp of lemon juice over the top.  Toss through again and serve sprinkled with chopped fresh coriander and yogurt on the side.

Notes:
The dhals are probably optional but they do add a nice crunch.

Beetroot Fried Rice 1


Nutty Bonbons for The Sweet Swap

I didn’t grow up believing in Santa Claus, the Easter Bunny or the Tooth Fairy.  There was no leaving cookies and carrots out for Santa and his hungry reindeer on Christmas Eve. I didn’t awake at Easter anticipating the search for chocolate eggs that a big furry visitor had hidden.  As for the tooth fairy, she didn’t visit till I was at least eight when we migrated to Australia.  By then I was old enough to know better and while I happily accepted coins in return for the last of my baby teeth, I knew deep down that a fairy wasn’t the one providing the compensation.

Nutty Bonbons 1

None of these things are anything to be sad about as these are western concepts that weren’t part of a typical Hindu Indian childhood.  We lived in Mumbai then, or Bombay as it was called at the time.  My parents made sure there was no shortage of wonder in my life and so there was no sense of deprivation.  I was an only child with a quirky imagination and they each had their unique ways of entertaining me.

Nutty Bonbons 5

My mother was then a stay-at-home-mum, and as for many kids who have that luxury, she lost some of her authority come nightfall.  So it was my dad who would come home from the daily grind to his duty of coaxing me to eat the healthy dinner that my mum had prepared.

Luckily he too had quite the imagination and sitting at our Formica table in our little flat, he would find a way to transform the contents of my plate into something a fussy six-year-old would find fascinating.

Rice, yoghurt, curries and sambhar would be carefully piled into an exotic looking arrangement with an equally exotic name to pique my interest.  Dad’s skills as an engineer were never so challenged as they were when he constructed these elaborate creations that gave a new meaning to playing with one’s food. The whackily christened Auburi Biselari Kuselari was one such creation, made up of whatever was on my plate and with a name that was entirely conjured up in my dad’s mind.

I like to think it is more a testament to my dad’s creativity and not a reflection of my own gullibility that this was a tactic which worked very well indeed.

Nutty Bonbons 4

Dad had another trick up his sleeve, and not just in a metaphorical sense.

Wanna see some magic? He would ask.

Now what child says no to that?

He would wave his hands around in the air, click his fingers, mumble some magicky sounding mumbo jumbo.  With spectacular pomp, dad would make a fist, wave his other hand over it and turn it over to reveal a treat as if materialised from the air.  And amazingly in his palm there would be a 5-star chocolate bar or a little pack of Gems (India’s answer to M & M’s) or a wedge of Amul cheese in its foil wrapping.

Dad knew just how to enthral and impress his little girl.

Nutty Bonbons 2

The Sweet Swap wasn’t quite the same as my dad’s wizardry, but it still involved packages of sweets appearing, as if by magic, on my doorstep.  The inaugural event involved food bloggers from all of Australia and was put together by two lovely bloggers; Sara of Belly Rumbles and Amanda of Chewtown.  Not only did the event raise funds for the charity organisation Childfund Australia, but it served to connect food nerds from all over the country, a real bonus for a newbie blogger like yours truly.  The basic gist of it was that each blogger was matched with three other bloggers.  We were instructed to make three batches of the same sweet and post them off to our matches.  In turn, we received three surprise bundles of sweets from the bloggers that we were matched to.

Now what could be better than receiving homemade goodies in the mail?

Over the course of the week, I delightedly received firstly some scrumptious Irresistaballs by Tara from vegeTARAian, followed by the heavenly, goodbye-diet, Snickers Bars courtesy of Cassandra from Food Is My Friend.  The last package contained some cloud-like Green Tea and Lemon Sherbet Marshmallows from Ed at Yaya’s Yumyums.

Left to right: Marshmallows, Irresistaballs, Snickers Bar

As for me, I decided to try and dabble in some low-fructose treats.  A little while ago, one of my colleagues, Maria, gave me a recipe for some seriously addictive bonbons that she had brought in to share.  After a few tweaks, I came up with a version that had a fructose-free middle and a coating of dark chocolate.

These bonbons have an incredible texture, with ingredients that feel really substantial in the mouth.  The bitterness of the dark chocolate beautifully cuts through the sweet nuttiness of the filling.  Remember that almond butter we made a few weeks ago?  Well, you probably didn’t need a way of using it up, but if you did, this is one.  These beauties are super easy and no-bake, which means you could easily get the kiddies involved, as long as an adult is handling the molten chocolate.  They also make a great gift and evidently survive well in the postal system.

VKD_0637

These bonbons landed on the doorsteps of Emily of  Hold the Peas, Muppy of Muppys and as nervous as I was about sending chocolate treats that I made to a professional sweet-maker, John of Perfection Chocolates.

Nutty Bonbons

Makes 30-35 bonbons

Get:

1 1/2 cup walnuts
1 cup shredded coconut
1/2 tsp cinnamon
1/4 tsp vanilla extract
2-3 tbsp almond butter
1/4 cup rice malt syrup
150g good quality dark chocolate
Desiccated coconut for sprinkling

Make:

Blitz the walnuts in a food processor until a very chunky meal is achieved.  Place in a large mixing bowl and add all the other ingredients apart from the chocolate. Start with 2 tbsp almond butter and add more later if the mixture is too dry.  Mix with a wooden spoon until it is a sticky, even mixture.  Oil your hands with a little coconut oil or a neutral oil.  Roll the mixture into balls that are a little smaller than a cherry tomato.  Spread out on a tray and place in the fridge for at least an hour.

Melt the chocolate using your preferred method- I like to use a Bain Marie.  Drop the balls into the molten chocolate two or three at a time.  Use two teaspoons to roll each ball in the chocolate until completely covered.  At this point, I sprinkled about half of them with desiccated coconut.  Place the balls on a grease-proof paper lined tray and return to the fridge. Refrigerate for at least 2 hours.

Notes:

You can substitute any other nut butter for the almond butter.

To make these completely fructose-free, you could use fructose-free chocolate which is sweetened with glucose or Stevia, and vanilla powder instead of extract.

Of course, if you are happy to embrace the fructose, you can substitute golden syrup for rice syrup and use any chocolate you like.

Nutty Bonbons 3

Dad’s Pav Bhaji- an Indian Street Food Favourite

If you are the type to like your food dainty, neatly arranged and delicately spiced, this recipe is probably not for you.  If elegance and order on the plate be your priority then under no circumstances should you even contemplate making and devouring this dish.  And if cutlery is your friend or you strive to maintain grace while eating your meals, well then I’m really baffled as to how you even ended up here.

Pav Bhaji 2

If you’re still here, I’m glad you are because if you are willing to overlook the complete and utter lack of prettyness of a dish and place something that looks like homogenous slop in your mouth, then this might just be for you.  And if you are game to tear off buttery, toasted bread with your fingers, scoop up some of the aforementioned slop, top it with zingy raw onions, a squeeze of lemon juice and fresh coriander and cram it into your mouth, you may just be glad that you did stick with me here.

Pav Bhaji 4bVKD_0720

So if you manage to get that far, what you will probably experience is something akin to a Bollywood street party in your mouth.  You know the kind where boy and girl are walking down the street seemingly normally and all of a sudden everyone breaks into song and magically, strangers know all the steps to the dance? Yup, just like that but on your tongue.

And if you’re still tuned in, I promise you won’t regret it.

Pav Bhaji 1

Pav Bhaji is an Indian street food that originated in Mumbai and is now consumed by hungry folk on street corners all over India, as well as in restaurants the world over.  It is a kind of spiced stew, crammed full of vegetables bound together by mashed potato.  It is the mashing, the cooking, the stirring, followed by more cooking allows the vegetables to absorb the spices so beautifully.  When this smoothly spiced bhaji meets buttery toasted bread, it really feels like, at least in that moment, all is right with the world.

In our family home, although my dad can cook, it is my mum who does most of the day-to-day cooking, like this dish.  But pav bhaji? This is undoubtedly my dad’s domain.

A meticulous vegetable chopper, dad first chops all the vegetables in a perfectly even dice, then proceeds to combine it all together in a simmering pan while the spices develop their flavours, slowly but surely.

So we wait patiently, the aroma making it almost impossible for us to focus on our pre-dinner tasks, until finally dad dishes up the delicious bhaji along with pan-toasted bread as well as the accompanying chopped onion, coriander and wedges of lemon.

We normally use store bought bread rolls to pile the bhaji onto, but if you would like to try making your own, Sneh from Cook Republic has a recipe.

Pav Bhaji 5

Dad’s Pav Bhaji

Feeds 4-6

Get:

3 medium potatoes, quartered (Desiree or Pontiac work well)
2 medium carrots, finely diced
3 medium onions (you will need 4 in total), finely chopped
1 red capsicum, diced
1 green capsicum, diced
3 small tomatoes, diced
3/4 cup frozen peas, soaked in boiling water
More boiling water
50g butter + extra for bread (optional but recommended!)

For the Tempering:

2 tsp cumin seeds
1 1/2 tsp pav bhaji masala
1/2 tsp Garam masala
1/4 tsp chilli pdr
1 tsp amchur (dry mango powder)
2 chillies
1 1/2 -2 tsp salt

To serve:
8 Bread rolls- white bread tastes the best with the bhaji but grain or wholemeal also work
Butter
1 Lemon, cut into wedges
1/3 cup fresh coriander, roughly chopped
1 small onion, finely chopped

Make:

Place the potatoes in a pot with 1/2 salt and enough boiling water to completely cover them. Boil until just cooked through.  Drain and set aside to cool.

Chop all the vegetables as described and soak the frozen peas in boiling water.

In a large non-stick wok or fry-pan, heat the oil on moderate heat.  Add the cumin seeds and when most of them have popped, add the chillies.  Fry, adjusting heat to prevent the seeds from burning, for 1-2 mins.  Add the spices except for salt and amchur and cook, stirring for 3-4 mins.  Add both types of capsicum and fry for 5-6 mins.  Add the onions and fry until the onions are translucent.  At this point, add 1/2 cup water, cover and cook for 3-4 mins.

The capsicum should be just cooked through by now.  Add tomatoes, carrots and peas and another cup of water. Add 1 1/2 tsp salt and stir through.  Cover and allow to cook on low heat until carrots are cooked through and tomatoes are starting to go mushy.  While this is cooking, peel the cooked potatoes.

Much of the water may have evaporated by now.  Add the potatoes and another cup of water.  Use a potato masher to roughly mash the mixture in the pan.  Keep it fairly chunky- don’t aim for a mashed potato consistency, but enough of the potato should be mashed to homogenise the mixture.

Cook for 2-3 mins.  At this point, you should taste and add more chilli powder, salt or amchur (for sourness) according to taste.  Cover and cook for 15-20 min, on low-medium heat, stirring every few mins.  The mixture should be quite loose during this process, like a very thick soup.  Add water as you cook to maintain this consistency.

Finally, add 50 grams butter, cubed and stir through until melted and the mixture thickens a little.  Cook uncovered, stirring for a further 5 mins.  Take off the heat and allow to sit for a few mins before serving.

Slice the buns into half through the middle as you would for a burger.  Butter the bread generously and fry, cut side down in a non-stick fry-pan until toasted.  Use this method rather than using the toaster or grill- trust me on this one!

Serve bhaji with a sprinkle of raw chopped onion, coriander and a good squeeze of lemon juice, and bread on the side.

There are 2 ways of eating this- either pile the bhaji onto the bread and eat like a pizza or tear off pieces of bread and spoon/scoop the bhaji onto it.  Either way, ditch the knife and fork and use those fingers!

Notes:

Pav bhaji masala, garam masala and amchur powder are available at Indian grocery stores.  Garam masala is also available in mainstream supermarkets.

You could make this dish vegan by using vegan spread instead of butter, or by skipping the butter altogether.

Pav Bhaji 3