Cucumber Raita

cucumber-raita-onesmallpot-3-of-5

I’ve been dabbling in a spot of scuba diving. A surprise to myself as well as those who know me. Being painfully un-athletic and colossally uncoordinated (who put that wall there?!), I never saw myself in a wetsuit, 20-something metres underwater, breathing from a tank and incredibly, not freaking out!

Being a serial over-thinker is something I’ve had to push aside. Because really, if I allowed myself the luxury of thinking about it……………..I am underwater, people!! Breathing from a tank!! With compressed air in my lungs!! Air that can diffuse into my bloodstream and form painful bubbles if I come to the surface too quickly!! This is not natural!! Humans were not supposed to breathe underwater!! What was I thinking?? Why would I jump out of a perfectly good boat or walk off a perfectly good shore to breathe through a tank underwater?!?!

So as you can see, my usual over-thinking habit has no place here. Instead, I am learning to quiet my mind and enjoy the peace and beauty of the underwater world. The stillness and slowness and floatiness of it all makes it a beautiful, almost a meditative experience.

If I’m lucky, I’ll see something awesome to distract me when my mind wanders to unwanted places. A gorgeous school of fish, zebra-striped with fluorescent green dorsal fins, engaged in a perfectly coordinated dance. An underwater flash mob.  Or will it be a baby shark, hiding under a soft coral, biding its time until it is big enough to survive the big bad ocean?

cucumber-raita-onesmallpot-4-of-5

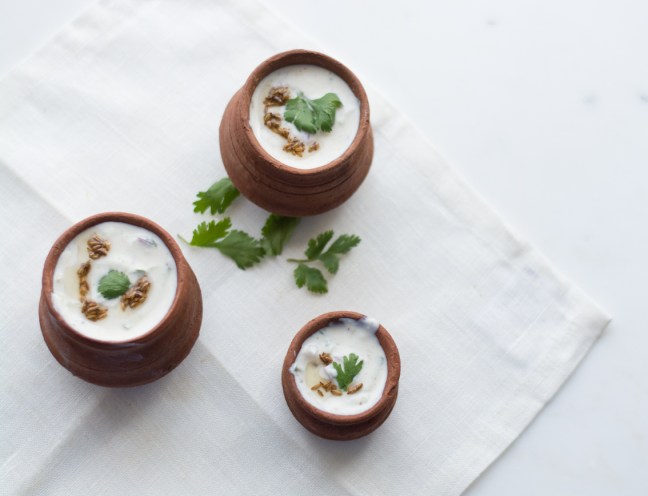
Raita has nothing to do with scuba diving. Nothing whatsoever. There is nothing unnatural about this refreshing yoghurt dish, a standard side in every Indian restaurant. It is the cooling element to any Indian meal. This is the way I like it, with a base of smooth yoghurt, sans cream and sugar which seem to feature in many restaurant versions.  Ginger and some light spices give it depth but keep it light and refreshing. Finally, tempered cumin seeds add a crunch that makes you want to interpose them between your front teeth just to enjoy it.

cucumber-raita-onesmallpot-2-of-5

Cucumber Raita

Get:

2 cups loose/watery plain yoghurt OR 1 1/2 cups yoghurt and 1/2 cup water
2-3 cm ginger, finely grated
1/2 tsp cumin powder
1/2 tsp coriander powder
1/4 tsp mild paprika (optional)
Salt to taste
1 telegraph cucumber or 2 small lebanese cucumbers, finely diced (peeled or unpeeled)
1/2 small red onion, finely diced (omit this if you dislike raw onion)

For the Tempering:

1 1/2 tsp vegetable/canola/sunflower oil
1 tsp cumin seeds
4 or 5 curry leaves
2 dried red chillies
Small handful coriander, roughly chopped

Make:

Place yoghurt (or yoghurt + water) in a large bowl with ginger, cumin powder, coriander powder, paprika and 1/2 tsp salt. Stir with a whisk until well combined and smooth. Taste and add more salt if needed- the mixture should only be salty enough to neutralise the tartness of the yoghurt.  The mixture should be no thicker than a pancake batter, so add a little more water and stir through if needed.

Add cucumber and onion and stir through gently.

In a small non-stick pan, heat the oil. Turn the heat down to low-medium and add the cumin seeds. Once they have popped, add curry leaves and dried chillies. Fry for a minute or two until the leaves are crisp. If using fresh leaves, you may need to step back or use a lid to protect yourself from oil splutter (see my post on tempering here).  Add the oil mixture to the Raita and stir through.

Garnish with coriander and serve as a side dish.

cucumber-raita-onesmallpot-5-of-5

Advertisement

Tefal Cook4Me and Spiced Chickpeas with Coconut

I’m the first to admit that I have control issues in the kitchen. The stove is a ship and I, its captain.  This makes it near intolerable for anyone who dares to help me put together a meal.  It also makes it very difficult for any sophisticated appliances to be truly useful in my kitchen.  My need for control means that I must stir the pot myself, pottering between that and chopping of the next ingredient to be added, while simultaneously shooing out anyone who ventures in.

Cook4Me 3 colours

When Tefal asked me to trial their Cook4Me Electric Pressure Cooker, I have to admit I was sceptical. I am a stovetop pressure cooker user from way back, refusing to be swayed even by an exploding-dhal-from prematurely-opened-cooker incident a few years ago.  Would I still be ‘hard core’ with an electric pressure cooker, I wondered?

I don’t know exactly when I officially joined the Tefal Cook4Me camp. Was it the heart-achingly moist, buttery fish fillets I made using the ‘Sweet Chilli Salmon’ recipe?  Or the realisation that I didn’t have to pay attention and count the whistles from a stovetop cooker in order to ensure my lentils were cooked but not pureed?  Whatever the trigger, the result is that I now use my Tefal Cook4Me almost every day.

You guys, this thing not only cooks things to perfection, retaining moisture and flavour, but it also tells you how to do it!! It is programmed with loads of gorgeous recipes that take you through the cooking process, step by step, for 2, 4 or 6 people. Even an intuitive cook like me is quite happy to minimise the firing of neurons at the end of the day and still end up with a delicious, healthy meal.  Also, this thing is one sexy looking machine! I know, I know……I saved the most important bit till last.

Picture 4166
Picture 4166

A lot of things are supposed to change your life these days…..appliances, cars, cosmetics. The Tefal Cook4Me may not change your entire life, but it sure will transform the way you cook, especially if you like quick, healthy, simple meals that are easy to clean up afterwards and so, so good to eat.

Oosli, or Spiced Black Chickpeas with Coconut, is a traditional South Indian Dish, popular during festival times but made throughout the year. It is a protein rich dish, perfect for those who rely on non-meat sources of protein, but also delicious as a filling workday lunch.  The earthiness of the legume is offset by the freshness of coconut and a subtle-but-definitely-there hint of lemon.  If you can’t find black chick peas, you can also use regular chick peas.

Tefal Cook4Me was kindly provided by Tefal Australia, however all opinions are my own.  Cook4Me images are from Tefal.

Spiced Chickpea coconut  (4 of 5)

Spiced Chickpeas and Coconut (Oosli)

Serves 2-4 as a side dish

Get:

1 cup dried small black chick peas, soaked overnight
2 tsp coconut or vegetable oil
1 tsp black mustard seeds
1/2 tsp turmeric powder
Pinch asafoetida
½ to 1 hot green chilli, split down the middle
2 dried red chillies broken into large pieces
8-10 curry leaves
3 tbsp fresh or fresh frozen (thawed) grated coconut
Salt
Lemon Juice
Small handful coriander, roughly chopped

Special Equipment:
Tefal Cook4Me Electric Pressure Cooker

Make:

Drain and rinse the soaked chickpeas. Place in the Cook4Me pot with plenty of the water (chick peas should be completely submerged with about 1 cm of water above them).  Choose manual on the Cook4Me panel and reduce the time using the dial to 2 minutes. Press ok to start.  Once your Cook4Me beeps to indicate that it is finished cooking, allow the pressure to dissipate (about 5-10 minutes).  Open the lid of the Cook4Me and remove the pot to drain the water from the chick peas.  The chick peas should be cooked through but firm.

Replace the empty pot into the Cook4Me and use the manual option to choose the ‘Browning’ setting. With the lid now left open, heat the oil in the Cook4Me pot.  Add the mustard seeds. Once they have popped, add turmeric, asafoetida, red chillies and green chilli.  Cook, stirring gently for 1-2 mins.  Add 4-5 curry leaves (they will splutter so step back or momentarily lower the lid).  Once the curry leaves have crisped, remove the green chilli and discard.

Drain the cooked chick peas and add to the pot. Add 1/2 tsp salt to start with.  Stir and leave to cook, with the lid lowered (but not latched), for a couple of minutes.  Add the coconut and remaining curry leaves, toss through.  Taste and add more salt if needed.  Stir again.

Turn off the Cook4Me and add 1 tsp lemon juice. Toss through, taste and add a little more lemon juice to taste.  The dish should be a little lemony but this shouldn’t be a dominant flavour.

Sprinkle with coriander just before serving. Serve as a side dish or as a vegan protein-rich main dish with flatbreads.

Notes:

All the ingredients should be available in Indian grocery stores.

Spiced Chickpea coconut (3 of 5)

Kale and Cranberry Toss

It’s been an indulgent couple of months largely owing to a cavalcade of Hindu festivals.  Starting with Ganesh Chathurthi, then Navrathri and the ultimate excuse for overeating, Diwali.  Dotted between them were birthdays, dinners out, a trip to a food bloggers conference where of course there was no shortage of incredible food, and Halloween.  In the middle of it all, I’ve found myself actually craving greens.  The timing couldn’t be better when I was sent the latest cookbook by accomplished chef and author Annabel Langbein, titled Through the Seasons (ABC Books) after her TV series.

Kale Cranberry Toss (1 of 3)

As the title suggests, this is a collection of fresh, delicious ways to use seasonal produce, real food at its best.  It is divided by the seasons with each section progressing from starters and salads, to mains and sides, ending as all good things should, with desserts.  There are also useful ‘how to’s’ such as making yoghurt and growing things from seed.  After my few months of excess, I for one have my eye on the Beachside Ceviche, Cucumber Salad with Dan’s Secret Sauce and the Baked Eggplant with Kasundi.  My sweet tooth won’t be able to resist trying the Chocolate Orange creams and Mexican Hot Chocolate.  The recipes are complimented by stunning photography that creates the mood for each season.

For now, we have a Kale and Cranberry Toss, a simple green side dish whose recipe I halved and slightly modified according the ingredients I had on hand.  What you end up with is orange scented, slightly softened kale dotted with tangy cranberries and the crunch of pepitas.  Kale is insanely good for you, and for those of you who haven’t quite been able to embrace it yet, this is a good way to start.  Also, I’m sure this one at least partially erases the over-indulgences of festivals gone by.

Just in time for the excesses of Christmas.

*Through the Seasons was a gift from ABC Books and Harper Collins.  As always, words and opinions are my own.

Kale Cranberry Toss (3 of 3)

Kale and Cranberry Toss

Serves 3-4 as a side dish

Slightly modified from Through the Seasons by Annabel Langbein

Get:

1 tbsp extra virgin olive oil
1 large shallot or small eschalot, thinly sliced.
1 small clove garlic, finely sliced
12-16 kale leaves
Finely grated zest of 1/3-1/2 and orange
2 tbsp water
2 tbsp orange juice
1/2 tbsp white wine vinegar
2 heaped tbsp dried cranberries
2 tbsp pepitas, toasted
Salt and freshly ground pepper, to taste

Make:

Heat oil in a large frypan or pot and cook shallots or eschalots and garlic until soft, about 2 mins.  Tear kale leaves off stems and roughly chop.  Add the chopped leaves to the pan with orange zest and water.  Cook on medium heat, tossing, for 2-3 minutes.  Add orange juice, vinegar and cranberries and cook covered for 1-2 minutes until kale is slightly softened and cranberries are plumped.  Uncover and cook for another minute or so until all the liquid has evaporated.  Turn off the heat and toss through a generous pinch of salt and freshly ground pepper.  Taste and add a little more seasoning if needed.  Serve with toasted pepitas sprinkled over the top.

Kale Cranberry Toss (2 of 3)

Spinach, Baby Corn and Mung Dhal Curry + Nourishing Spinach Broth

The young man always set his stall up just outside the main gate.  He would line the steel canisters up on the cheap plastic table, leaving the lids on until the first few walkers would trickle past.  The gate behind him led into a paved path, which encircled a large man-made lake called Sankey Tank.  Every morning, the sweetly smiling, crisp shirted young man would peddle his wares to the local residents who walked or jogged the popular Bangalore path.

Two large signs rested against the front row of vessels.

Nutritious and Healthy Hot Soups are Available Here explained the first one

Next to it, the other sign went on to list the options: Hot Ragi (millet).  Palak and Methi (Spinach and Fenugreek). Vegetable. Baby Corn.  Aloe Vera and Wheat Grass. 

Spinach Baby Corn Mung 2

In the earlier part of the morning, it was mainly the office-goers he served, confidently ladling hot liquids until he achieved the mixture that each customer looked forward to.  They would drink quickly, blowing into their cups between sips, then rush off with a wave to begin a new day.  Later in the morning came the housewives and retirees, often in pairs or threes.  There was no air of urgency about this bunch and they would linger a little longer around his stall, sipping the spiced, healthful broth and exchanging news.

Spinach Baby Corn Mung 1

He wore no watch, but guessed the time according to the regulars.  The old man who fed the pigeons arrived at precisely eight am, and left at nine fifteen.  There was the trickle of school children that would begin at around 8.30 and trail off around nine. And the aunty who always wore a woollen beanie, regardless of the weather, usually arrived around ten.

Then, at around ten thirty, when all the walkers had walked, joggers had jogged and soup drinkers had drunk, the young man would meticulously pack away his things and head home.  Every day he would take pleasure in the lightness of the canisters at the end of the morning.  It made him happy that people liked his soup, so full of nourishment.  And it made him even happier that the cycle home from Sankey Tank at the end of his shift was always easier than the one he had done in the wee hours of the morning.

Spinach Baby Corn Mung 4

Spinach, Baby Corn and Mung Dhal curry

Get:

2 large bunches English spinach, leaves and tender stems only, finely chopped
8-10 fresh baby corns, sliced to 2-3mm pieces
1/3 cup dried split mung dhal
Salt
Lemon juice
Boiling water
Small handful coriander, roughly chopped

For the Tempering:
2 tsp vegetable oil
1 tsp black mustard seeds
1/2 tsp turmeric powder
1/2 tsp chilly powder
2-3 dried red chillies, broken into large pieces

Make:

Boil the spinach in 2-3 cups salted water (enough to submerge it) for 5-7 minutes.  Drain and reserve the water.

In a large non-stick saucepan, dry roast the mung dhal, stirring continuously until they have gained a little colour and are fragrant.  Remove from the saucepan and set aside.

Boil the sliced baby corn in plenty of salted water until they are starting to become tender.  Then add the roasted mung dhal and cook until the dhal is mostly but not completely cooked.  Drain and reserve the water.

In the non-stick saucepan, heat the oil and add the mustard seeds.  When the seeds have popped (adjust the heat to prevent burning them), add the other tempering ingredients.  Add the spinach and cook for a few minutes, then add the baby corn and mung dhal.  If the mixture is a bit dry, add a little of the spinach water.  Add salt to taste- start with 1/2 tsp.   Stir through, taste and add more salt if needed.  Cook, covered,  until the baby corn is fairly tender and until any excess water has evaporated (you may have to cook uncovered for a few minutes at the end).

Squeeze in a generous about of lemon juice (start with a tbsp, add more according to taste) and stir through just before serving.  Enjoy with your favourite Indian flatbread.

Nourishing Spinach Broth:

Get:

The spinach and baby corn water from the previous recipe
2-3 cloves of garlic, crushed
1 green chilli, split down the middle
1-2 tsp turmeric powder
Salt and lemon juice to taste

For the Tempering:
2 tsp vegetable oil
1 tsp cumin seeds
Make:

Boil all the ingredients (apart from the oil, cumin and lemon juice) in a pot for about 15-20 mins.  Add salt only if needed after tasting.  Strain the broth to remove the garlic and chilly.  In a separate small non-stick pan, heat the oil and add the cumin seeds.  When they have popped, add the mixture to the broth and stir.  Add lemon juice to taste.

Notes:

Mung Dhal, dry red chillies and all the spices are readily available in Indian grocery stores.

Spinach Baby Corn Mung 3

Curry Leaf Thambuli

Curry Leaf Coconut Raita 1

My parents are farmers, of sorts.

Not really, but in one corner of the garden is a curry leaf tree of grand proportions.  It towers above the hibiscus, overshadows the quietly achieving chilli plants and puts the tiny basil crop to shame.  The slender, lustrous leaves caress the fence and carpet the garden bed, softly making their presence known.  They tickle your face as you walk past, filling the nostrils with their subtle but unmistakable scent.

It is quite common for Indian families to have a curry leaf plant.  The herb is a staple in South Indian cuisine, most dishes bearing a scattering of the deep green leaves.  That they aid digestion is well known, but curry leaves are also packed with iron, buzzing with antioxidants and help regulate blood glucose levels.

Curry Leaf Coconut Raita 6

Couple that with the fact that a small package of shriveled leaves, their fragrance but a distant memory, will set you back at least four dollars in most Australian supermarkets, and growing your own just makes good sense.  My parents’ version however, is one of mammoth proportions that surpasses what is dictated by that good sense.  It turns out that this particular Indian has taken a liking to Aussie climate and soil.  This piece of urban foliage could probably supply a small Indian city or a large Indian town without too much trouble.  It certainly does supply a sizable sector of my parents’ friends circle on a regular basis and anyone who dares to ask for a few curry leaves is usually bombarded with an overstuffed shopping bag of vegetation that will suffice for the coming year or so.

Curry Leaf Coconut Raita 2

The tree’s offspring have been adopted out to various friends and colleagues in the past and are now thriving like leafy teenagers in pots and backyards.  When it begins to flourish out of control, Dad has been forced to prune the tree back lest it completely destroy their pergola and invade the garden, engulfing the house and possibly even the entire street.

This Curry Leaf Thambuli sees the leaves blended with fresh coconut and yoghurt to make a spicy cold soup or condiment.  This is another recipe from my cousin Chaithra, you know, the one who brought you that delicious ivy gourd and coconut dish, Thondekaye Sukha.  You will have to make a trip to the local Indian store for this one, and a good food processor is important.  Eat it on its own, stir it through rice or even drizzle it onto a piece of grilled, Indian spiced fish.  Should you find yourself in possession of a large overstuffed shopping bag of these leaves, this is a fabulous way to use them up in a healthy, nutrient-rich way.  If you do not have access to such a bounty, well then the investment is probably worthwhile.

DSC_3786

Curry Leaf Thambuli

Serves 2-4 as a side dish

Get:

2 tsp ghee
70-80 curry leaves (or the leaves from 4 sprigs)
1/3 cup fresh or frozen grated coconut
1 cm ginger
1-2 hot green chillies (I used frozen ones), to taste
1 tbsp + 1/4 cup Greek style yoghurt
Water
Salt, to taste

For the tempering:
1/2 tsp ghee
1/2 tsp cumin seeds
1/2 tsp black mustard seeds
1 dried red chilli, broke into pieces
Pinch asafoetida
2 tsp urad dhal

Make:

In a small saucepan, melt and heat 2 tsp ghee.  Add the curry leaves.  If they are fresh, they will splutter, so stand back.  When they are browned and crisp, take off the heat and allow to cool a little.

In a food processor, blitz the ghee/curry leaf mixture, coconut, ginger, green chillies 1 tbsp yoghurt and a couple of tbsp water.  When it is a slightly coarse paste, add it to the remaining yoghurt in a bowl.  Add 1/4 tsp salt and stir through.  Taste and add a little more salt if needed.  The mixture should be spicy and slightly sour.  The salt serves to balance out the sourness of the yoghurt.

In a small saucepan, on medium heat, melt and heat the ghee.  Add the mustard and cumin seeds and when they are popping, turn the heat down to low.  Add the other tempering ingredients and stir until the urad dhal browns a little.  If it is browning quickly, take the pan off the heat and just stir the hot oil mixture.  Add a few more curry leaves if available and stir until they are crisp.

Add the tempered mixture to the Thambuli and stir through.  Serve with rice or as a sauce.

Curry Leaf Coconut Raita 3

Roasted Brussel Sprouts with Garam Masala and Coconut

Brussel Sprouts Masala 5

An airport meal is a ritual of mine every time I embark on an international trip.  I look forward to that time, after all charms and pleas are unleashed on the person behind the check-in desk to let those extra three kilos through without charge.  After that, toiletries in plastic snap-lock bags are placed in trays, boots and belts are removed, then awkwardly pulled on again, carry-ons are hauled onto security belts and the whole juggling act is carried out whilst waving the passport and boarding card at officials every step of the way.  Finally, when documents are put away carefully and bags are reassembled, there is a simple pleasure in sitting down, catching one’s breath and either hashing out a plan for the trip to come or reflecting on the adventure that was.

I am aware that when it comes to culinary let-downs, airport food is a close second to that on the flying machines themselves.  Food in that in-between land is always overpriced, limited in variety and invariably disappointing.  Bread that is slightly stale after spending the day in an overly air-conditioned environment.  Muffins that are similarly cold and dry.  Slices of ham that are dehydrated around the edges.  Scrambled eggs that can be lifted en masse from the plate.  Sandwiches whose cost might feed a small African nation for a day.

Brussel Sprouts Masala 1

I know all this, yet I always try and make time, between that madness of the security gates and the departure gates, to sit, reflect and have a meal at the airport.  On the way to Florence, I sat at Sydney airport and nutted out that feeling I always have when I am starting on a trip.  That niggle, like a tiny stone in a shoe, that I have forgotten something.  So I sat, stared at the ascending planes, gathered my thoughts, and dissected the niggle.  I sipped my medicinal coffee and chewed on my grilled (plastic) cheese sandwich, remembered what I had forgotten and realised with relief that it was something I could live without.  Just like that, I tipped the stone out of my shoe.

Brussel Sprouts Masala 2

It’s been a few days of pizza and pasta now, and this at about the point when I begin to crave something of home.  To me, Italian food comes only second to Indian food.  I love its simplicity- a toothsome pizza base, a well simmered sauce and a handful of basil, and it is at its best.  But after a few days, I do crave a vegetable or two, preferably home-cooked in Indian spices.  Green beans, stir-fried the South-Indian way or in this simple curry would do just fine.  Or this ivy gourd and coconut stir fry.  Or these brussel sprouts, rubbed with garam masala and coconut oil, then roasted until they are slightly sweet.  Tender but still offering some resistance against eager teeth.  Interspersed with chewier coconut.  These sprouts would do very well against my current carb overload, but would also make an amazing side dish, or a main meal with a couple of poached eggs on top.

Brussel Sprouts Masala 4

Roasted Garam Masala Brussel Sprouts

Feeds 2 as a main dish or 4 as a side dish

Based on Ina Garten’s recipe in The Barefoot Contessa Cookbook.

Get:

600g brussel sprouts
1/2 cup shaved coconut (use shredded if you can’t find this)
4 tbsp coconut oil, melted
3 tsp garam masala
1/4-1/2 tsp chilli powder
1 tsp cumin seeds
3/4 tsp salt
1/2 lime

Make:

Preheat the oven to 200 degrees.

Cut the stems off the brussel sprouts and cut them in half lengthwise.

In a large roasting pan, toss all the ingredients using your (clean) hands, rubbing the spices into the cut surfaces of the sprouts.

Roast for 35-45 minutes, tossing in the pan every 10 mins, until the sprouts are crisp-edged, tender inside, but still holding together and a little chewy.

Squeeze lime juice generously over it before serving.

Brussel Sprouts Masala 3

Green Beans and Fire

For most of us, the warmer months are something we await eagerly. As soon as the central heating of the nation is turned up, we dust off our beach towels, ditch the scarves and plan holidays, picnics, barbeques and the like.

Beans 1

But for those in some parts of Australia the anticipation of Spring and Summer is not so positive. The Australian heat brings with it a natural disaster that is devastating and uncontrollable. Every year like clockwork, fires rage through the Australian countryside, fueled by the dry vegetation that is typical of a nation that is in drought more often than it is not. The fires originate when they are lit either by accident or by pranksters who surely have no concept of the level of devastation they cause with the act.

Families evacuate on advice of the authorities, scooping up pets, food supplies and valuables. Inevitably hundreds of homes are lost and with them, all that their previous inhabitants owned and loved. So far in my state of NSW, the lives of two people as well as countless animals, including pets and wildlife, have succumbed.
For me, the bushfires are something that we hear about daily as hour by hour, more and more homes are engulfed despite the courageous efforts of the Rural Fire Service. Whilst close to home, we must be deeply grateful that we are not the ones who stand to lose everything to something that is beyond our control. And in our gratitude, we should try to provide whatever support we can to help the families get through yet another season of destruction.

If you would like to donate to the bushfire appeal, try here or here or to donate to help affected animals, try here. I’m sure if you choose to, it will come back to you one day a million times over.

Beans 2

On a slightly brighter and simpler note, here is a simple green beans dish that is the perfect combination of low effort and high yield, a welcome thing in the heat. Freshness of the beans is paramount and it also helps if the tomatoes are a little over-ripe. For the most part, you can chop everything up and throw it in a pan after tempering the spices, then cover and forget about it for a good twenty minutes or so. Serve with your favourite Indian flat bread, in a wrap or as a side for meat dishes.

Beans 4

Simple Green Beans Curry

Serves 3-4 as a side dish

Get:
500g fresh green beans, topped and tailed
2 over-ripe tomatoes, diced small
1 medium white or brown onion, finely chopped
2 tsp cooking oil
1 tsp cumin seeds
1/2 tsp cumin powder
1/2 tsp coriander powder
1/4-1/2 tsp chilli powder, according to taste
2cm ginger, finely grated
Salt
Water
Small handful fresh coriander, roughly chopped

Make:
Chop or break the beans into roughly 4-5 cm lengths. In a large non-stick fry pan, heat the oil and temper the cumin seeds. Reduce to a low-moderate heat and add the spice powders and fry for about 2 minutes. Add the ginger and onions and saute until the onion is a little tender. Then, in go the tomatoes, 1 tsp salt and about 1/2 cup water. Cover and cook on a low-moderate heat for 7-10 minutes, until the tomatoes yield easily when pressed.

Throw in the beans, stir through and add another cup of water. Cover and cook until the beans are tender with some bite (about 20 minutes). At this point if the mixture is still quite watery, uncover and cook on low heat until most of the water has evaporated. When the mixture has almost completely reduced, taste and add more salt or chilli powder if desired, then stir through. Stop cooking when the water has evaporated such that the tomatoes and onions cling onto the beans.

Before serving, garnish with the fresh coriander.

Beans 3