Spinach, Baby Corn and Mung Dhal Curry + Nourishing Spinach Broth

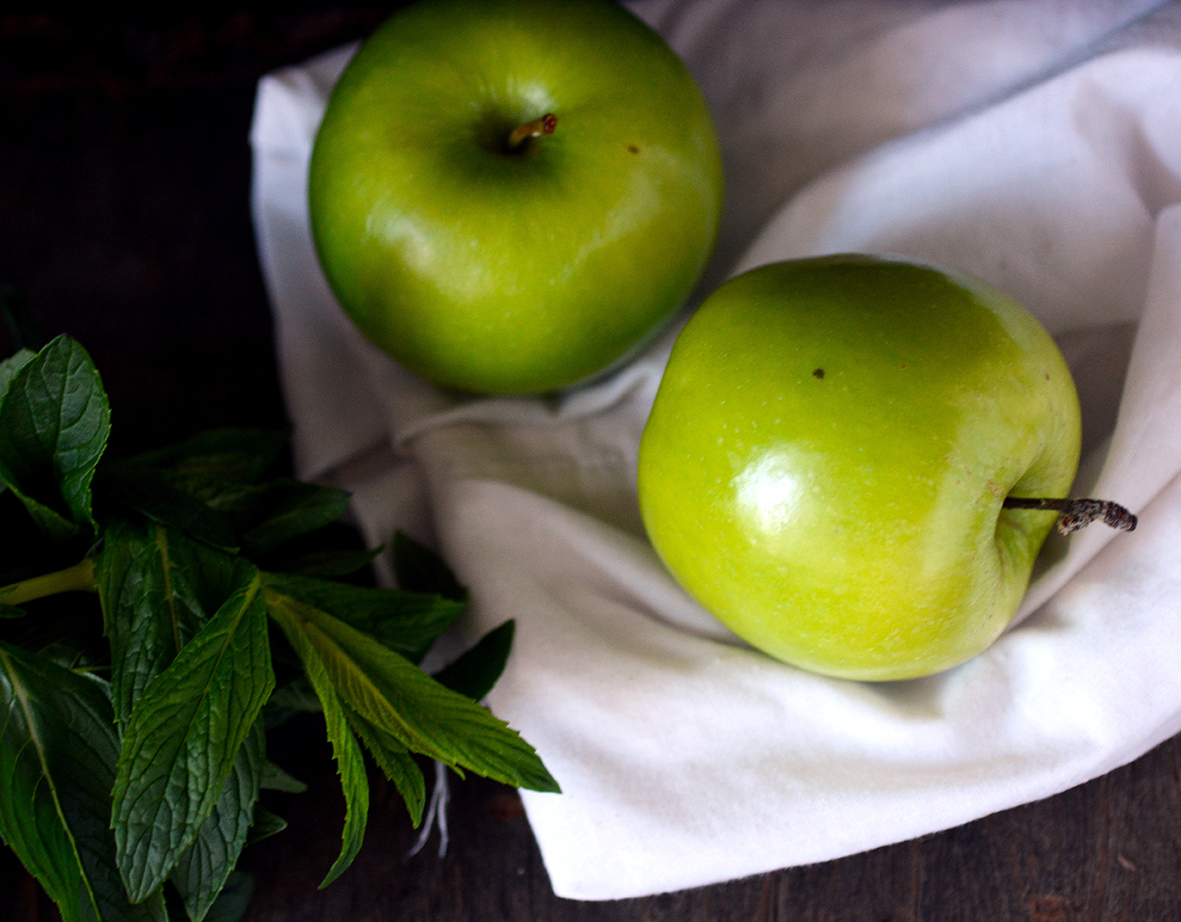
The young man always set his stall up just outside the main gate.  He would line the steel canisters up on the cheap plastic table, leaving the lids on until the first few walkers would trickle past.  The gate behind him led into a paved path, which encircled a large man-made lake called Sankey Tank.  Every morning, the sweetly smiling, crisp shirted young man would peddle his wares to the local residents who walked or jogged the popular Bangalore path.

Two large signs rested against the front row of vessels.

Nutritious and Healthy Hot Soups are Available Here explained the first one

Next to it, the other sign went on to list the options: Hot Ragi (millet).  Palak and Methi (Spinach and Fenugreek). Vegetable. Baby Corn.  Aloe Vera and Wheat Grass. 

Spinach Baby Corn Mung 2

In the earlier part of the morning, it was mainly the office-goers he served, confidently ladling hot liquids until he achieved the mixture that each customer looked forward to.  They would drink quickly, blowing into their cups between sips, then rush off with a wave to begin a new day.  Later in the morning came the housewives and retirees, often in pairs or threes.  There was no air of urgency about this bunch and they would linger a little longer around his stall, sipping the spiced, healthful broth and exchanging news.

Spinach Baby Corn Mung 1

He wore no watch, but guessed the time according to the regulars.  The old man who fed the pigeons arrived at precisely eight am, and left at nine fifteen.  There was the trickle of school children that would begin at around 8.30 and trail off around nine. And the aunty who always wore a woollen beanie, regardless of the weather, usually arrived around ten.

Then, at around ten thirty, when all the walkers had walked, joggers had jogged and soup drinkers had drunk, the young man would meticulously pack away his things and head home.  Every day he would take pleasure in the lightness of the canisters at the end of the morning.  It made him happy that people liked his soup, so full of nourishment.  And it made him even happier that the cycle home from Sankey Tank at the end of his shift was always easier than the one he had done in the wee hours of the morning.

Spinach Baby Corn Mung 4

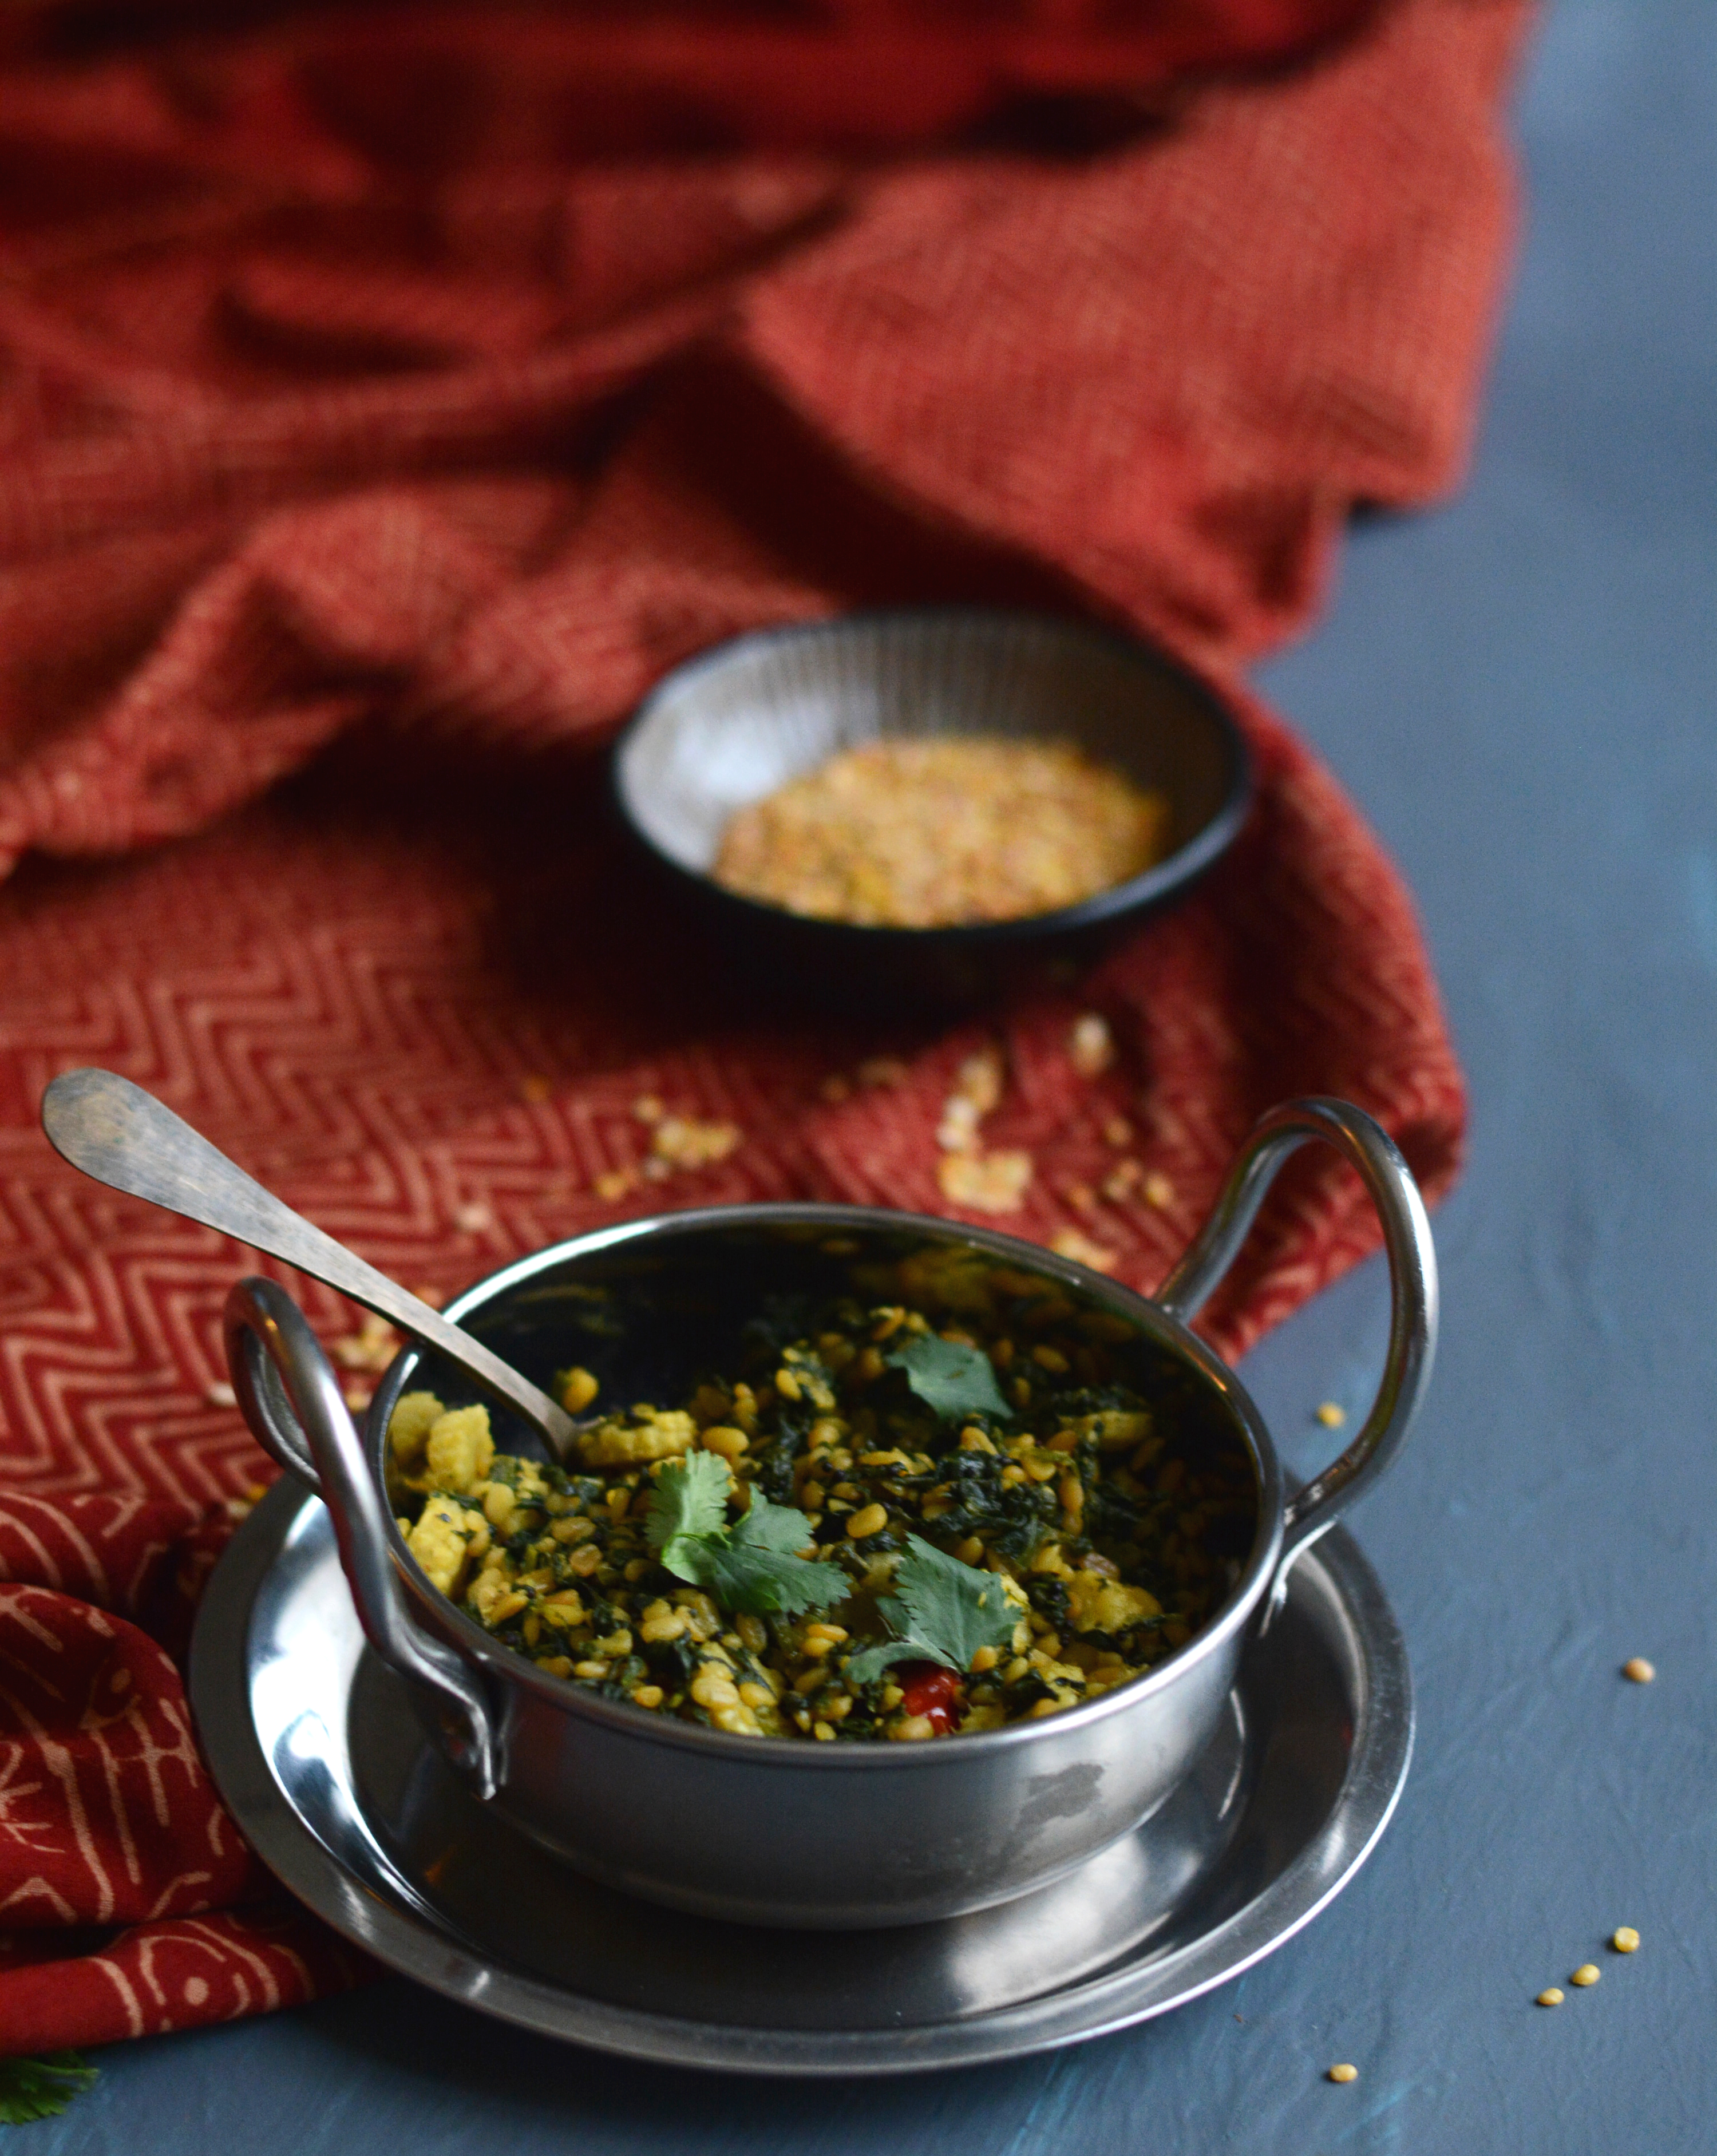
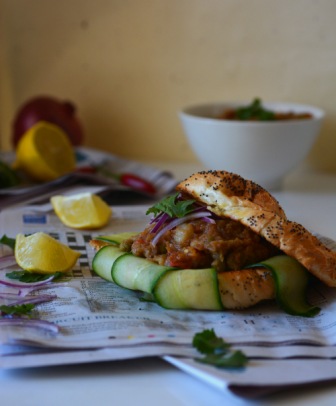
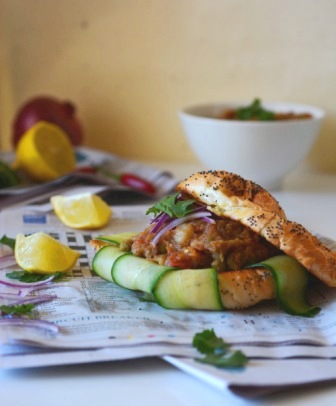
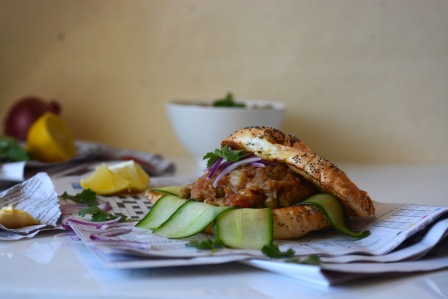
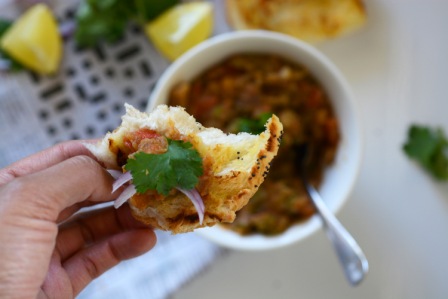
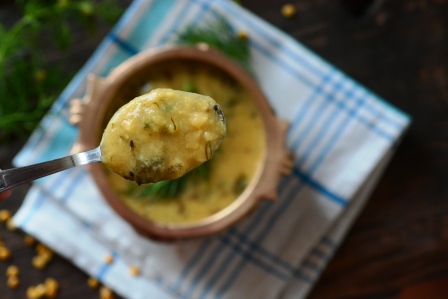
Spinach, Baby Corn and Mung Dhal curry

Get:

2 large bunches English spinach, leaves and tender stems only, finely chopped
8-10 fresh baby corns, sliced to 2-3mm pieces
1/3 cup dried split mung dhal
Salt
Lemon juice
Boiling water
Small handful coriander, roughly chopped

For the Tempering:
2 tsp vegetable oil
1 tsp black mustard seeds
1/2 tsp turmeric powder
1/2 tsp chilly powder
2-3 dried red chillies, broken into large pieces

Make:

Boil the spinach in 2-3 cups salted water (enough to submerge it) for 5-7 minutes.  Drain and reserve the water.

In a large non-stick saucepan, dry roast the mung dhal, stirring continuously until they have gained a little colour and are fragrant.  Remove from the saucepan and set aside.

Boil the sliced baby corn in plenty of salted water until they are starting to become tender.  Then add the roasted mung dhal and cook until the dhal is mostly but not completely cooked.  Drain and reserve the water.

In the non-stick saucepan, heat the oil and add the mustard seeds.  When the seeds have popped (adjust the heat to prevent burning them), add the other tempering ingredients.  Add the spinach and cook for a few minutes, then add the baby corn and mung dhal.  If the mixture is a bit dry, add a little of the spinach water.  Add salt to taste- start with 1/2 tsp.   Stir through, taste and add more salt if needed.  Cook, covered,  until the baby corn is fairly tender and until any excess water has evaporated (you may have to cook uncovered for a few minutes at the end).

Squeeze in a generous about of lemon juice (start with a tbsp, add more according to taste) and stir through just before serving.  Enjoy with your favourite Indian flatbread.

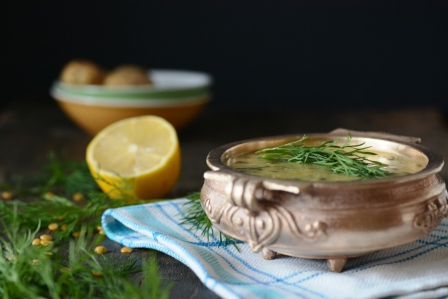
Nourishing Spinach Broth:

Get:

The spinach and baby corn water from the previous recipe
2-3 cloves of garlic, crushed
1 green chilli, split down the middle
1-2 tsp turmeric powder
Salt and lemon juice to taste

For the Tempering:
2 tsp vegetable oil
1 tsp cumin seeds
Make:

Boil all the ingredients (apart from the oil, cumin and lemon juice) in a pot for about 15-20 mins.  Add salt only if needed after tasting.  Strain the broth to remove the garlic and chilly.  In a separate small non-stick pan, heat the oil and add the cumin seeds.  When they have popped, add the mixture to the broth and stir.  Add lemon juice to taste.

Notes:

Mung Dhal, dry red chillies and all the spices are readily available in Indian grocery stores.

Spinach Baby Corn Mung 3

Advertisement

Raw Mint Slice for The Sweet Swap 2014

The punch of peppermint is what first makes

It’s presence known in the rich nutty base

Then sexy dark chocolate, creamy with coconut

Widens the smile on the indulger’s face

Mint Slice 3

So as a nibble with tea

Or an after dinner zing,

This raw mint slice will make

Your taste-buds sing!

Mint Slice 4

Ok so a poet I clearly am not.  But I am kinda tickled pink with this recipe, and boxes of the decadent yet goodness-filled squares went out to three lovely bloggers.  Amanda of Chewtown, Bryton of Food in Literature and Cassandra of Journey From Within each received a box of these gluten-free, low sugar, raw goodies.  In turn, I welcomed sugary goodness in the form of Butterscotch Pecans from Fiona of Tiffin and Raw Date and Almond Truffles from Karla of Get On Up.  In its second year, the Sweet Swap, organised by Amanda (Chewtown) and Sara (Belly Rumbles) is a fun, innovative event that brings Aussie bloggers together and benefits a worthy cause.

Raw Mint Slice

Makes 24 squares, approx 4cm x 4cm

Get:

Base:
3/4 cup cashew or macadamia nut butter (homemade or store bought)
2 tbsp milk powder (or pea protein powder for a vegan option)
1/2 cup shredded coconut
2 tbsp rice syrup
4 drops peppermint oil (available at cake supply shops)
1 1/2 tsp spirulina powder (for colour, optional)

Topping:
120g good quality dark chocolate
1 tbsp thick coconut cream* (see note)

To Sprinkle:
Small handful cacao nibs or shredded coconut

Make:

See the note below first regarding coconut cream.  Prepare a tray lined with grease-proof paper.  To make the base, place all the ingredients in a bowl and stir.  It will probably be a little too thick to stir, at which point you can knead with clean hands.  If the nut butter you use is on the runny side, you may need to add a little more milk or protein powder to achieve a bread dough consistency.  Press the mixture down into the tray to roughly a 6-8mm thickness.

To make the topping, melt the chocolate in a double boiler or in 20-30 second bursts in the microwave.  When it is fully melted, quickly stir through the coconut milk before the chocolate seizes up.  Quickly spread the mixture evenly over the base and sprinkle with cacao nibs or coconut.

Place in the refrigerator for at least 2 hours before slicing with a sharp knife.

Notes:
Use coconut cream with no additives (I use Ayam brand), and pop the can in the refrigerator for at least 6 hours or overnight.  Then, open the tin without shaking and use the thick part of the cream off the top of the tin.

Mint Slice 2

Roasted Brussel Sprouts with Garam Masala and Coconut

Brussel Sprouts Masala 5

An airport meal is a ritual of mine every time I embark on an international trip.  I look forward to that time, after all charms and pleas are unleashed on the person behind the check-in desk to let those extra three kilos through without charge.  After that, toiletries in plastic snap-lock bags are placed in trays, boots and belts are removed, then awkwardly pulled on again, carry-ons are hauled onto security belts and the whole juggling act is carried out whilst waving the passport and boarding card at officials every step of the way.  Finally, when documents are put away carefully and bags are reassembled, there is a simple pleasure in sitting down, catching one’s breath and either hashing out a plan for the trip to come or reflecting on the adventure that was.

I am aware that when it comes to culinary let-downs, airport food is a close second to that on the flying machines themselves.  Food in that in-between land is always overpriced, limited in variety and invariably disappointing.  Bread that is slightly stale after spending the day in an overly air-conditioned environment.  Muffins that are similarly cold and dry.  Slices of ham that are dehydrated around the edges.  Scrambled eggs that can be lifted en masse from the plate.  Sandwiches whose cost might feed a small African nation for a day.

Brussel Sprouts Masala 1

I know all this, yet I always try and make time, between that madness of the security gates and the departure gates, to sit, reflect and have a meal at the airport.  On the way to Florence, I sat at Sydney airport and nutted out that feeling I always have when I am starting on a trip.  That niggle, like a tiny stone in a shoe, that I have forgotten something.  So I sat, stared at the ascending planes, gathered my thoughts, and dissected the niggle.  I sipped my medicinal coffee and chewed on my grilled (plastic) cheese sandwich, remembered what I had forgotten and realised with relief that it was something I could live without.  Just like that, I tipped the stone out of my shoe.

Brussel Sprouts Masala 2

It’s been a few days of pizza and pasta now, and this at about the point when I begin to crave something of home.  To me, Italian food comes only second to Indian food.  I love its simplicity- a toothsome pizza base, a well simmered sauce and a handful of basil, and it is at its best.  But after a few days, I do crave a vegetable or two, preferably home-cooked in Indian spices.  Green beans, stir-fried the South-Indian way or in this simple curry would do just fine.  Or this ivy gourd and coconut stir fry.  Or these brussel sprouts, rubbed with garam masala and coconut oil, then roasted until they are slightly sweet.  Tender but still offering some resistance against eager teeth.  Interspersed with chewier coconut.  These sprouts would do very well against my current carb overload, but would also make an amazing side dish, or a main meal with a couple of poached eggs on top.

Brussel Sprouts Masala 4

Roasted Garam Masala Brussel Sprouts

Feeds 2 as a main dish or 4 as a side dish

Based on Ina Garten’s recipe in The Barefoot Contessa Cookbook.

Get:

600g brussel sprouts
1/2 cup shaved coconut (use shredded if you can’t find this)
4 tbsp coconut oil, melted
3 tsp garam masala
1/4-1/2 tsp chilli powder
1 tsp cumin seeds
3/4 tsp salt
1/2 lime

Make:

Preheat the oven to 200 degrees.

Cut the stems off the brussel sprouts and cut them in half lengthwise.

In a large roasting pan, toss all the ingredients using your (clean) hands, rubbing the spices into the cut surfaces of the sprouts.

Roast for 35-45 minutes, tossing in the pan every 10 mins, until the sprouts are crisp-edged, tender inside, but still holding together and a little chewy.

Squeeze lime juice generously over it before serving.

Brussel Sprouts Masala 3

Rose and Raspberry Celebration Tart for OSP’s 1st Blogiversary!

Rose raspberry tart 1

I’ve been like an excitable little kid, anticipating this day. The day that marks a year of blogging for me. A year of breathlessly rushing into the kitchen after a day at work to try out a new idea I had. To make it truly amazing so that I can share it with you all. A year of thinking way too much about every canape, main meal and dessert I ate. Of putting every dish through a deep analysis to figure out how I could make it at home, what interesting twist I could give it and more recently, what I could do to make it sugar-free. Twelve months of drawing on my imagination and the things that have inspired me to decide how I want to style the dish and the best way to photograph it to provide a visual complement to my words.

Also, perhaps closest to my heart, the words themselves. The stories I would tell and the windows that dish would open up into the inner workings of my mind. Because for me, food is as important as it is because it always tells a tale, triggers a memory or incites an emotion. There is a commonality between my mother’s family’s puliyogare, and a terrine served at a fine dining restaurant. Between that three ingredient fudge and that delicate, seven layer cake that graces the window of the upmarket patisserie, looking far too pretty to plunge a spoon into.

Raspberries 1

That connection may not be in the ingredients, the method or how it is served. What all food has in common is that it was made by hands that are controlled by a mind with a story to tell, a history to either reveal or protect and thoughts to express.

Food is sustenance, for nourishing and for fulfilling. But it is also for sharing, for drawing people in and for bringing them together. A bowl of warming soup that you slowly savour while watching television, curled up on the couch on a wintery evening. The pudding that is eaten slowly, each syrupy spoonful punctuating words that you share with someone you are just getting to know, while you try desperately not to let the sauce dribble inelegantly down your chin. The cup of too-hot tea that you blow the steam off before you settle your head back onto the shoulder of your sweetheart.

Rose raspberry tart 3

It is a privileged position, this one. To be able to view food this way is a function of a comfortable life. But it is how I view food, and I thank you for allowing me to share that with you for the past year. This yearling space of mine means more to me than perhaps I could ever explain. A creative outlet, a happy place and a raft that has helped keep me afloat through what has been a challenging year. Each comment, glowing or otherwise, every tiny piece of interaction and encouragement has made my heart smile.

At the basest level I have discovered rosewater, cashew cream, how to steam puddings and how wonderfully therapeutic bread-making is. I have found rice syrup, Quinoa and kale. I have worked out what makes a good food prop and just how much light I need for a photo session. Beyond that, this small corner of mine has given me so much more.

Rose raspberry tart 4

We have come a long way, you and I. From that first kulfi recipe with its endearingly awkward photographs to now, when I finally feel I am getting a grasp of things. We can go further, we know this. We have so much more to discover about each other, to share over a cup of coffee and a chocolate truffle.

This blog is growing too. I am working to make some positive changes here in this space and outside it.  So do stick with me.  For there is no-one else in the world I can imagine moving forward with.

Thank you all for sharing the past year with me, it has meant more to me than you could possibly know.

Rose raspberry tart 6

Rose and Raspberry tart (Vegan, Gluten-Free, fructose-free)

Feeds 6-8

Crust recipe modified from here

Get:

For the crust:
2 1/2 cups almond meal
Generous pinch salt
1/4 tsp baking powder
4 1/2 tbsp coconut oil
3 tbsp rice syrup

For the rose and cashew cream filling:
1 1/2 cups raw cashews
Water
2 tbsp rosewater
1/3 – 1/2 cup rice syrup or honey

To decorate:
2 small punnets raspberries, washed and patted dry
Anything else you desire- chocolate, crushed nuts etc etc etc.

Make:

Immerse the cashews in water and soak for at least 3 hours.

To make the crust:
Preheat the oven to 175 C.

Place the almond meal, salt and baking powder in a large bowl and mix well.
In another bowl, whisk the coconut oil and syrup. They will not mix very well but do your best. Add the wet ingredients to the dry ingredients and with clean hands, crumble everything together and knead lightly until a dough is formed.

Grease a tart tin and press the mixture evenly into its base and about 1 1/2 cm up the sides. Bake for 15-20 min or until golden brown.

To make the filling:
Drain the cashews and rinse. Place them in the bowl of a high speed food processor. Add rosewater, syrup or honey and 1/3 cup water. I found 1/3 cup of syrup to be adequate, but taste and add a little more if desired. Process on high speed until a smooth or slightly coarse cream forms, scraping down the sides as needed.

When the tart base has cooled, remove it from the tin and fill with the cashew cream, spreading evenly. Refrigerate for 20 mins before decorating with raspberries and whatever else you choose. I used some dark chocolate leaves that I piped.  You can of course, opt for another fruit if you wish!

Raspberries 3

Green Beans and Fire

For most of us, the warmer months are something we await eagerly. As soon as the central heating of the nation is turned up, we dust off our beach towels, ditch the scarves and plan holidays, picnics, barbeques and the like.

Beans 1

But for those in some parts of Australia the anticipation of Spring and Summer is not so positive. The Australian heat brings with it a natural disaster that is devastating and uncontrollable. Every year like clockwork, fires rage through the Australian countryside, fueled by the dry vegetation that is typical of a nation that is in drought more often than it is not. The fires originate when they are lit either by accident or by pranksters who surely have no concept of the level of devastation they cause with the act.

Families evacuate on advice of the authorities, scooping up pets, food supplies and valuables. Inevitably hundreds of homes are lost and with them, all that their previous inhabitants owned and loved. So far in my state of NSW, the lives of two people as well as countless animals, including pets and wildlife, have succumbed.
For me, the bushfires are something that we hear about daily as hour by hour, more and more homes are engulfed despite the courageous efforts of the Rural Fire Service. Whilst close to home, we must be deeply grateful that we are not the ones who stand to lose everything to something that is beyond our control. And in our gratitude, we should try to provide whatever support we can to help the families get through yet another season of destruction.

If you would like to donate to the bushfire appeal, try here or here or to donate to help affected animals, try here. I’m sure if you choose to, it will come back to you one day a million times over.

Beans 2

On a slightly brighter and simpler note, here is a simple green beans dish that is the perfect combination of low effort and high yield, a welcome thing in the heat. Freshness of the beans is paramount and it also helps if the tomatoes are a little over-ripe. For the most part, you can chop everything up and throw it in a pan after tempering the spices, then cover and forget about it for a good twenty minutes or so. Serve with your favourite Indian flat bread, in a wrap or as a side for meat dishes.

Beans 4

Simple Green Beans Curry

Serves 3-4 as a side dish

Get:
500g fresh green beans, topped and tailed
2 over-ripe tomatoes, diced small
1 medium white or brown onion, finely chopped
2 tsp cooking oil
1 tsp cumin seeds
1/2 tsp cumin powder
1/2 tsp coriander powder
1/4-1/2 tsp chilli powder, according to taste
2cm ginger, finely grated
Salt
Water
Small handful fresh coriander, roughly chopped

Make:
Chop or break the beans into roughly 4-5 cm lengths. In a large non-stick fry pan, heat the oil and temper the cumin seeds. Reduce to a low-moderate heat and add the spice powders and fry for about 2 minutes. Add the ginger and onions and saute until the onion is a little tender. Then, in go the tomatoes, 1 tsp salt and about 1/2 cup water. Cover and cook on a low-moderate heat for 7-10 minutes, until the tomatoes yield easily when pressed.

Throw in the beans, stir through and add another cup of water. Cover and cook until the beans are tender with some bite (about 20 minutes). At this point if the mixture is still quite watery, uncover and cook on low heat until most of the water has evaporated. When the mixture has almost completely reduced, taste and add more salt or chilli powder if desired, then stir through. Stop cooking when the water has evaporated such that the tomatoes and onions cling onto the beans.

Before serving, garnish with the fresh coriander.

Beans 3

OSP @ Ungaro Raw, Rozelle

When it comes to the raw food movement, I have always been somewhat of a sceptic.  I suspect it has something to do with my ethnic background.  After all, us Indians are known for cooking things to within an inch of their lives.  So for me, going to a restaurant and paying for a meal that isn’t cooked seems preposterous to say the least.

20130830_134954

When a dear friend announced that she had quit her job and was going travelling indefinitely, I was insanely jealous but also keen to catch up with her before she left.  When she suggested we do lunch at Ungaro Raw, the sceptic in me was seduced by her description of their Mint & Coconut Chocolate Truffles.  She promised they would be an explosion of flavours in the mouth (her words, not mine) and I was sold.

20130830_133726

Ungaro Raw is nestled in the fun end of Darling Street in Rozelle, opposite the markets.  This place is so shiny and new that even tracking a phone number down for them is difficult and their website promises that it is the ‘future home of something cool’.  Don’t let that put you off from trying out their mouth-watering menu though.  Not everything on it is raw but it is all vegan, organic and made up of wonderful, fresh produce.

My friend and I were initially drawn to the display of desserts in the front glass cabinet, which I thought was an excellent tactic on their part.  We convinced each other we should really eat something sensible first and sat at one of the insanely cute vintage tables outside.  The rustic vintage decor stretched throughout the little restaurant, and sunshine streamed in the two huge doors, giving the place a gorgeous feel.  The sunshine must have been contagious as we found all the staff to be bubbly, very helpful and incredibly welcoming.

20130830_13441020130830_133911

A vege burger was ordered and devoured- fragrant crusty bread, scrumptious lentil pattie and all.  There was a plate of corn and millet fritters which my friend seemed to almost inhale, assuring me that it was delicious.  A berry smoothie was had; thick, filling and not over-sweet as so many other smoothies seem to be.

20130830_141557

And after what seemed like an eternity, it was time for dessert.  We decided to order two very different  dishes.  The lemon cheesecake had a cashew cream filling that meant it was not only gluten free, but lactose free as well.  The filling was unlike anything I’ve had before, leaving a satisfying, nutty flavour in my mouth that I wanted to savour every second of.

As for the Chocolate Mint slice, it’s beautifully textural layers were just what I was hoping for with just the right level of sweetness and refreshing mintiness to satisfy that sweet tooth.

20130830_144122

Don’t think I had forgotten about those Mint & Coconut Chocolate Truffles!  One of those babies as well as its’ neighbour, a Chocolate Orange ball came home with me in an innocent looking paper bag.  Both of them may or may not have reached home in a half-eaten state.  And as for these  after dessert desserts, I can think of no better way to describe it than the incredibly chocolaty taste explosion I was promised.

Ungaro Raw may make a convert out of me yet.  And you? Well, all I can say is, you’d better get in there before the rest of Sydney hears about the new kid in town.

Ungaro Raw is on the corner of Darling St. and National St. in Rozelle.  They do breakfast and lunch 7 days a week and dinner on Fridays and Saturdays.

Tel: (02) 8964 9223

ungaroraw.com (coming soon)

20130830_135023

<a href=”http://www.urbanspoon.com/r/70/1777782/restaurant/Sydney/Ungaro-Raw-Rozelle”><img alt=”Ungaro Raw on Urbanspoon” src=”http://www.urbanspoon.com/b/logo/1777782/minilogo.gif” style=”border:none;width:104px;height:15px” /></a>

Cauliflower and Apple Salad with Tamarind Dressing

When I was asked by the Australian Jewish Newspaper to contribute a recipe appropriate for the upcoming Jewish festival Rosh Hashanah, I got to thinking about food with respect to religion.  Food is so complexly linked to our culture which in turn influences the way we choose to celebrate important religious festivals.

From the universally known bread and wine of Christianity to the more complex dishes I was raised with that are linked to the multitude of Hindu festivals, I am fascinated by the basis for why certain foods are considered auspicious.

Green apples 2

This is a month that is heavily concentrated with important Hindu festivals.  Krishna Janmasthami, or Gokulashtami is next.  Traditionally, many sweet and savoury snacks are prepared as an offering to the cheeky Lord Krishna, known for his mischievous thieving of home-churned butter as a child.  It is easy to see why this festival was a childhood favourite of mine, and it wasn’t just because I was always quite fond of Lord Krishna.

Barely have our waistlines recovered from the excessive consumption during Gokulashtami before Ganesh Chathurthi arrives, a celebration of the elephant headed God.  Little steamed or deep fried pastry parcels with a coconut and jaggery filling are a traditional staple.  There are many stories associated with the auspiciousness of this dish, variations of which are called the modakam or kadabu.  The simplest explanation is that the sweets were a favourite of Lord Ganesha and he is often depicted with a plate of the delicacies at his feet.

cauliflower

What especially strikes a chord with me is the significance of bevu bella, a mixture of bitter neem leaves and caramel-sweet jaggery.  A spoonful of bittersweet that is distributed during Ugadi, the Kannada New year.  It is a reminder that life brings with it both happiness and sorrow and one must begin each year prepared to handle both with equal grace.

Green Apples1

Rosh Hashanah falls in September and is the Jewish New year.  It is believed to be the anniversary of the creation of Adam and Eve, and a ‘day of judgement’ for those that follow Judaism.  Foods such as apples, honey and dates are offered and eaten to symbolise a sweet new year.  Pomegranates are another auspicious food with their many seeds representing a fruitful year ahead.

cauliflower apple salad 1

I put together a salad that was inspired by one I had at a trendy Sydney cafe, Kepos Street Kitchen.  There, hubs and I hipster-watched as we devoured a large bowl of an incredible cauliflower and pomegranate salad.  I couldn’t source any pomegranate for this recipe so I’ve used apple but pomegranate would also work well.

This is a salad that combines the bite of cauliflower with the tartness of green apples and cranberries.   The dressing is tamarind based, sweetened with honey and perfectly balanced with the warmth of cumin and paprika.  It is a dressing that will collect at the bottom of the bowl but this is far from a problem because you will find yourself sipping spoonfuls of it long after the solid ingredients are gone.  Crunchy toasted pecans, tossed in right before serving lend a final textural surprise.

cauliflower apple salad 2

Cauliflower and Apple Salad

Serves 2-3 as a side dish

Get:

For the dressing:

Small ball of dried tamarind (ping-pong ball sized)
1/2 cup boiling water
1  1/2 tsp cumin seeds
1/2 tsp paprika
1/4 tsp salt
1 tsp honey
1/2 tsp lemon juice
1/2 tsp olive oil

For the salad:

1/4 cup pearl barley
1/4 tsp salt
1 1/2 cups boiling water
1/2 cup pecans
1  1/2 cups cauliflower in tiny florets
1/2 a green apple diced or 1/3 cup pomegranate seeds
1/2 cup dried cranberries, roughly chopped
1 tbsp mint leaves, finely chopped
2 tbsp parsley (flat or curly), finely chopped

Make

Preheat the oven to 160 C.  When heated, place the pecans in the oven on a tray for 8-10 mins or until toasted.  Allow to cool and chop roughly.  You will not be needing the oven after this.

Soak the tamarind in 1/2 cup boiling water for about 10 minutes.  Mash the tamarind in the water with a fork and drain, reserving the water.  You can discard the tamarind pulp.

Place the pearl barley, 1 1/2 cups boiling water and 1/4 tsp salt in a saucepan or pot.  Bring to the boil and simmer for 30-40mins until the barley is cooked but still a little chewy.  Drain and set aside.

In a small non-stick pan, toast the cumin until a little browned and fragrant.  You could probably also do this in the oven.  Using a mortar and pestle or spice grinder, grind 1/2 tsp of the toasted cumin to a powder.

Chop the stems off the cauliflower just at the base of the florets and divide into tiny florets.  Wash well.  Blanch in boiling water (enough to completely cover the cauliflower) for 5 minutes.  Drain and set aside.

Dice 1/2 a green apple into roughly 8-10 mm pieces.

To make the dressing, combine tamarind water and the rest of the dressing ingredients except for the whole cumin seeds in a large bowl.  Whisk to combine well.  Taste and add more salt or lemon juice if desired.

To the bowl add cauliflower, apple, barley, whole toasted cumin and herbs.  Toss well to coat in the dressing.  Just before serving, toss through the pecans.

Notes:

Dried tamarind is available at all Indian grocers.  You could also use tamarind paste- dissolve about 1/2 tsp in 1/2 cup boiling water.

Pomegranate seeds would also work really well in this salad either instead of or in addition to the apple.

Walnuts would also work well instead of pecans.

Want more salad? Try:

Quinoa Salad
Zucchini, Carrot and Fennel Salad
Warm Lentil Salad with Goats Cheese and Walnuts

cauliflower apple salad 3

A Bowl of Red

Beetroot Fried Rice 2

Beetroot does this thing where it colours everything around it crimson with its juices.

My fingers, the wooden spoon, the new(ish) tea towels……et al.

I can’t decide whether it’s very cool or very obnoxious.

Beetroot and peas

And rice…..well rice doesn’t stand a chance against beet juice, what with being white and all.

It’s a blank canvas for redness.

This is a super simple, quick weekday meal.  My solution to having nothing in the vegetable crisper drawer except a single lone beet, and a container of cooked rice that needed a good home.

Peas

I think we’ll keep this one on the dinner rotation.  The beets provide fibre and a touch of sweetness which is nicely contrasted by the chilli.  The rice makes it a filling weekday meal which is super quick to make.  Did I say that already?  Well it is……it took me longer to take photos of this dish than it did to make it.

Super quick.

Beetroot Fried Rice 3

Beetroot Fried rice

Feeds 2-3

Get:

500g beetroot, peeled and julienned
1/2 cup fresh or frozen peas
2 tsp vegetable oil
1 tsp black mustard seeds
1/4 tsp turmeric
1/2- 1 tsp chilli powder
1/8 tsp asafoetida
1/2 tsp urad dhal (uncooked)
1/2 tsp channa dhal (uncooked)
8-10 curry leaves
1-2 large hot fresh red chillies, finely chopped
Salt
3 cups cooked rice (I use basmati)
1 tsp lemon juice

Make:

If you do not have rice which is already cooked, cook the rice using your favourite method.  Spread the cooked rice out on a large tray to cool.

Peel the beetroot and julienne- I use a mandolin for this.

If using fresh peas, cook in boiling water for 5-10 minutes.  If using frozen peas, just soak in boiled water for a few mins.

Heat the oil in a non-stick wok or fry pan.  Turn the heat down and add the mustard seeds and cover while they pop.  Add the dhals and fry until they are slightly browned.  Add the spices and fry for 2-3 mins.  Then, add the chilli and curry leaves and fry until the leaves are browned.  Read more about tempering spices here.

Throw in the beetroot, 1 tsp salt and about 1/2 cup water. Stir through and cover the pan. Cook on low to moderate heat for 4-5 mins until the beetroot is tender but still firm.  Drain the peas and add to the pan, as well as the rice.  You may have to break up the rice with your fingers.  Continue to toss everything together until it is all coated in the spices and oil, and heated through.  Be gentle with the rice so it doesn’t go squishy.  Taste and add more salt if needed.  Squeeze about a tsp of lemon juice over the top.  Toss through again and serve sprinkled with chopped fresh coriander and yogurt on the side.

Notes:
The dhals are probably optional but they do add a nice crunch.

Beetroot Fried Rice 1


Dad’s Pav Bhaji- an Indian Street Food Favourite

If you are the type to like your food dainty, neatly arranged and delicately spiced, this recipe is probably not for you.  If elegance and order on the plate be your priority then under no circumstances should you even contemplate making and devouring this dish.  And if cutlery is your friend or you strive to maintain grace while eating your meals, well then I’m really baffled as to how you even ended up here.

Pav Bhaji 2

If you’re still here, I’m glad you are because if you are willing to overlook the complete and utter lack of prettyness of a dish and place something that looks like homogenous slop in your mouth, then this might just be for you.  And if you are game to tear off buttery, toasted bread with your fingers, scoop up some of the aforementioned slop, top it with zingy raw onions, a squeeze of lemon juice and fresh coriander and cram it into your mouth, you may just be glad that you did stick with me here.

Pav Bhaji 4bVKD_0720

So if you manage to get that far, what you will probably experience is something akin to a Bollywood street party in your mouth.  You know the kind where boy and girl are walking down the street seemingly normally and all of a sudden everyone breaks into song and magically, strangers know all the steps to the dance? Yup, just like that but on your tongue.

And if you’re still tuned in, I promise you won’t regret it.

Pav Bhaji 1

Pav Bhaji is an Indian street food that originated in Mumbai and is now consumed by hungry folk on street corners all over India, as well as in restaurants the world over.  It is a kind of spiced stew, crammed full of vegetables bound together by mashed potato.  It is the mashing, the cooking, the stirring, followed by more cooking allows the vegetables to absorb the spices so beautifully.  When this smoothly spiced bhaji meets buttery toasted bread, it really feels like, at least in that moment, all is right with the world.

In our family home, although my dad can cook, it is my mum who does most of the day-to-day cooking, like this dish.  But pav bhaji? This is undoubtedly my dad’s domain.

A meticulous vegetable chopper, dad first chops all the vegetables in a perfectly even dice, then proceeds to combine it all together in a simmering pan while the spices develop their flavours, slowly but surely.

So we wait patiently, the aroma making it almost impossible for us to focus on our pre-dinner tasks, until finally dad dishes up the delicious bhaji along with pan-toasted bread as well as the accompanying chopped onion, coriander and wedges of lemon.

We normally use store bought bread rolls to pile the bhaji onto, but if you would like to try making your own, Sneh from Cook Republic has a recipe.

Pav Bhaji 5

Dad’s Pav Bhaji

Feeds 4-6

Get:

3 medium potatoes, quartered (Desiree or Pontiac work well)
2 medium carrots, finely diced
3 medium onions (you will need 4 in total), finely chopped
1 red capsicum, diced
1 green capsicum, diced
3 small tomatoes, diced
3/4 cup frozen peas, soaked in boiling water
More boiling water
50g butter + extra for bread (optional but recommended!)

For the Tempering:

2 tsp cumin seeds
1 1/2 tsp pav bhaji masala
1/2 tsp Garam masala
1/4 tsp chilli pdr
1 tsp amchur (dry mango powder)
2 chillies
1 1/2 -2 tsp salt

To serve:
8 Bread rolls- white bread tastes the best with the bhaji but grain or wholemeal also work
Butter
1 Lemon, cut into wedges
1/3 cup fresh coriander, roughly chopped
1 small onion, finely chopped

Make:

Place the potatoes in a pot with 1/2 salt and enough boiling water to completely cover them. Boil until just cooked through.  Drain and set aside to cool.

Chop all the vegetables as described and soak the frozen peas in boiling water.

In a large non-stick wok or fry-pan, heat the oil on moderate heat.  Add the cumin seeds and when most of them have popped, add the chillies.  Fry, adjusting heat to prevent the seeds from burning, for 1-2 mins.  Add the spices except for salt and amchur and cook, stirring for 3-4 mins.  Add both types of capsicum and fry for 5-6 mins.  Add the onions and fry until the onions are translucent.  At this point, add 1/2 cup water, cover and cook for 3-4 mins.

The capsicum should be just cooked through by now.  Add tomatoes, carrots and peas and another cup of water. Add 1 1/2 tsp salt and stir through.  Cover and allow to cook on low heat until carrots are cooked through and tomatoes are starting to go mushy.  While this is cooking, peel the cooked potatoes.

Much of the water may have evaporated by now.  Add the potatoes and another cup of water.  Use a potato masher to roughly mash the mixture in the pan.  Keep it fairly chunky- don’t aim for a mashed potato consistency, but enough of the potato should be mashed to homogenise the mixture.

Cook for 2-3 mins.  At this point, you should taste and add more chilli powder, salt or amchur (for sourness) according to taste.  Cover and cook for 15-20 min, on low-medium heat, stirring every few mins.  The mixture should be quite loose during this process, like a very thick soup.  Add water as you cook to maintain this consistency.

Finally, add 50 grams butter, cubed and stir through until melted and the mixture thickens a little.  Cook uncovered, stirring for a further 5 mins.  Take off the heat and allow to sit for a few mins before serving.

Slice the buns into half through the middle as you would for a burger.  Butter the bread generously and fry, cut side down in a non-stick fry-pan until toasted.  Use this method rather than using the toaster or grill- trust me on this one!

Serve bhaji with a sprinkle of raw chopped onion, coriander and a good squeeze of lemon juice, and bread on the side.

There are 2 ways of eating this- either pile the bhaji onto the bread and eat like a pizza or tear off pieces of bread and spoon/scoop the bhaji onto it.  Either way, ditch the knife and fork and use those fingers!

Notes:

Pav bhaji masala, garam masala and amchur powder are available at Indian grocery stores.  Garam masala is also available in mainstream supermarkets.

You could make this dish vegan by using vegan spread instead of butter, or by skipping the butter altogether.

Pav Bhaji 3

Hug-In-A-Bowl Yellow Dhal

Isn’t it funny how being ill causes many of us to enter a time capsule and revert to when we were kids?  I know when I’m hit with the flu or a tummy bug, the nine- year old in me comes out in all her whingy glory and I find myself craving mummy-style pampering, lots of hugs and comfort food.

VKD_0606

When I was ten years old, I got the chicken pox and had to have two weeks off school (devastating, I know).  My mother stayed home from work as well to look after me and it’s only now when I have a career of my own that I appreciate the difficulty of taking so much time off with zero notice.

So for two weeks we hung out at home watching videos on the VCR (showing my age now) and playing game after game of Monopoly, me slathered in calamine lotion and mum doing all she could to distract me from scratching the pox.  I gained a true obsession appreciation for the game, becoming some sort of speckly real estate mogul of a cardboard and plastic world.

VKD_0619

And mum kept the comfort food coming.  A sore throat was a feature of my chicken pox so she would make a lovely, seasoned and buttery mashed potato which she would form into little round cakes lovingly pressed with a fork to make them a little bit fancy.  I lived on these simple little potato cakes until my throat recovered and I could stand to eat other foods.

Slowly, the pox dried up and I was given the all-clear to return to school.  I know we were both a little sad to put aside the Monopoly board, leave behind the mother-daughter pseudo holiday and return to our respective vocations.

VKD_0618

Over the past few days when I was hit with the flu, comfort food was again what I craved.  And at the top of the list of warm flu-busting foods for me is Dhal, that simply flavoured lentil soup that is on every Indian menu.  Not the buttery, garlicky stuff you get in restaurants but a simple yellow dhal, the kind that is made in Indian homes all over the world on a daily basis.

This dish is one of the first Indian recipes I learned, when I was young and restless and would only stand still in my mum’s kitchen long enough to learn something this simple.  It is still made fairly frequently in our home, and often we will stray from the basic recipe to throw in some frozen peas, a couple of handfuls of baby spinach, chopped onion or diced potato.  I could eat bowlfuls of this stuff as a soup or mix it with rice the traditional way with a side of curry and yoghurt.

Ask ten Indian women how they make their yellow dhal and you are likely to end up with ten different recipes.  This is the way my mum and I make it- a little gingery, a little lemony, a little herby and a lot comforting.

VKD_0630

Basic Yellow Dhal

Serves 2-3

Get:

1/2 cup Toor Dhal
Boiled water
Salt
2 cm piece ginger, grated
1-2 hot red chillies cut into thirds
Small handful coriander, chopped roughly
Small Handful Dill, chopped roughly
1 1/2 – 2 tsp lemon juice

For the Tempering:

1 tsp vegetable, canola or sunflower oil
1 tsp cumin seeds
Generous pinch asafoetida (optional but recommended)
6-8 curry leaves

Make:

Cook Dhal however you are used to doing so.  I use a pressure cooker.  I place the dhal in the cooker with 1 1/2 cups boiling water and a good pinch of salt.  With my cooker, the dhal is cooked after 3 whistles but you will have to adapt this according to the cooker you use.

Another option is to soak the dhal overnight, then either boil it with 1 1/2- 2 cups water in a saucepan with a tight-fitting lid, or use a rice cooker.  You should be able to use a microwave as well but I have never used this method.

Once the dhal is cooked, add a further 1/2 cup water, 1/2 tsp salt, the ginger and the chillies.  Transfer the whole mixture to a saucepan or pot.  Simmer on low heat for 10-15 mins, stirring intermittently.  Ensure you break up any lumps in the cooked dhal when you stir.

Add the herbs and simmer for a further 2 mins.  Turn off the heat and add the lemon juice, stir through.  Taste and add a little more salt or lemon according to taste.

In a separate small pan, heat 1 tsp oil.  Add the cumin seeds and turn off the heat.  Once the cumin seeds have all popped, add the asafoetida and curry leaves.  When the curry leaves have semi-browned in the oil, add the tempered mixture to the dhal and stir through.

Serve with rice, chapatis or on it’s own.

Notes:

Asafoetida is the dried and powdered gum exuded by certain underground rhizomes and an important ingredient in Indian vegetarian cooking.  It has a pungent smell and helps to balance flavours as well as aids digestion.

You can get Toor Dhal and asafoetida at Indian Grocery stores.  Toor Dhal is also available in some supermarkets.

The pressure cooker method is the easiest way to cook dhal. If using a pressure cooker, allow it to cool completely before trying to remove the lid. If using the other methods, soak overnight first and ensure the dhal is cooked through before using- this will take a good 30-40 mins on the stove.

VKD_0614