Nutty Bonbons for The Sweet Swap

I didn’t grow up believing in Santa Claus, the Easter Bunny or the Tooth Fairy.  There was no leaving cookies and carrots out for Santa and his hungry reindeer on Christmas Eve. I didn’t awake at Easter anticipating the search for chocolate eggs that a big furry visitor had hidden.  As for the tooth fairy, she didn’t visit till I was at least eight when we migrated to Australia.  By then I was old enough to know better and while I happily accepted coins in return for the last of my baby teeth, I knew deep down that a fairy wasn’t the one providing the compensation.

Nutty Bonbons 1

None of these things are anything to be sad about as these are western concepts that weren’t part of a typical Hindu Indian childhood.  We lived in Mumbai then, or Bombay as it was called at the time.  My parents made sure there was no shortage of wonder in my life and so there was no sense of deprivation.  I was an only child with a quirky imagination and they each had their unique ways of entertaining me.

Nutty Bonbons 5

My mother was then a stay-at-home-mum, and as for many kids who have that luxury, she lost some of her authority come nightfall.  So it was my dad who would come home from the daily grind to his duty of coaxing me to eat the healthy dinner that my mum had prepared.

Luckily he too had quite the imagination and sitting at our Formica table in our little flat, he would find a way to transform the contents of my plate into something a fussy six-year-old would find fascinating.

Rice, yoghurt, curries and sambhar would be carefully piled into an exotic looking arrangement with an equally exotic name to pique my interest.  Dad’s skills as an engineer were never so challenged as they were when he constructed these elaborate creations that gave a new meaning to playing with one’s food. The whackily christened Auburi Biselari Kuselari was one such creation, made up of whatever was on my plate and with a name that was entirely conjured up in my dad’s mind.

I like to think it is more a testament to my dad’s creativity and not a reflection of my own gullibility that this was a tactic which worked very well indeed.

Nutty Bonbons 4

Dad had another trick up his sleeve, and not just in a metaphorical sense.

Wanna see some magic? He would ask.

Now what child says no to that?

He would wave his hands around in the air, click his fingers, mumble some magicky sounding mumbo jumbo.  With spectacular pomp, dad would make a fist, wave his other hand over it and turn it over to reveal a treat as if materialised from the air.  And amazingly in his palm there would be a 5-star chocolate bar or a little pack of Gems (India’s answer to M & M’s) or a wedge of Amul cheese in its foil wrapping.

Dad knew just how to enthral and impress his little girl.

Nutty Bonbons 2

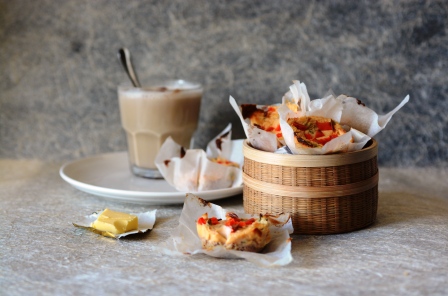
The Sweet Swap wasn’t quite the same as my dad’s wizardry, but it still involved packages of sweets appearing, as if by magic, on my doorstep.  The inaugural event involved food bloggers from all of Australia and was put together by two lovely bloggers; Sara of Belly Rumbles and Amanda of Chewtown.  Not only did the event raise funds for the charity organisation Childfund Australia, but it served to connect food nerds from all over the country, a real bonus for a newbie blogger like yours truly.  The basic gist of it was that each blogger was matched with three other bloggers.  We were instructed to make three batches of the same sweet and post them off to our matches.  In turn, we received three surprise bundles of sweets from the bloggers that we were matched to.

Now what could be better than receiving homemade goodies in the mail?

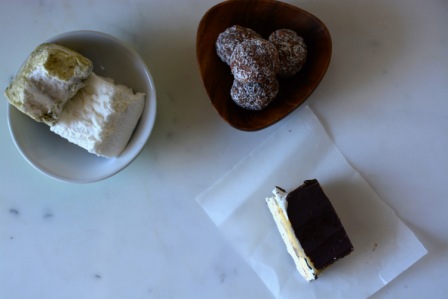
Over the course of the week, I delightedly received firstly some scrumptious Irresistaballs by Tara from vegeTARAian, followed by the heavenly, goodbye-diet, Snickers Bars courtesy of Cassandra from Food Is My Friend.  The last package contained some cloud-like Green Tea and Lemon Sherbet Marshmallows from Ed at Yaya’s Yumyums.

Left to right: Marshmallows, Irresistaballs, Snickers Bar

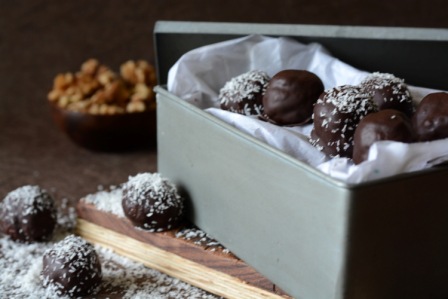
As for me, I decided to try and dabble in some low-fructose treats.  A little while ago, one of my colleagues, Maria, gave me a recipe for some seriously addictive bonbons that she had brought in to share.  After a few tweaks, I came up with a version that had a fructose-free middle and a coating of dark chocolate.

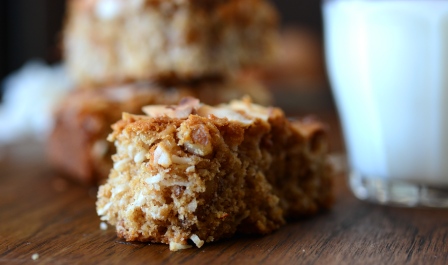
These bonbons have an incredible texture, with ingredients that feel really substantial in the mouth.  The bitterness of the dark chocolate beautifully cuts through the sweet nuttiness of the filling.  Remember that almond butter we made a few weeks ago?  Well, you probably didn’t need a way of using it up, but if you did, this is one.  These beauties are super easy and no-bake, which means you could easily get the kiddies involved, as long as an adult is handling the molten chocolate.  They also make a great gift and evidently survive well in the postal system.

VKD_0637

These bonbons landed on the doorsteps of Emily of  Hold the Peas, Muppy of Muppys and as nervous as I was about sending chocolate treats that I made to a professional sweet-maker, John of Perfection Chocolates.
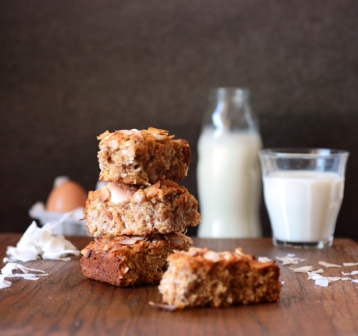
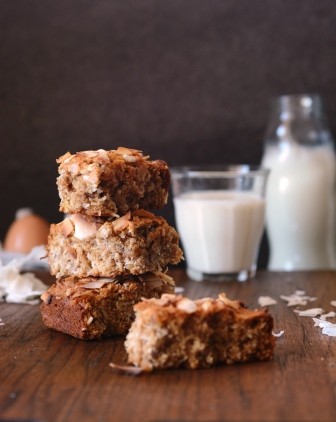
Nutty Bonbons

Makes 30-35 bonbons

Get:

1 1/2 cup walnuts
1 cup shredded coconut
1/2 tsp cinnamon
1/4 tsp vanilla extract
2-3 tbsp almond butter
1/4 cup rice malt syrup
150g good quality dark chocolate
Desiccated coconut for sprinkling

Make:

Blitz the walnuts in a food processor until a very chunky meal is achieved.  Place in a large mixing bowl and add all the other ingredients apart from the chocolate. Start with 2 tbsp almond butter and add more later if the mixture is too dry.  Mix with a wooden spoon until it is a sticky, even mixture.  Oil your hands with a little coconut oil or a neutral oil.  Roll the mixture into balls that are a little smaller than a cherry tomato.  Spread out on a tray and place in the fridge for at least an hour.

Melt the chocolate using your preferred method- I like to use a Bain Marie.  Drop the balls into the molten chocolate two or three at a time.  Use two teaspoons to roll each ball in the chocolate until completely covered.  At this point, I sprinkled about half of them with desiccated coconut.  Place the balls on a grease-proof paper lined tray and return to the fridge. Refrigerate for at least 2 hours.

Notes:

You can substitute any other nut butter for the almond butter.

To make these completely fructose-free, you could use fructose-free chocolate which is sweetened with glucose or Stevia, and vanilla powder instead of extract.

Of course, if you are happy to embrace the fructose, you can substitute golden syrup for rice syrup and use any chocolate you like.

Nutty Bonbons 3

Dad’s Pav Bhaji- an Indian Street Food Favourite

If you are the type to like your food dainty, neatly arranged and delicately spiced, this recipe is probably not for you.  If elegance and order on the plate be your priority then under no circumstances should you even contemplate making and devouring this dish.  And if cutlery is your friend or you strive to maintain grace while eating your meals, well then I’m really baffled as to how you even ended up here.

Pav Bhaji 2

If you’re still here, I’m glad you are because if you are willing to overlook the complete and utter lack of prettyness of a dish and place something that looks like homogenous slop in your mouth, then this might just be for you.  And if you are game to tear off buttery, toasted bread with your fingers, scoop up some of the aforementioned slop, top it with zingy raw onions, a squeeze of lemon juice and fresh coriander and cram it into your mouth, you may just be glad that you did stick with me here.

Pav Bhaji 4bVKD_0720

So if you manage to get that far, what you will probably experience is something akin to a Bollywood street party in your mouth.  You know the kind where boy and girl are walking down the street seemingly normally and all of a sudden everyone breaks into song and magically, strangers know all the steps to the dance? Yup, just like that but on your tongue.

And if you’re still tuned in, I promise you won’t regret it.

Pav Bhaji 1

Pav Bhaji is an Indian street food that originated in Mumbai and is now consumed by hungry folk on street corners all over India, as well as in restaurants the world over.  It is a kind of spiced stew, crammed full of vegetables bound together by mashed potato.  It is the mashing, the cooking, the stirring, followed by more cooking allows the vegetables to absorb the spices so beautifully.  When this smoothly spiced bhaji meets buttery toasted bread, it really feels like, at least in that moment, all is right with the world.

In our family home, although my dad can cook, it is my mum who does most of the day-to-day cooking, like this dish.  But pav bhaji? This is undoubtedly my dad’s domain.

A meticulous vegetable chopper, dad first chops all the vegetables in a perfectly even dice, then proceeds to combine it all together in a simmering pan while the spices develop their flavours, slowly but surely.

So we wait patiently, the aroma making it almost impossible for us to focus on our pre-dinner tasks, until finally dad dishes up the delicious bhaji along with pan-toasted bread as well as the accompanying chopped onion, coriander and wedges of lemon.

We normally use store bought bread rolls to pile the bhaji onto, but if you would like to try making your own, Sneh from Cook Republic has a recipe.

Pav Bhaji 5

Dad’s Pav Bhaji

Feeds 4-6

Get:

3 medium potatoes, quartered (Desiree or Pontiac work well)
2 medium carrots, finely diced
3 medium onions (you will need 4 in total), finely chopped
1 red capsicum, diced
1 green capsicum, diced
3 small tomatoes, diced
3/4 cup frozen peas, soaked in boiling water
More boiling water
50g butter + extra for bread (optional but recommended!)

For the Tempering:

2 tsp cumin seeds
1 1/2 tsp pav bhaji masala
1/2 tsp Garam masala
1/4 tsp chilli pdr
1 tsp amchur (dry mango powder)
2 chillies
1 1/2 -2 tsp salt

To serve:
8 Bread rolls- white bread tastes the best with the bhaji but grain or wholemeal also work
Butter
1 Lemon, cut into wedges
1/3 cup fresh coriander, roughly chopped
1 small onion, finely chopped

Make:

Place the potatoes in a pot with 1/2 salt and enough boiling water to completely cover them. Boil until just cooked through.  Drain and set aside to cool.

Chop all the vegetables as described and soak the frozen peas in boiling water.

In a large non-stick wok or fry-pan, heat the oil on moderate heat.  Add the cumin seeds and when most of them have popped, add the chillies.  Fry, adjusting heat to prevent the seeds from burning, for 1-2 mins.  Add the spices except for salt and amchur and cook, stirring for 3-4 mins.  Add both types of capsicum and fry for 5-6 mins.  Add the onions and fry until the onions are translucent.  At this point, add 1/2 cup water, cover and cook for 3-4 mins.

The capsicum should be just cooked through by now.  Add tomatoes, carrots and peas and another cup of water. Add 1 1/2 tsp salt and stir through.  Cover and allow to cook on low heat until carrots are cooked through and tomatoes are starting to go mushy.  While this is cooking, peel the cooked potatoes.

Much of the water may have evaporated by now.  Add the potatoes and another cup of water.  Use a potato masher to roughly mash the mixture in the pan.  Keep it fairly chunky- don’t aim for a mashed potato consistency, but enough of the potato should be mashed to homogenise the mixture.

Cook for 2-3 mins.  At this point, you should taste and add more chilli powder, salt or amchur (for sourness) according to taste.  Cover and cook for 15-20 min, on low-medium heat, stirring every few mins.  The mixture should be quite loose during this process, like a very thick soup.  Add water as you cook to maintain this consistency.

Finally, add 50 grams butter, cubed and stir through until melted and the mixture thickens a little.  Cook uncovered, stirring for a further 5 mins.  Take off the heat and allow to sit for a few mins before serving.

Slice the buns into half through the middle as you would for a burger.  Butter the bread generously and fry, cut side down in a non-stick fry-pan until toasted.  Use this method rather than using the toaster or grill- trust me on this one!

Serve bhaji with a sprinkle of raw chopped onion, coriander and a good squeeze of lemon juice, and bread on the side.

There are 2 ways of eating this- either pile the bhaji onto the bread and eat like a pizza or tear off pieces of bread and spoon/scoop the bhaji onto it.  Either way, ditch the knife and fork and use those fingers!

Notes:

Pav bhaji masala, garam masala and amchur powder are available at Indian grocery stores.  Garam masala is also available in mainstream supermarkets.

You could make this dish vegan by using vegan spread instead of butter, or by skipping the butter altogether.

Pav Bhaji 3

Fructose-free Baking: Coconut Cake Bars

Ok, it’s been just over a month since I finished the 8-week I Quit Sugar program (read about that here and here) and I have to say that I have slipped, like once…..or twice….or thrice.  I have had a couple of binge days where no amount of self cajoling has kept me away from the dark chocolate and nothing but a brownie will do.  And I have had those days where that gorgeous fudge that that client has brought in simply can’t be ignored.

VKD_0648

But you know what? I don’t actually feel that guilty. I guess firstly because I never intended to be completely sugar-free for life.  I always knew I’d re-introduce the S-word back into my life in the form of the (occasional) treat and while recently I seem to have stretched the definition of ‘occasional’, I have certainly noticed some changes in my attitude to sugar.

For one thing, my tastes when it comes to sugary treats has refined and while it seems nothing will cure me of my chocolate obsession, I seem to be able to resist the cheap, sugar-laden ‘confectionary’ type chocolate.  I previously would have crammed any cocoa-related substance indiscriminately into my mouth at break-neck speed, just in case all the chocolate factories in the world happened to burn down in the next five minutes.  But now, I seem to very partial to high quality dark chocolate……the good stuff, as any addict would say.

I can also quite happily walk past a bag of lollies or a pack of biscuits without turning into a human vacuum cleaner and have also been able to resist many cakes and such without too much drama.

VKD_0676

Then there was that weak moment, or succession of moments,  when I came home from a Saturday at work madly craving a chocolaty treat.

That evening, after discovering an Adriano Zumbo brownie packet mix in the cupboard, the mixture may or may not have met with a couple of eggs and some butter and made its way into the oven.

Thirty- five minutes later, about a quarter of the pan may or may not have disappeared.

It’s my word against the brownies’ so I guess we’ll never know how it all happened.

VKD_0667

Aside from struggling a little with the transition from ‘sugar-detox’ to ‘just treating myself to the good stuff every now and then’, the other thing I struggled with is not being able to bake while I was trying to detox.  So I’ve been playing around with some fructose-free recipes and hit up my stash of cookbooks to see if I could modify an existing recipe.

I dug out a squat, fat little book called ‘500 Cookies’ by Phillipa Vanstone and found a recipe called ‘Coconut Wedges’.  I tweaked some things, added some saffron (it’s the Indian in me) and came up with something that I will call Fructose-free Coconut Cake bars.  If you don’t mind the fructose, you can of course use any other syrup such as honey, maple-syrup or golden syrup.

These little dudes are like the anti-brownie.  While brownies are the good stuff, these bars have the stuff that’s good for you.

These are dense, crumbly little numbers, somewhere between a cake and a bread, that you could totally get away with eating for breakfast.  They of course, also make a great healthy snack which I suspect is their original intention.

VKD_0692

Fructose-Free Coconut Cake Bars
Makes 12-15
Adapted from ‘500 Cookies’ by Phillipa Vanstone

Get:

1/4 tsp or generous pinch saffron strands
1 tbsp milk, warmed
3/4 cup plain (all-purpose) flour
1/2 cup wholemeal flour
1/2  tsp baking powder
1/2 tsp bi-carb soda
1/2 cup rolled or quick oats
1 1/2 cup shredded or desiccated coconut + 1/4 cup extra
1/2 tsp all-spice
1 cup walnuts or pecans, roughly chopped
1/2 cup coconut oil, melted
3/4 to 1 cup rice malt syrup
1/2 tsp vanilla extract
2 eggs

Make:

Preheat the oven to 175 C.

In a small bowl, add the saffron strands to the warm milk and stir until the milk is coloured. Set aside.

In a large bowl, mix the flours, baking powder and baking soda.  Add 1 1/2 cups coconut, the oats and all-spice and mix well.

In a separate bowl, whisk the oil with the syrup.  Whisk in the eggs, vanilla and milk with saffron.  Pour the wet mixture into the bowl with the dry mixture and stir through gently until just combined.

Pour the mixture into a 30cm x 20cm baking tin and smooth out evenly.  My mixture didn’t fill the entire tin and there was about 2 inches empty at one end.  Sprinkle extra coconut over the top.  If using desiccated coconut to sprinkle, do this about 5-7 mins into the baking process so it doesn’t burn.

Bake on the middle shelf of the oven for 12-15 mins.  Test by inserting a clean knife or skewer into the centre of the cake- if it comes out clean, it’s done!
Allow to cool and slice into bars, about 7 cm x 4cm.

Notes:

Ok, so the saffron is a luxury and very nice but probably optional.

Vanilla extract has a little sugar in it.  If you need this to be completely fructose free, use vanilla powder or the seeds from 1/2 a vanilla bean.

If you don’t have coconut oil, a neutral oil such as vegetable oil should work.

VKD_0672

Hug-In-A-Bowl Yellow Dhal

Isn’t it funny how being ill causes many of us to enter a time capsule and revert to when we were kids?  I know when I’m hit with the flu or a tummy bug, the nine- year old in me comes out in all her whingy glory and I find myself craving mummy-style pampering, lots of hugs and comfort food.

VKD_0606

When I was ten years old, I got the chicken pox and had to have two weeks off school (devastating, I know).  My mother stayed home from work as well to look after me and it’s only now when I have a career of my own that I appreciate the difficulty of taking so much time off with zero notice.

So for two weeks we hung out at home watching videos on the VCR (showing my age now) and playing game after game of Monopoly, me slathered in calamine lotion and mum doing all she could to distract me from scratching the pox.  I gained a true obsession appreciation for the game, becoming some sort of speckly real estate mogul of a cardboard and plastic world.

VKD_0619

And mum kept the comfort food coming.  A sore throat was a feature of my chicken pox so she would make a lovely, seasoned and buttery mashed potato which she would form into little round cakes lovingly pressed with a fork to make them a little bit fancy.  I lived on these simple little potato cakes until my throat recovered and I could stand to eat other foods.

Slowly, the pox dried up and I was given the all-clear to return to school.  I know we were both a little sad to put aside the Monopoly board, leave behind the mother-daughter pseudo holiday and return to our respective vocations.

VKD_0618

Over the past few days when I was hit with the flu, comfort food was again what I craved.  And at the top of the list of warm flu-busting foods for me is Dhal, that simply flavoured lentil soup that is on every Indian menu.  Not the buttery, garlicky stuff you get in restaurants but a simple yellow dhal, the kind that is made in Indian homes all over the world on a daily basis.

This dish is one of the first Indian recipes I learned, when I was young and restless and would only stand still in my mum’s kitchen long enough to learn something this simple.  It is still made fairly frequently in our home, and often we will stray from the basic recipe to throw in some frozen peas, a couple of handfuls of baby spinach, chopped onion or diced potato.  I could eat bowlfuls of this stuff as a soup or mix it with rice the traditional way with a side of curry and yoghurt.

Ask ten Indian women how they make their yellow dhal and you are likely to end up with ten different recipes.  This is the way my mum and I make it- a little gingery, a little lemony, a little herby and a lot comforting.

VKD_0630

Basic Yellow Dhal

Serves 2-3

Get:

1/2 cup Toor Dhal
Boiled water
Salt
2 cm piece ginger, grated
1-2 hot red chillies cut into thirds
Small handful coriander, chopped roughly
Small Handful Dill, chopped roughly
1 1/2 – 2 tsp lemon juice

For the Tempering:

1 tsp vegetable, canola or sunflower oil
1 tsp cumin seeds
Generous pinch asafoetida (optional but recommended)
6-8 curry leaves

Make:

Cook Dhal however you are used to doing so.  I use a pressure cooker.  I place the dhal in the cooker with 1 1/2 cups boiling water and a good pinch of salt.  With my cooker, the dhal is cooked after 3 whistles but you will have to adapt this according to the cooker you use.

Another option is to soak the dhal overnight, then either boil it with 1 1/2- 2 cups water in a saucepan with a tight-fitting lid, or use a rice cooker.  You should be able to use a microwave as well but I have never used this method.

Once the dhal is cooked, add a further 1/2 cup water, 1/2 tsp salt, the ginger and the chillies.  Transfer the whole mixture to a saucepan or pot.  Simmer on low heat for 10-15 mins, stirring intermittently.  Ensure you break up any lumps in the cooked dhal when you stir.

Add the herbs and simmer for a further 2 mins.  Turn off the heat and add the lemon juice, stir through.  Taste and add a little more salt or lemon according to taste.

In a separate small pan, heat 1 tsp oil.  Add the cumin seeds and turn off the heat.  Once the cumin seeds have all popped, add the asafoetida and curry leaves.  When the curry leaves have semi-browned in the oil, add the tempered mixture to the dhal and stir through.

Serve with rice, chapatis or on it’s own.

Notes:

Asafoetida is the dried and powdered gum exuded by certain underground rhizomes and an important ingredient in Indian vegetarian cooking.  It has a pungent smell and helps to balance flavours as well as aids digestion.

You can get Toor Dhal and asafoetida at Indian Grocery stores.  Toor Dhal is also available in some supermarkets.

The pressure cooker method is the easiest way to cook dhal. If using a pressure cooker, allow it to cool completely before trying to remove the lid. If using the other methods, soak overnight first and ensure the dhal is cooked through before using- this will take a good 30-40 mins on the stove.

VKD_0614

OSP @ Mexico Food and Liquor, Sydney

Sunday afternoon lunch feels a little cheeky, doesn’t it?  Almost as if you should be doing something more responsible, like cleaning the house……or doing your internet banking…….or making sure you have clean underwear for the week.  It’s like a last little weekend hurrah before work clothes have to be ironed, milk and bread have to be bought and the general Monday morning chaos starts again.

But Sunday lunch with girlfriends and beers on a summery day in the middle of winter?

Yup…….I’m badass like that.

20130519_140015

So it looks like someone out there is making an effort to address the severe shortage of good Mexican eateries in Sydney.  Our favourite haunt has long been Flying Fajita Sisters in Glebe with its wall of pain and its homemade nachos.  I have also heard good things about Cafe Pacifico but have not yet had that pleasure.  When some friends and I heard that there was a new kid in town, we just had to try Mexico Food and Liquor in Surry Hills.

20130519_164040

I think one of my favourite things about this place was the ambiance.  The place had the feel of a trendy little taqueria, or what I imagine one would be like.  Decorated in a traditional, homely and slightly whimsical way, it managed to be funky without being pretentious.  Little touches like the mismatched jars of flowers on every table and the assortment of Mexico inspired wall decor made us feel a little like we were in someone’s home.  A really cosy home with friendly hosts and good food on order.

Not big beer drinkers, my friend and I asked the waiter to recommend a ‘girly beer’ (our words, not his) and he swore by the Pacifico, which turned out to be just what we wanted.  The others opted for mocktails which looked stunning and apparently did not disappoint.

20130519_14104820130519_143733

The menu offered a respectable spread of quesadillas, dips salads and soft-shell tacos, with the surprising absence of crunchy tacos and burritos.  We opted for a fully vegetarian menu and ordered the, patatas bravas, cauliflower salad, pumpkin and toasted coconut quesadillas as well as the three cheese quesadillas on the specials board.

The patatas bravas were the spiced, fried potato goodness we had expected and the quesadillas and their sauces were quite delicious, although the general consensus was that the three cheese won the quesadilla-off.

20130519_144109

The star of the spread was that cauliflower salad with cucumber, black beans, avocado, olives and feta which totally blew my mind.  That was the dish that I continued to eye throughout the rest of the meal, not wanting to be greedy and succumb to my urge of just shovelling the whole thing into my mouth with a fork, my hand or any other vaguely effective instrument.  Happily I think the others cottoned on to my deep love for this salad and I was finally offered the last little bit while the others polished off the quesadillas et al.

Dessert was satisfactory but my no means earth-shattering.  We were recommended the Bunuelos de xocolate with pine-nut crema, which turned out to be pillowy little donuts in a custard.  They somewhat did their job for a lunchtime dessert after a very filling meal but would have been a little disappointing  if we had actually saved room for and anticipated a good, sweet ending.

Mexico Food and Liquor is one step closer to filling the good Mexican food void in this city.  I certainly will go back to but purely based on our experience, my suggestion would be to focus on the main meal and head elsewhere if your sweet tooth is tingling afterwards.

Mexico Food and Liquor is at 15 Randle St, (02) 9211 7798.  

We paid $6-$8 for starters and soft shell tacos, $12-$16 for salads and quesadillas.

We paid for our own meal and this post was not commissioned.

 20130519_135929

<a href=”http://www.urbanspoon.com/r/70/1716699/restaurant/Sydney/Mexico-Food-and-Liquor-Surry-Hills”><img alt=”Mexico Food and Liquor on Urbanspoon” src=”http://www.urbanspoon.com/b/logo/1716699/biglogo.gif&#8221; style=”border:none;padding:0px;width:104px;height:34px” /></a>

Goats Cheese and Walnut Mini-Cheesecakes

Over the past week or so I have had a sneaking suspicion about something that today was proven to be irrefutably true, and that is that I have somehow invoked the wrath of the cooking Gods.

It started with the weekend pasta dish for which I made a lovely white wine and cream sauce and invited two of my favourite ingredients, prawns and broccolini (who can resist mini-me vegetables?) to the party.  It was looking awfully promising until I overcooked the pasta, resulting in a nice dinner where there should have been a really, really nice dinner.

VKD_0526

Then there were my experiments in the realm of low-fructose baking.  Now, my forays into unchartered cooking territory don’t always result in applause but I have to say my adventures over the last couple of days well and truly take the cake (pun totally intended) as far as kitchen mishaps go.

Fuelled by my last success with citrus cake, I decided to try my hand at the lemon and poppy seed loaf…… using dextrose instead of sugar.  Suffice it to say that I must’ve truly taken my frustrations out on the unsuspecting batter while mixing, as it absolutely refused to rise.  It still tasted reasonable and the funny synthetic smell imparted by the dextrose that I dusted it with distracted only slightly from the otherwise enjoyable crumb.

Thus was my first lesson in what NOT to do with dextrose.

Don’t worry citrus and poppy seed lovers, that one remains a work in progress.

VKD_0529

The jewel in my crappy cooking week crown was the simple cheesecake recipe I road-tested that turned out to be simply disastrous.  With the look, texture and taste of plastic, this creation was not even a face it’s mother could love.  Alarm bells did go off when I was able to peel the cheesecake off its base in one piece, but taste it I did and what a waste of taste-bud labour that it was.  So I peeled, I dumped and I moved on with a determination to make something, something this week that was worth the ingredients it was made of.

Finally, there was a breakthrough.  A spark of yum in an otherwise ugh week.

What I have for you today hopefully symbolises the end of the week of colossal disasters.  Tiny little savoury cheesecakes (again with the mini things!) with a buttery base that really pack a punch.  A simple recipe, but tasty and would work well for a substantial snack or an appetiser for a dinner party.  Or in my case, a couple of these for breakfast and I was all set for the morning.

These little savoury cheesecakes are totally adaptable- you could throw in some bacon, spinach, whole walnuts or most anything else that floats your boat.  If you have little ones that like to dabble in the kitchen, this would be a great recipe for them to try, as long as you handle the oven side of things.

So enjoy, while I go off to negotiate with whoever up there is in charge of allowing me to cook edible things.

PS: Less than a week left to vote for my post on Cherry Lassi in the SA Writers Centre Food Bloggers Writing Competition!  Click here to be redirected to the voting page.  There’s a chance to will a $100 voucher through the SAWC as well as my eternal gratitude in it for those who vote!

Goats cheese walnut cheesecakes

Goat’s cheese and Ricotta Mini Cheesecakes

Modified from Simply Heaven, a Kraft Philadelphia Cookbook

Makes 6

Get:

For the base:
1/4 cup walnuts, ground
1/4 cup breadcrumbs
Generous pinch salt
15g butter, melted

For the cheesecake layer:
115g Goats Cheese
100g Ricotta cheese or cream cheese
1 small red chilli, finely chopped (optional)
1/4 tsp salt
1/4 tsp paprika
Small handful fresh herbs, finely chopped- parsely, chives and dill work well
1/4 red capsicum, finely diced to sprinkle on top
1 egg

Make:

Preheat the oven to 180 C.

Combine the cheeses, chilli, salt, paprika and herbs in a bowl and mix well.  Add the egg and mix thoroughly to a smooth mixture.

For the base, combine ingredients and mix well.

Grease and line 6 cups of a muffin tin with muffin liners or baking paper.  If not using liners, just grease the cups.  I prefer to use liners as this minimises the mess!

Divide the base mixture between the cups and press down evenly.  Divide the cheesecake mixture between the cups and even out a little with a spoon.  Sprinkle the diced red capsicum over the top of the cheesecakes.

Bake for 15 mins on the middle shelf.  The cheesecakes will be slightly soft in the middle when baked, but will firm up on cooling.

Goats Cheese Ricotta Cheesecakes

South-Indian Plantain Stir-Fry and a Shameless Request for Votes

Well hellooooo there!

I was waiting for you. Yes, you.

Have you met Plantain yet? No??

Well…..You…..meet Plantain. Plantain……You.

Plantain looks like Banana but he’s different.

DSC_0681

Plantain and Banana, they’re cousins. They spent the summer holidays at each others’ places growing up. They played dress up and astronauts and explored outer space together in a space-ship made out of the cardboard box that the new fridge arrived in.

They played street cricket together and fought over who gets to bat first.  Too often they played silly pranks on that prissy little girl next door who always wore pink.

DSC_0700

But as grown-ups, Plantain and Banana are quite different.  Plantain is the chunkier, starchier, denser cousin.  The earthy green or brown to Banana’s sunny yellow. Plantain is thick-skinned and not easily insulted.

Plantain sometimes thinks Banana needs to Man-Up.

Plantain won’t give in without a fight.  He needs a good cookin’ before he’ll be eaten.  He does spices really, really well and takes on almost a potato-ey quality if he’s cooked properly.

While Banana makes himself very available, Plantain likes to play hard to get.  But we know he hangs out in Asian and Indian grocery stores.  We know he’s worth the hunt.

Plantain works really, really well in this stir-fry, a satisfyingly starchy dish that’ll fill you right up.

DSC_0705

Ohhh!!! I almost forgot!! My post on Cherry Lassi (remember that?!?) has been entered in the SA Writers Centre Food Blogging Writing Competition. I know, it’s just a tad exciting and scary. I would be ever so grateful, if you like the post, if you would vote for me by following this link. Thanks in advance sweet-peas!

DSC_0718

Plantain Palya: South Indian Plantain Stir-Fry
Serves 3-4

Get:
4 Plantains
3 cm piece of dried tamarind
Chilli powder
Salt
1 tsp Rasam Powder

For the Tempering:
1 tbsp vegetable oil
1/2 tsp urad Dhal (uncooked)
1/2 tsp channa Dhal (uncooked)
1/2 tsp cumin seeds
1/2 tsp mustard seeds
1/4 tsp turmeric powder
1/4 to 1/2 tsp chilli powder
8-10 fresh or dried curry leaves

Make:

Tear up the tamarind and place in a small bowl with about 1/2 cup boiling water.  Mash the tamarind with a fork and leave to soak.

To prepare the plantains, scrape the green or brown outer skin off by using a knife to grasp the edge of it and peeling it off.  Leave a thin layer of the fibrous coating (under the skin) as this helps prevent the plantain from falling apart as it is cooked.  Slice the plantain once lengthways, then slice transversely into 1- 1 1/2 cm pieces.  You should end up with little semi-circles of plantain that are covered on the curved edge with the fibrous layer.

For the tempering, heat the oil in a large non-stick frypan.  Lower heat and add cumin and mustard seeds, then dhals.  When the seeds have popped, add  turmeric and chilli powders, then fry for 2 mins.  Add curry leaves and fry until browned.  If using fresh leaves, there will be some major sizzle so you may need to cover the pan.

Add the plantain and stir to coat in the oil and spices.

Mash the soaking tamarind again and strain through a tea strainer, reserving the water.  The tamarind can be stored in the fridge and used again within a couple of days in the same way.  Sprinkle the tamarind water over the plantain and stir through.

Add about 1/2 cup water and cover.  Allow to cook, covered, stirring every few minutes.  After 3-4 mins, sprinkle 1 tsp salt and stir through.  Cover again and continue cooking over moderate heat, stirring intermittently.  Cook until the plantain is tender but still firm.

Sprinkle rasam powder and stir through, allow to cook for a couple more minutes.  Taste and add more chilli powder and/or salt if required. Stir through.  At this point, if there is still a fair bit of moisture content in the mixture, you can uncover and continue frying while stirring gently.  When most of the water has evaporated, drizzle about a tbsp of oil over the mixture and fry until the plantain is the texture and firmness of cooked potato, and all the moisture has evaporated. If the moisture evaporates before the plantain is adequately cooked, add a little more water and cook/reduce further.

Serve with chapatis and a sprinkle of chopped coriander.

Notes:

This recipe requires a visit to an Indian grocery store.  There, you’ll find the plantains, rasam powder (a South-Indian spice mix), dhals and tamarind.  All the other spices can also be found there or at a regular supermarket.  Strictly speaking, the dhals are probably optional if you prefer not to buy a whole bag of each for one dish.  If you can’t find dried tamarind, about 1/2 tsp tamarind paste dissolved in 1/2 cup water will do the trick, although tamarind water made from dried tamarind tastes so much better.

Leave yourself a good 60 to 90 mins to prepare this dish as the Plantain doesn’t give up without a fight.

DSC_0721

Weekly Photo Challenge: The Sign Says

Weekly Photo Challenge: The Sign Says

I was really just looking for the loo but the public restrooms in Turkey promise so much more……

See more interpretations of the Daily Post’s Weekly Photo Challenge: The Sign Says here

Click the Month: May 2013

Sydney seems to have turned into a refrigerator of sorts this month.  The cold seems to seep in right to the bones and the sun calls it a day by 5 pm.  We have been lucky to dodge winter through most of April but it seems it’s time to embrace the fact that the chilly season is well and truly here.  Gloriously sunny days make everything better though and we still have a good supply of those.  And then there have been the mornings where we have woken up to an eerie fog that blankets the city, an almost solid mist that one has to squint to see through.

So I have for you some shots I took during our Mothers’ Day Picnic.  Clear skies, a dog-friendly beach and a delicious homemade focaccia (my first attempt!) made the day complete.

DSC_0187

DSC_0179DSC_0182

DSC_0207DSC_0245

DSC_0276

DSC_0268DSC_0215

Oh my God I CAN swim!!

DSC_0289DSC_0297

DSC_0298DSC_0299

DSC_0304
All this frolicking about on the beach and chasing after tennis balls is positively exhausting!

Aaaaannndddd it’s almost June!

Quitting Sugar: Seven weeks on

So………….seven weeks, huh?

And they said I wouldn’t last……..

Today makes it SEVEN WEEKS since I told sugar to hit the road Jack.

Incredibly, I have made it through with my sanity (and that of those around me) intact.

DSC_0538

Did I cheat?  Yes, three times and all in the last two weeks.  Once, I had a bite of dessert at a restaurant……amazingly just one bite and I was happy to stop.

Another time I had a small square of dark chocolate.  But we’ll blame that on events beyond my control- the time of month, the changing of the tides, the upcoming lunar eclipse.

The remarkable thing was, none of those times was I the out of control sugar monster that I once was.  I simply had a small bite and then like the self-controlled, poised being that I have always wanted to be, I stopped!

Am I good, or what??

DSC_0353

So if this week is seven weeks, next week, somewhat unsurprisingly will be EIGHT weeks.  Eight weeks is what some of the experts say is the time needed to break an addiction, so that signifies the end of the hard core detox.

This last week I started to introduce small amounts of sugar- a few berries here and there, a few snacks sweetened with rice malt syrup (a fructose free sweetener).  Berries taste like little bundles of heaven now, which is a real surprise as I never was a berry person.

Where to after eight weeks?  Well, what I hope to gain is control over my own sweet tooth.  The ability to be able to occasionally have one chocolate from some exquisite chocolatier without feeling the need to plunge into the entire vat of melted chocolate and backstroke around it in circles.  The gift of being able to enjoy dessert at a fancy restaurant without feeling guilty about all the other sugar I ate that day.

And you know what?  I think I might be getting there.

DSC_0543