Fructose-free Baking: Coconut Cake Bars

Ok, it’s been just over a month since I finished the 8-week I Quit Sugar program (read about that here and here) and I have to say that I have slipped, like once…..or twice….or thrice.  I have had a couple of binge days where no amount of self cajoling has kept me away from the dark chocolate and nothing but a brownie will do.  And I have had those days where that gorgeous fudge that that client has brought in simply can’t be ignored.

VKD_0648

But you know what? I don’t actually feel that guilty. I guess firstly because I never intended to be completely sugar-free for life.  I always knew I’d re-introduce the S-word back into my life in the form of the (occasional) treat and while recently I seem to have stretched the definition of ‘occasional’, I have certainly noticed some changes in my attitude to sugar.

For one thing, my tastes when it comes to sugary treats has refined and while it seems nothing will cure me of my chocolate obsession, I seem to be able to resist the cheap, sugar-laden ‘confectionary’ type chocolate.  I previously would have crammed any cocoa-related substance indiscriminately into my mouth at break-neck speed, just in case all the chocolate factories in the world happened to burn down in the next five minutes.  But now, I seem to very partial to high quality dark chocolate……the good stuff, as any addict would say.

I can also quite happily walk past a bag of lollies or a pack of biscuits without turning into a human vacuum cleaner and have also been able to resist many cakes and such without too much drama.

VKD_0676

Then there was that weak moment, or succession of moments,  when I came home from a Saturday at work madly craving a chocolaty treat.

That evening, after discovering an Adriano Zumbo brownie packet mix in the cupboard, the mixture may or may not have met with a couple of eggs and some butter and made its way into the oven.

Thirty- five minutes later, about a quarter of the pan may or may not have disappeared.

It’s my word against the brownies’ so I guess we’ll never know how it all happened.

VKD_0667

Aside from struggling a little with the transition from ‘sugar-detox’ to ‘just treating myself to the good stuff every now and then’, the other thing I struggled with is not being able to bake while I was trying to detox.  So I’ve been playing around with some fructose-free recipes and hit up my stash of cookbooks to see if I could modify an existing recipe.

I dug out a squat, fat little book called ‘500 Cookies’ by Phillipa Vanstone and found a recipe called ‘Coconut Wedges’.  I tweaked some things, added some saffron (it’s the Indian in me) and came up with something that I will call Fructose-free Coconut Cake bars.  If you don’t mind the fructose, you can of course use any other syrup such as honey, maple-syrup or golden syrup.

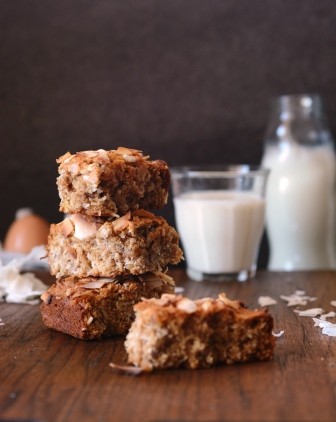
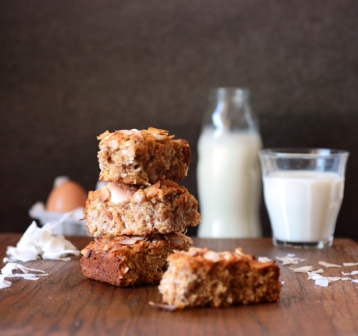
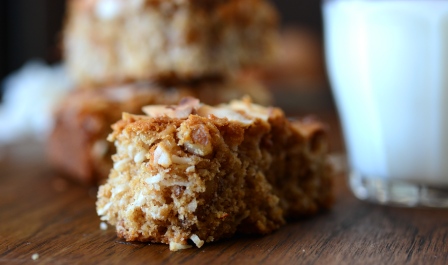
These little dudes are like the anti-brownie.  While brownies are the good stuff, these bars have the stuff that’s good for you.

These are dense, crumbly little numbers, somewhere between a cake and a bread, that you could totally get away with eating for breakfast.  They of course, also make a great healthy snack which I suspect is their original intention.

VKD_0692

Fructose-Free Coconut Cake Bars
Makes 12-15
Adapted from ‘500 Cookies’ by Phillipa Vanstone

Get:

1/4 tsp or generous pinch saffron strands
1 tbsp milk, warmed
3/4 cup plain (all-purpose) flour
1/2 cup wholemeal flour
1/2  tsp baking powder
1/2 tsp bi-carb soda
1/2 cup rolled or quick oats
1 1/2 cup shredded or desiccated coconut + 1/4 cup extra
1/2 tsp all-spice
1 cup walnuts or pecans, roughly chopped
1/2 cup coconut oil, melted
3/4 to 1 cup rice malt syrup
1/2 tsp vanilla extract
2 eggs

Make:

Preheat the oven to 175 C.

In a small bowl, add the saffron strands to the warm milk and stir until the milk is coloured. Set aside.

In a large bowl, mix the flours, baking powder and baking soda.  Add 1 1/2 cups coconut, the oats and all-spice and mix well.

In a separate bowl, whisk the oil with the syrup.  Whisk in the eggs, vanilla and milk with saffron.  Pour the wet mixture into the bowl with the dry mixture and stir through gently until just combined.

Pour the mixture into a 30cm x 20cm baking tin and smooth out evenly.  My mixture didn’t fill the entire tin and there was about 2 inches empty at one end.  Sprinkle extra coconut over the top.  If using desiccated coconut to sprinkle, do this about 5-7 mins into the baking process so it doesn’t burn.

Bake on the middle shelf of the oven for 12-15 mins.  Test by inserting a clean knife or skewer into the centre of the cake- if it comes out clean, it’s done!
Allow to cool and slice into bars, about 7 cm x 4cm.

Notes:

Ok, so the saffron is a luxury and very nice but probably optional.

Vanilla extract has a little sugar in it.  If you need this to be completely fructose free, use vanilla powder or the seeds from 1/2 a vanilla bean.

If you don’t have coconut oil, a neutral oil such as vegetable oil should work.

VKD_0672

Hug-In-A-Bowl Yellow Dhal

Isn’t it funny how being ill causes many of us to enter a time capsule and revert to when we were kids?  I know when I’m hit with the flu or a tummy bug, the nine- year old in me comes out in all her whingy glory and I find myself craving mummy-style pampering, lots of hugs and comfort food.

VKD_0606

When I was ten years old, I got the chicken pox and had to have two weeks off school (devastating, I know).  My mother stayed home from work as well to look after me and it’s only now when I have a career of my own that I appreciate the difficulty of taking so much time off with zero notice.

So for two weeks we hung out at home watching videos on the VCR (showing my age now) and playing game after game of Monopoly, me slathered in calamine lotion and mum doing all she could to distract me from scratching the pox.  I gained a true obsession appreciation for the game, becoming some sort of speckly real estate mogul of a cardboard and plastic world.

VKD_0619

And mum kept the comfort food coming.  A sore throat was a feature of my chicken pox so she would make a lovely, seasoned and buttery mashed potato which she would form into little round cakes lovingly pressed with a fork to make them a little bit fancy.  I lived on these simple little potato cakes until my throat recovered and I could stand to eat other foods.

Slowly, the pox dried up and I was given the all-clear to return to school.  I know we were both a little sad to put aside the Monopoly board, leave behind the mother-daughter pseudo holiday and return to our respective vocations.

VKD_0618

Over the past few days when I was hit with the flu, comfort food was again what I craved.  And at the top of the list of warm flu-busting foods for me is Dhal, that simply flavoured lentil soup that is on every Indian menu.  Not the buttery, garlicky stuff you get in restaurants but a simple yellow dhal, the kind that is made in Indian homes all over the world on a daily basis.

This dish is one of the first Indian recipes I learned, when I was young and restless and would only stand still in my mum’s kitchen long enough to learn something this simple.  It is still made fairly frequently in our home, and often we will stray from the basic recipe to throw in some frozen peas, a couple of handfuls of baby spinach, chopped onion or diced potato.  I could eat bowlfuls of this stuff as a soup or mix it with rice the traditional way with a side of curry and yoghurt.

Ask ten Indian women how they make their yellow dhal and you are likely to end up with ten different recipes.  This is the way my mum and I make it- a little gingery, a little lemony, a little herby and a lot comforting.

VKD_0630

Basic Yellow Dhal

Serves 2-3

Get:

1/2 cup Toor Dhal
Boiled water
Salt
2 cm piece ginger, grated
1-2 hot red chillies cut into thirds
Small handful coriander, chopped roughly
Small Handful Dill, chopped roughly
1 1/2 – 2 tsp lemon juice

For the Tempering:

1 tsp vegetable, canola or sunflower oil
1 tsp cumin seeds
Generous pinch asafoetida (optional but recommended)
6-8 curry leaves

Make:

Cook Dhal however you are used to doing so.  I use a pressure cooker.  I place the dhal in the cooker with 1 1/2 cups boiling water and a good pinch of salt.  With my cooker, the dhal is cooked after 3 whistles but you will have to adapt this according to the cooker you use.

Another option is to soak the dhal overnight, then either boil it with 1 1/2- 2 cups water in a saucepan with a tight-fitting lid, or use a rice cooker.  You should be able to use a microwave as well but I have never used this method.

Once the dhal is cooked, add a further 1/2 cup water, 1/2 tsp salt, the ginger and the chillies.  Transfer the whole mixture to a saucepan or pot.  Simmer on low heat for 10-15 mins, stirring intermittently.  Ensure you break up any lumps in the cooked dhal when you stir.

Add the herbs and simmer for a further 2 mins.  Turn off the heat and add the lemon juice, stir through.  Taste and add a little more salt or lemon according to taste.

In a separate small pan, heat 1 tsp oil.  Add the cumin seeds and turn off the heat.  Once the cumin seeds have all popped, add the asafoetida and curry leaves.  When the curry leaves have semi-browned in the oil, add the tempered mixture to the dhal and stir through.

Serve with rice, chapatis or on it’s own.

Notes:

Asafoetida is the dried and powdered gum exuded by certain underground rhizomes and an important ingredient in Indian vegetarian cooking.  It has a pungent smell and helps to balance flavours as well as aids digestion.

You can get Toor Dhal and asafoetida at Indian Grocery stores.  Toor Dhal is also available in some supermarkets.

The pressure cooker method is the easiest way to cook dhal. If using a pressure cooker, allow it to cool completely before trying to remove the lid. If using the other methods, soak overnight first and ensure the dhal is cooked through before using- this will take a good 30-40 mins on the stove.

VKD_0614

South-Indian Plantain Stir-Fry and a Shameless Request for Votes

Well hellooooo there!

I was waiting for you. Yes, you.

Have you met Plantain yet? No??

Well…..You…..meet Plantain. Plantain……You.

Plantain looks like Banana but he’s different.

DSC_0681

Plantain and Banana, they’re cousins. They spent the summer holidays at each others’ places growing up. They played dress up and astronauts and explored outer space together in a space-ship made out of the cardboard box that the new fridge arrived in.

They played street cricket together and fought over who gets to bat first.  Too often they played silly pranks on that prissy little girl next door who always wore pink.

DSC_0700

But as grown-ups, Plantain and Banana are quite different.  Plantain is the chunkier, starchier, denser cousin.  The earthy green or brown to Banana’s sunny yellow. Plantain is thick-skinned and not easily insulted.

Plantain sometimes thinks Banana needs to Man-Up.

Plantain won’t give in without a fight.  He needs a good cookin’ before he’ll be eaten.  He does spices really, really well and takes on almost a potato-ey quality if he’s cooked properly.

While Banana makes himself very available, Plantain likes to play hard to get.  But we know he hangs out in Asian and Indian grocery stores.  We know he’s worth the hunt.

Plantain works really, really well in this stir-fry, a satisfyingly starchy dish that’ll fill you right up.

DSC_0705

Ohhh!!! I almost forgot!! My post on Cherry Lassi (remember that?!?) has been entered in the SA Writers Centre Food Blogging Writing Competition. I know, it’s just a tad exciting and scary. I would be ever so grateful, if you like the post, if you would vote for me by following this link. Thanks in advance sweet-peas!

DSC_0718

Plantain Palya: South Indian Plantain Stir-Fry
Serves 3-4

Get:
4 Plantains
3 cm piece of dried tamarind
Chilli powder
Salt
1 tsp Rasam Powder

For the Tempering:
1 tbsp vegetable oil
1/2 tsp urad Dhal (uncooked)
1/2 tsp channa Dhal (uncooked)
1/2 tsp cumin seeds
1/2 tsp mustard seeds
1/4 tsp turmeric powder
1/4 to 1/2 tsp chilli powder
8-10 fresh or dried curry leaves

Make:

Tear up the tamarind and place in a small bowl with about 1/2 cup boiling water.  Mash the tamarind with a fork and leave to soak.

To prepare the plantains, scrape the green or brown outer skin off by using a knife to grasp the edge of it and peeling it off.  Leave a thin layer of the fibrous coating (under the skin) as this helps prevent the plantain from falling apart as it is cooked.  Slice the plantain once lengthways, then slice transversely into 1- 1 1/2 cm pieces.  You should end up with little semi-circles of plantain that are covered on the curved edge with the fibrous layer.

For the tempering, heat the oil in a large non-stick frypan.  Lower heat and add cumin and mustard seeds, then dhals.  When the seeds have popped, add  turmeric and chilli powders, then fry for 2 mins.  Add curry leaves and fry until browned.  If using fresh leaves, there will be some major sizzle so you may need to cover the pan.

Add the plantain and stir to coat in the oil and spices.

Mash the soaking tamarind again and strain through a tea strainer, reserving the water.  The tamarind can be stored in the fridge and used again within a couple of days in the same way.  Sprinkle the tamarind water over the plantain and stir through.

Add about 1/2 cup water and cover.  Allow to cook, covered, stirring every few minutes.  After 3-4 mins, sprinkle 1 tsp salt and stir through.  Cover again and continue cooking over moderate heat, stirring intermittently.  Cook until the plantain is tender but still firm.

Sprinkle rasam powder and stir through, allow to cook for a couple more minutes.  Taste and add more chilli powder and/or salt if required. Stir through.  At this point, if there is still a fair bit of moisture content in the mixture, you can uncover and continue frying while stirring gently.  When most of the water has evaporated, drizzle about a tbsp of oil over the mixture and fry until the plantain is the texture and firmness of cooked potato, and all the moisture has evaporated. If the moisture evaporates before the plantain is adequately cooked, add a little more water and cook/reduce further.

Serve with chapatis and a sprinkle of chopped coriander.

Notes:

This recipe requires a visit to an Indian grocery store.  There, you’ll find the plantains, rasam powder (a South-Indian spice mix), dhals and tamarind.  All the other spices can also be found there or at a regular supermarket.  Strictly speaking, the dhals are probably optional if you prefer not to buy a whole bag of each for one dish.  If you can’t find dried tamarind, about 1/2 tsp tamarind paste dissolved in 1/2 cup water will do the trick, although tamarind water made from dried tamarind tastes so much better.

Leave yourself a good 60 to 90 mins to prepare this dish as the Plantain doesn’t give up without a fight.

DSC_0721

On a roll

I am a bit of a novice on the bread side of things.  I mean, I love the stuff, it is possibly even my favourite carb.  I would indulge in crusty, soft centred white bread all day if both my gastrointestinal tract and my waistline were more accommodating.  But when it comes to actually baking it?  Well, let’s just say my bread resumé is a short one.

So knowing this, you would assume that I would keep it very simple, right?  Like, find a good recipe, read and understand it and follow it to the last gram?  Like, bake a few text-book loaves before I got too adventurous?

DSC_0369

Well if you think I’m that sensible, you clearly don’t know me too well.  We have to work on that.  Coffee next week?

Find a good recipe I did……Joy of Joy the Baker, one of my favourite blogs, posted a recipe for Cream Cheese Cinnamon Rolls which I had mentally bookmarked some time ago.  I finally had a chance to try it.  But follow it to a tee?? I don’t think I’m actually capable of that.

I had to spice it up, make it savoury and of all things, healthy.  Wholemeal flour……whaaaaat??

I had to fill it with a tangy coriander and dill pesto conjured up entirely in my own brain.

Then on a whim, I threw in some feta I found hiding unassumingly in the fridge.

Did I get away with it?  You bet your savoury scrolls I did!

DSC_0379

And the best thing is, you can too.  The possibilities for variations are drool-worthy.  Olive bread with an olive tapenade and rosemary filling? I am all over that like a rash!  Pepita bread with spiced pumpkin puree filling? Why not!

Like all bread, this one takes a little time and elbow grease.  It is left to rise while you vacuum the floors or go out for lunch or write your next blog post or whatever it is you do when you have to wait two hours for something.  Then after you cut the scrolls, you ignore it again for two hours while it rises again.

DSC_0391

But all the effort is well worth it.  At the end of it all you will have eight perfect, filling scrolls for a picnic, breakfast or to pack for lunch.  And you will be glad you kneaded, waited, kneaded again and waited again.

DSC_0384

Wholemeal Coriander and Dill Scrolls

Dough recipe adapted from Saveur October 2008 via Joy the Baker

For the Filling:

Pesto:

1 cup (packed) fresh coriander, leaves and stalks
1 cup (packed) fresh dill, leaves and stalks
1 large or 2 small garlic cloves, peeled
3cm piece fresh ginger
1 tbsp lemon juice
2 tbsp olive oil
1/2 tsp salt
10 raw cashews
1 tbsp cumin seeds

Other ingredients:

Zest of 1 lemon
40g feta
1 tbsp cumin, toasted

For the Bread:

1 tbsp cumin seeds
1 (7g) package active dry yeast
pinch sugar
1/2 cup milk at room temperature
1 egg
1 egg yolk
2 3/4 cups plain wholemeal flour, sifted, plus more for kneading
3/4 teaspoon salt
100g butter, melted, plus more for the pan

Make:

Toast all the cumin (2 tbsp) in a small pan over medium heat until slightly browned and fragrant.

In a large bowl combine yeast, pinch sugar and 1/4 cup water heated to 45 degrees C (a bit warmer than body temp if you do not have a thermometer).  Stir to combine and let sit until frothy and foamy, about 10 minutes.

Add egg, egg yolk and milk.  Whisk until well combined.  Add the flour, 1 tbsp toasted cumin and salt and mix with a wooden spoon until the dough just begins to come together.  Knead the dough for 3-5 mins.

Add the melted butter and continue to knead for about 5-6 minutes.  The dough will be a little wet and sticky.  Remove the dough from the bowl and grease the bowl.  Place the dough back into the bowl and cover the bowl with plastic wrap and a kitchen towel.  Leave in a warm place to rise for 1 1/2 to 2 hours, or until doubled in size.

While the dough rises, make the pesto.  Combine the pesto ingredients in the bowl of a food processor and whizz until it reaches coarse paste consistency.

When the dough has doubled in size, place it onto a heavily floured work surface.  Gently knead the dough until it is no longer sticky, adding more flour as needed.  Knead for a few minutes.

Using a floured rolling pin, roll the dough into an oval of about 7 millimetre thickness, about 20cm x 30cm.

Spread the pesto evenly over the dough.  Grate the lemon zest finely over the top of the pesto.  Sprinkle 1 tbsp cumin seeds and crumbled feta evenly over the top.

Grasp hold of one long edge and roll as tightly as possible until it is one long roll

Place dough roll seam side down on a cutting board.  Using a sharp, thin knife, trim off the uneven edges.

Cut the roll into 8 equal slices.  Place the slices, cut side up and evenly spaced in a greased high-edged metal baking pan.  Cover pan with plastic wrap and set aside in a warm place to rise for 1 1/2 to 2 hours

Heat the oven to 190 degrees C.  Uncover the rolls and bake for 30-35 mins, or until a clean knife inserted into the bread comes out clean.

Notes:

For the second rise, Joy suggests that you could also leave the scrolls in the baking tray in the fridge to rise overnight.  The scrolls should be taken out of the fridge 15 min before baking.

DSC_0389