Click the Month: October 2013

LTC 5

This month I got my first taste of one of the many perks of being a food blogger.  I attended a lovely, intimate afternoon tea hosted by the good people of ABC Books at the kitchen of the Williams Sonoma store in Bondi.  The book in question was acclaimed food writer Valli Little’s Love to Cook (Harper Collins), the latest offering in the stunning ABC delicious series.

LTC 1

Let me start by gushing a little about this kitchen.   That enormous, stylish, airy space was a dream come true and I half contemplated crawling into one of the pristine white cupboards and hiding out till everyone left so that I could, like maybe, live there.  I had almost convinced myself that no-one would notice, when the vivacious Valli started speaking and demonstrating a couple of the dishes from the book.  Realising that I  wouldn’t be able to enjoy the experience quite so well from inside a cupboard, I ditched my original idea and just soaked in the atmosphere.

LTC 3

And Valli Little?  Warm, encouraging  and approachable, much like her writing and her recipes.  Her food is unpretentious and completely achievable for a home cook, while still being special enough to pamper your loved ones with like this dessert. Little makes it clear that there is no shame in using ingredients such as Nutella and condensed milk to put together a beautiful dish.  She has a unique style and sense of fun to her writing; think ‘Green Goddess Dressing’ and ‘Laura Ashley Soup’.

LTC 6

Each of Little’s cookbooks is not only beautifully written, but enriched with stunning food photography which is the work of stylist David Morgan and photographer Jeremy Simons.  This gorgeous new addition to the delicious series is one that would snuggle in nicely on the bookshelf of anyone who loves to cook.

I was a guest of Harper Collins & ABC Books at this event hosted at Williams Sonoma.

LTC 7

Advertisement

Rose and Saffron Pots De Crème

Rose Saffron Pots 3

It’s a funny thing, is rosewater.  Too much of it in a dish and each bite is like a group hug with a gaggle of perfumed grannies.  Although, get the balance right and you are greeted with a sensation that is more a scent than a flavour.  A nuance that adds a romantic and intoxifying quality to the dish, whether it be a scented middle eastern fried rice, a soft and yielding Turkish delight or the Indian Gulab Jamun.

In India, rose is a default flavour, much like chocolate or strawberry in Australia.  Growing up, rose milk, rose Kulfi and the Gulkand (rose jam) that my mum used to buy me from tiny footpath stalls in Bangalore were well-loved and anything but exotic.

Rose Saffron Pots 4

We Indians have the middle-east to thank for rosewater, which was obtained by chemists in the ancient Islamic world using a steam distillation method.  We now not only use it in our cooking, but also in Ayurvedic medicine and as a perfume.  It is not uncommon for unsuspecting wedding guests to be sprinkled with a liberal amount of it upon their entry to the venue as a welcoming gesture.

Rose Saffron Pots 1

When a friend gifted me a copy of the beautiful Delicious Home Cooking by Valli Little, I immediately zeroed in on the recipe for Honey Pots De Crème, the cogs in my mind turning as I worked out how I could make it a fructose-free version with Indian flavours.  The result was a smooth baked custard wafting with the fragrance of roses and saffron, which lends itself to a biscuit for dipping or a sprinkling of nuts as it pleases you.

Rose Saffron Pots 7

Rose and Saffron Pots De Crème

Modified from Delicious Home Cooking, Valli Little (ABC Books, Harper Collins)

Serves 3-4 in ramekins or 7-8 in shot glasses

Get:

150ml thickened cream
1/4 cup + 1 tsp rice syrup or honey
1/4 cup milk
2 tbsp Rosewater*
Generous pinch saffron strands
1 egg plus 2 egg yolks
1/2 vanilla bean
1 tbsp pistachios (optional)

Make:

Preheat the oven to 160 C.

In a medium-sized saucepan, warm the cream, milk, rosewater, saffron and syrup or honey until just simmering (but not boiling!).  Stir gently to incorporate the syrup/honey. Take off the heat and allow to cool a little.

Split the vanilla bean and scrape the seeds into a mixing bowl.  Put the bean casing into the cream mixture.

To the bowl with the vanilla seeds, add the egg and egg yolks.  With an electric beater, beat until pale and a little thickened.  Add the egg mixture to the cream mixture and stir until well combined (do not beat or you will create more froth).  Set aside off the heat for 5 mins to infuse.  In the meantime, boil a kettle of water.

Place the ramekins (3 or 4) or shot glasses for smaller portions (8) in a deep ceramic baking dish.  You can also use small glass jars.  Strain the mixture into a jug and divide the mixture between the ramekins or shot glasses.

Set the dish with the ramekins on the middle shelf of the oven and carefully pour boiling water into the dish to a level about half of 3/4 of the way up the sides of the ramekins.

Bake for 40-45 mins or until set but with a slight wobble.

Remove the dish from the oven and carefully lift the ramekins out of the hot water and onto a tray.  Allow to cool completely, then chill in the fridge for at least an hour before serving.  I roasted the pistachios for about 6-7 mins, then crushed them and sprinkled them over the Pots de Crème before serving.  You could use anything that provides a bit of a crunch like other nuts, wafers or honeycomb.

*Rosewater is available at Indian and Middle eastern grocers.

Rose Saffron Pots 6

A Crumble for Comfort

I had serious arguments with myself before I finally made my mind up to post this recipe.  After all, who needs yet another recipe for baking fruit covered in a simple flour and oat mixture?  Especially when we are solidly in spring here in Australia, decidedly not a time for hot baked desserts.

Apple Blueberry Crumble 1

What finally convinced me to post was the reminder that this blog is as much for me as it is for the ten or so of you who regularly read it.

It is a place for me to chronicle my recipes, so that when I am old and senile, I will still be able to whip myself up a quick dessert, a dhal that tastes like home or my palak paneer.

As soon as I remember where I left my glasses so that I may read the screen.

It is a place for me to share my thoughts, memories and experiences.  To excitedly show you what I whipped up in my kitchen that made us happy over here.  I decided that perhaps a classic recipe with some equally sweet memories attached is the perfect thing to share in this, my corner of cyber-space.

All that and the fact that I had some sad, softish looking apples trying to die a slow death in my fruit bowl which simply had to be used up.

Green apples 3


I learnt the original version of this from a housemate during my time in Glasgow.  We were interns then, poor for both money and time.

As interns, our days were a blur of hospital duty, scrubs and pagers.  There were weeks of nightshifts where day became night and night was day.  A unique form of jet-lag without the fun parts like aeroplanes and cocktails by the pool.  Amidst it all we did all we could to absorb information from our seniors while attempting to appear knowledgeable in front of the students.

We ate when we could and coming home to a prepared meal was a luxury we never took for granted.  The local pub knew us well as making our way further afield to eat out in the city was a trip we seldom had the time or energy to make.  Piled into a big house together, we found that sharing meals was the most economical, not to mention most enjoyable way to go about things.

When my housemate made this crumble, an enormous dish of this would stretch to be both dessert and breakfast for several days.  During the busier times, it might have served as dinner as well.  We would store it in the cooled oven, which in the Glasgow winter was not too different from a fridge in any other place.

Apple Blueberry Crumble 3

You can make this your own as I did.  I usually use Granny Smith (green) apples but just about any apple will work.  The blueberries do that thing they do, exploding in the heat and covering everything rather dramatically in their purple juices.  Feel free to use whatever berries you like, or even raisins.  The crumble can only be enhanced by add-ins such as shredded coconut, pecans or hazelnuts, but I quite enjoy the way pepitas swell with hot air and go all crunchy.

Apple and Blueberry Crumble

Serves 6-8 for dessert or 4 hungry interns for dinner

Get:

For the fruit layer:

6 apples
1 punnet blueberries
1/2 tsp cinnamon powder
1/2 tsp vanilla extract
2 tbsp rice syrup, honey or brown sugar

For the crumble:

3/4 cup wholewheat plain flour
3/4 cup quick oats
3 tbsp pepitas
1 tsp cinnamon powder
1 & 1/2 tbsp rice syrup, honey or brown sugar
1 & 1/2 tbsp butter
8 cloves

Make:

Preheat the oven to 160 C.

Core and dice the apples to a 1 1/2 to 2 cm dice.  In a mixing bowl, mix the apples, blueberries and the rest of the fruit layer ingredients so that the fruit is well coated in the other ingredients.  Distribute the fruit mixture evenly in a medium sized deep ceramic dish.

Place all the crumble ingredients, apart from the cloves, in the same bowl.  Use your (clean) fingers to massage the butter and syrup into the other ingredients.  Stop when it is well mixed to a moist crumble consistency.

Scatter the crumble mixture evenly over the top of the fruit mixture.  Dot the cloves into the crumble.

Bake on the middle shelf of the oven for 40-50 minutes until the apples are soft and yeilding.

Serve warm with vanilla ice cream, cream or Greek yoghurt. The latter is probably a more sensible option if you are having leftovers for breakfast but if you opt for ice-cream it’ll be our little secret.

Apple Blueberry Crumble 2

Is it just me or……..

…….are artichokes the most daunting thing ever?  Where did they come from anyway? It’s like some little green martian accidentally dropped one out of his backpack whilst here scoping the earth as a potential new colony for his martian people (meople?).

And actually, the martians use them as war missiles but us crazy humans saw them growing everywhere and thought eating them would be a great idea.  Meanwhile, the little green people are looking down at this funny little planet with its strange inhabitants that are inexplicably making dip out of their weapons.

Blueberries

And I’m surely not the only one who collapses into fits of giggles every-time that meerkat ad airs.  Seriously? I barely even know what they are advertising since I’m usually rolling on the floor by the time they get to the point.

Oh and I can’t be alone in thinking that celebrity is no excuse to try out ludicrous names on your children.  Is anyone else waiting for poor little North West’s parents to announce that it was all just a silly joke and that they actually named her Jane?

Please tell me it’s not just me….

Meringue 3

Also, is anyone else completely in awe that if you whip egg whites long enough and fast enough, they transform into snowy peaks?  The science geek in me is secretly excited every time this happens…..the denaturing of proteins to turn slimy egg whites into glorious edible snow.

And furthermore, you can sweeten and flavour this almost solid white froth and bake it to crispy-chewy mounds.  Mounds that you can top with cream, syrup, fruit or whatever you fancy and call it dessert!

Meringue 1

Oh yes, the theme of this month’s Sweet Adventures Blog Hop, hosted by Claire K Creations, was Meringue Madness so I just had to try my hand at fructose-free meringues.  I replaced caster sugar with dextrose and although they bled a bit, this didn’t seem to affect them in the end and they were pretty darn good.  You could flavour these with whatever essence takes your fancy (I intend to try rosewater next time) and top them just about anything.  I went with this fructose-free lemon curd, some cream and some lovely fresh blueberries.

Meringue 4

Fructose-free Meringues

Makes 6

Modified from Donna Hay Magazine

Get:

4 egg whites
1 cup dextrose powder
1 tsp white vinegar

Make:

Preheat the oven to 120 C.

Beat egg whites initially on low speed, then on high speed until stiff peaks form.

Drizzle in vinegar and any flavouring, and sprinkle in dextrose bit  by bit, beating briefly with each addition.  Beat until sugar is completely incorporated.

Line a baking tray with baking paper or a silicone mat and grease lightly.  Dollop large scoops of the mixture onto the tray and flatten out slightly.  Bake on the middle shelf for 40 minutes, then turn off the oven and leave them in there to cool for an hour or so.

Top with whatever you like and serve.

Meringue 2

Fructose-free Lemon Curd from a Lemony Bounty

I’ve set about the task of growing herbs in my balcony with a stubborn determination which is not entirely typical of me.  Mind you, gardening for me is an undertaking that requires nothing short of the stubbornest of determinations because despite my best efforts, I seem to fail miserably at growing anything.

Anything apart from mould in bowls of questionable things in my fridge, that is.

lemons 1

Of course like all other products of my generation, I blame my mother entirely for this particular deficiency.  She once told me that when she was a child, she planted some seedlings and rushed out excitedly the next day to pull them out of the soil to check if the roots were growing.

Needless to say there was not much of anything growing after that.

Lemon Juice

As luck would have it, Dad is actually quite a competent gardener and I can almost forgive him for not passing on the gene as he keeps me adequately supplied with whatever is flourishing in their garden.

So while the basil languishes in our balcony and the dill shrivels pathetically next to it, my parents’ garden has a curry leaf tree that has reached alarming heights, chilli plants that frequently sprout their spicy red fruit and a lemon tree that produces impressive numbers of citrusy goodness every winter.

When my parents handed over a bag of the aforementioned lemons, it was immediately clear to me that I would not be able to use all of the fruit before they dried up to half of their juicy selves.

Lemon Curd 2

Following this was the thought that this would be the perfect opportunity to try my hand at making lemon curd.  That’s right, for the first time!  Surprising as I have always found the sweet, creamy tang of lemon curd at once delightful and refreshing.

I then decided that one first wasn’t enough for the day and decided to make a fructose-free version of said lemon curd.

This version uses dextrose, which is a glucose powder.  It is slightly less sweet than regular lemon curd but I found it sweet enough.  You could probably add a little more dextrose if you wanted to.  You can use lemon curd for lots of things- tarts, lemon meringue pie, cake.  Or just spread it on toast.  I am planning more lemon curd related posts in the future so stay with me fellow citrus-lovers.

So what are your favourite ways to use lemon or other fruit curds? I would love to hear your ideas in the comments section.

Lemon Curd 1

Fructose-free Lemon Curd

Makes just under a cup

Modified from Gifts from the Kitchen by Annie Riggs via The Patterned Plate

Get:

2 eggs

Juice and finely grated zest of 1 1/2 lemons

62g butter, cubed

110g dextrose

Make:

Beat the eggs and place in the heatproof top bowl of a double boiler or Bain Marie.  I used a large thick walled ceramic bowl.  Ensure the water in the lower vessel is not touching the bowl at the top.  Add the other ingredients and cook on moderate heat for 17-20mins, stirring every few mins.

Stop cooking when the mixture is the consistency of a thick custard.

Allow to cool for a few mins, then place in the fridge to speed up the cooling process.

Place into a sterilised jar and in the fridge.  Mine lasted a few days in the fridge.

Notes:

To sterilise glass jars, wash with soap and hot water and place the jars and lids upturned on a baking tray in a preheated oven at 160 C for 20 mins.

If  fructose-free is not your thing, replace the dextrose with the same amount of caster sugar.

Lemon Curd 3

Steamed Chai Puddings for my first SABH

The tea cupboard is straining at its hinges with boxes and boxes of tea bags.  That’s right, a tea cupboard because we surpassed the tea chest long ago.

A recent trip to India resulted in a tea frenzy which means that there are now enough herbal teas to feed an army of detox-ers.  Several types of Tulsi tea, a mint tea, a terribly sharp ginger tea and masala tea, plus an un-labelled one that I dubbed ‘mystery tea’.

Chai Pud 3

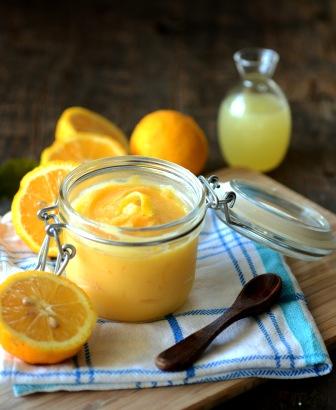
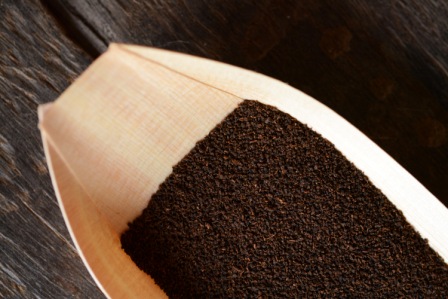
As well, I was given some incredibly good quality black loose leaf tea by a friend.  It was grown on his parents’ tea estate at a hill station in a beautiful part of south India. This friend grew up surrounded by rolling hills of a lush green carpet as far as the eye can see, at the top of a mountain with no mobile phone reception and little in the way of entertainment.  He tells tales of encountering wild animals in the front garden.  A tiger lurking among the bushes.  A leopard slinking along the rows of tea.

The wild bison he says, with mild annoyance, eat the roses that his mother painstakingly cultivates.

And we listen in awe, myself a city baby to the core (Mumbai, Sydney, London).  To me these stories are almost from another world, one where fresh mountain air is abundant, Wi-Fi is but a pipe dream and wildlife roams unhindered in the garden.

Chai

For weeks I have wanted to create something beautiful using that fragrant loose leaf black tea.  Something other than, well, tea.  When I stumbled across the Sweet Adventures Blog Hop event with its current theme of Sweet Surprise, I knew I had to come up with something that incorporated the tea and pushed my boundaries in the kitchen.

Chai Pud 4

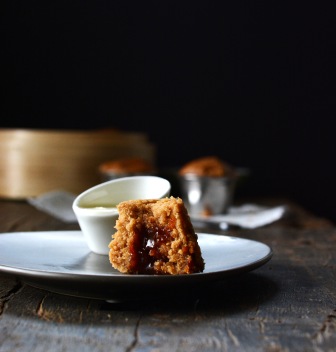
It is no secret that I adore using chai spices in sweets (like here and here).  So it was that the idea of chai puddings came into being.  And since I have always been a little intrigued by the idea of steaming, instead of baking, puddings I decided give it a go.  This is a steamed English pudding recipe, delicately infused with the flavour of good tea and spiced up with ginger, cinnamon and cardamom.  I used a bamboo steamer for these but you could easily fashion one using a colander and a pot lid.  I decided to make mini puddings, which I feel are the perfect serve of soft, warm, fragrant sponge.  And the surprise? Well, you might just have to keep reading…………

Chai Pud 5

Steamed Chai Puddings with a Caramel Surprise

Makes 4 or 5 mini puddings

Caramel Recipe from Smitten Kitchen

Pudding recipe modified from Notebook Magazine, August 2009, via www.taste.com.au

Get:

Caramel:

1/4 cup sugar
2 tbsp unsalted butter in small pieces
1 1/2 tbsp heavy cream

 Pudding:

1/2 cup milk
6 cardamom pods
1/2 vanilla bean split with seeds scraped out
3 tsp good quality powdered loose leaf black tea
1/2 tsp ground cinnamon
4cm ginger, grated
70g butter at room temperature
1/4 cup caster sugar
1 egg
3/4 cup Self-Raising flour
1 tbsp rice malt syrup or golden syrup

Make:

For the Caramel:

In a small non-stick saucepan on low-moderate heat, melt the sugar.  Remember when melting sugar, you want to just agitate the saucepan rather than stirring the melting sugar as that will cause it to crystallise.

Take the saucepan off the heat and add the butter- stir until the butter melts and it is somewhat incorporated (it will not blend completely).  Then, add the cream and return to the heat.  Boil on low-moderate heat until it becomes a dark golden colour and reaches the soft-ball stage. To test this, drop a pit of the caramel into a cup of cold water.  If a soft ball forms that you can actually pick up, it is ready.

Pour the caramel onto a plate lined with grease-proof paper and place in the freezer for 20-30 mins. When set, form the caramel into little balls about the size of a large olive.

For the Puddings:

Grease the mini ramekins well.  Line them with grease-roof paper.  Boil about 1 1/2 L of water in a large saucepan or in the kettle.

In a medium saucepan, place the milk, tea, vanilla (seeds and shell), half of the ginger, 5 of the cardamom pods, crushed (seeds and pods) and the cinnamon.  Bring to the boil and simmer on low heat for about 10 mins.  Take off the heat and place in the fridge to cool and infuse.  Once cooled, strain into another cup.  You will be using 1/3 cup + 1 tbsp of this milky tea.

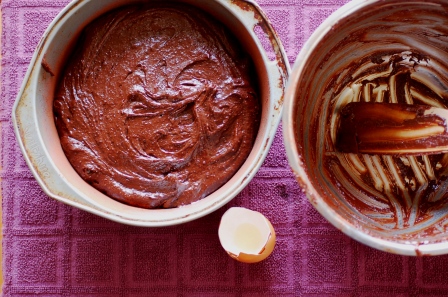
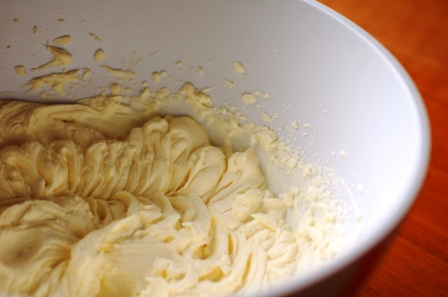
In a large mixing bowl, cream the butter and sugar using an electric beater or a whisk and a powerful arm.  Add the egg and beat until incorporated. Powder the seeds of the remaining cardamom pod and add this along with the other half of the grated ginger.  Add the milky tea (1/3 cup + 1 tbsp) and the flour in alternating batches, stirring in between.  Stir until all the ingredients are well incorporated.  You can use the electric beater for this.

Fill the ramekins with the mixture to about 1/2 cm from the top.  Place in the steamer and place the steamer on top of a large saucepan half filled with boiling water.  Try and ensure it is a fairly tight fit.  Put the lid on the steamer and cook on moderate heat.  After about 20 mins, remove the lid and push on one of the puddings with your finger- if it is cooked with a spongy consistency, push a caramel ball into the centre of each pudding so that is about 1/2 cm below the edge of the ramekin.  Cook a little longer before inserting the caramel if it is undercooked. The pudding would have risen well above the rims of the ramekins.  Put the steamer lid back on and steam for a further 5-8 mins.

Allow the puddings to cool slightly, then run a knife along the top of the ramekin to remove the overhang.  Eat the overhang immediately before anyone else gets wind of it.

Run the knife around the edge of the pudding to loosen.  Tip the puddings onto a plate or serve in the ramekin with some cream or vanilla ice cream.

Notes:

I used these little stainless steel cups I had that are 6 cm in diameter and 4 cm high.  Mini ramekins would also work well.  Or double the pudding recipe (the caramel amount should be adequate) and use normal sized ramekins, with larger caramel balls.

If using small cardamom pods, use two in the pudding mixture instead of one.Chai Pud 2

Flourless Chocolate Cake

A few weekends ago, my friend lovely Maureen came to visit from interstate for a mere 32 hours, a whirlwind trip that began perfectly with some hard core and highly productive factory outlet shopping.  You see, despite being a very intelligent individual in all other aspects of life, this poor misguided soul detests shopping and for some unfathomable reason comes to me for fashion advice.

Luckily, despite her lack of interest for retail therapy which I will never understand, we have other common interests on which we have built our friendship, one of these being our mutual love of all things edible.

I had been meaning to try a local Mexican restaurant for months so we decided to reward ourselves for our hard work (all that credit card swiping is exhausting) by doing just that.  It was pretty good Mexican that really hit the spot…….but to my dismay, it turned out it was the meal that kept on giving.
DSC_0108                        DSC_0115

The following morning we made grand plans to hit the beach.  We packed Cookie into the car and drove across Sydney only to find that nature had other plans.  Over a divine beachside breakfast,  a pesky bout of gastroenteritis crept up on me like the sneaky rascal it is, and I realised that a walk on the beach was a mere dream.

DSC_0127

After depositing my friend at the airport with profuse apologies (among other things that were profusely taking place), I came home to crawl under the covers and rest my slightly dehydrated self.

I awoke to puppy dog eyes gazing at me and a strange sense of invigoration.  A strong urge to bake resulted in this flourless chocolate cake for my gluten-free colleague whose birthday was the next day.

I tried out my recently acquired, albeit basic, cake decorating skills (thanks to my friend Subo in the UK and a more recent cake decorating class- more about that later) and Ta Dah! One little birdy cake that was devoured in barely half an hour by the hospital crew.

Make this cake.  Even if you don’t need to be gluten free.  Hell, even if you want to marry gluten and have its babies, ditch it for one day and MAKE THIS CAKE.

DSC_0212

Flourless Chocolate Cake (GF)

Barely adapted from Gourmet November 1997 on Epicurious

Get:

100g fine-quality bittersweet chocolate (not unsweetened)

110g (1/2 cup) unsalted butter
3/4 cup sugar
3 large eggs
1/3 cup almond meal
1/2 cup unsweetened cocoa powder plus additional for sprinkling

Make:

Preheat oven to 190°C and butter an 8-inch round baking pan. Line bottom with a round of wax paper greased on both sides.  Alternatively, you can butter the pan and dust the inside with cocoa powder.

Chop chocolate into small pieces. In a double boiler or metal bowl set over a saucepan of barely simmering water melt chocolate with butter, stirring, until smooth. Remove top of double boiler or bowl from heat and whisk sugar into chocolate mixture. Add eggs and whisk well. Sift 1/2 cup cocoa powder and almond meal over chocolate mixture and whisk until just combined. Pour batter into pan and bake in middle of oven 25 minutes, or until top has formed a thin crust. Test by passing a clean knife into the centre of the cake all the way to the bottom- the knife should come out clean.  Cool cake in pan on a rack and invert onto a serving plate.

Dust cake with additional cocoa powder or cover with white chocolate ganache.

Cake keeps, after being cooled completely, in an airtight container for 1 week (this is sort of a guess as I’ve never actually managed to keep it that long).

White Chocolate Ganache

Get:

250g white cooking chocolate
125ml double cream or pure cream

Make:

Melt chocolate in a double boiler, stirring constantly.  Add cream and stir until blended.  Allow to cool slightly and pour over cake, spread with a spatula.

* A double boiler consists of a pot or saucepan containing boiling water on simmer and a second pot or saucepan sitting in the rim of the first one.  The second pot should contain the chocolate and other ingredients to be melted.  It is important that the water is not touching the bottom of the pot containing the chocolate and that you do not let any water in with the chocolate as chocolate and water don’t seem to like each other very much.

Also be careful as burnt fingers do not a good cook make.

DSC_0161

Save-the-day Mango Dessert

Right, so you finally got your act together and invited those friends over for dinner.

You know the ones…..

They are invited to every birthday of yours, and you to theirs.  And each time you see them, there are promises that you must catch up properly soon, that it’s been far too long and that you really shouldn’t let that much time go by before you see each other next.

But somehow as earnest and genuine all these promises are, before you know it six months have gone by before you finally do get around to inviting them over.

So the day arrives and you have this menu of mammoth proportions planned in your mind.

You jump out of bed, bright eyed and bushy tailed (ok, so in my case it’s usually a reluctant and creaky scramble out of bed after at least 3 hits of the snooze button, but I’m guessing there are some (insane) morning people out there).

So once you’ve done whatever it is you need to do in the morning to return you to some semblance of a human being, you go to the gym, stop off at the supermarket on your way home to get supplies and before you know it, half the day is mysteriously over.

Please tell me I’m not the only person this happens to….?

Vacuum, bathrooms, laundry, make the main meal, tidy up the living room, make a salad, load dishwasher, clean kitchen, pick out not-too-mainstream-but-not-too-weird music for the evening, shower, find clothes, wear clothes, put wine in fridge.

DSC_0081

And somewhere in all that, the likelihood of actually making that cheesecake or pannacotta or apple pie that you had planned for dessert becomes but a tiny speck on the horizon.

This is when this dessert saves the day.  A dessert so impressive but more importantly, so ludicrously easy that it will catapult you from barely organised slightly frazzled hostess to certifiable domestic goddess.

DSC_0088

A layer of jelly (or jell-O depending which hemisphere you’re at) topped by a mango fool and garnished with something crunchy.  Serve it in a martini glass and it’ll be ultra sexy (hey, it worked for Beyonce), or in a drinking glass or glass jars for super cute quirkiness.

DSC_0093

Easy Mango Dessert

Get:

1 packet mango flavoured jelly crystals (to make 500ml jelly)
Flesh of 2 small mangoes or 425g tin of mango in syrup
Pinch Saffron
3 tsp caster sugar
Insides of 8 cardamom pods
300ml fresh whipping cream

Make:

Make the jelly according to packet instructions.  If using martini glasses, pour 1/4 cup of the mixture into each glass.  Drinking glasses may fit a little more jelly.  Chill for at least 4 hours to set.

Blitz the mango with 2 tsp water or syrup (if using tinned), saffron and 1/2 tsp sugar to achieve a thick saucy consistency.  Add a little more water or syrup if needed.  Taste and add more sugar if required.

Using a mortar and pestle or an electric grinder, powder the cardamom with 1/2 tsp sugar.  Place the cream in a deep bowl.  Using a hand held electric beater, whip the cream on medium speed until soft peaks are achieved.  Be careful not to go too far as there is a fine line between soft and firm peaks.  Sprinkle cardamom sugar as well as the remaining 2 tsp sugar over the whipped cream and beat on low speed until mixed.  Taste and add more sugar if required.

Add mango sauce to cream and fold in gently to create a swirled through effect.

Divide cream between the glasses, placing on top of the firm jelly.

Top with garnish of your choice, preferably something with crunch.  I used some fresh coconut and almond flakes, toasted gently in a dry frypan over the stove.  Half a tablespoon of each per glass should do it.  Crushed meringues, pomegranate seeds, berries, any other nuts and chocolate shavings would also make great toppings, but feel free to unleash your creativity into the glass.

Chill for at least 2 hours before serving.DSC_0602

Hello, welcome and Mum’s Pista Kulfi

Starting a blog is both exhilarating and terrifying.  Buried under all those great ideas for blog posts, there is a tiny little voice that questions whether this is too big a commitment for my flitty piscean self.  That squeaky voiced me wonders if anyone would even be interested in anything I have to say in this, my little patch of cyber-space.

Image

“What if no-one reads it apart from my my parents?  What if even they don’t read it and just tell me they do so as not to hurt my fragile ego?  What if everyone around me secretly thinks that I can’t write or cook to save my life and they just haven’t broken it to me yet?”

Says that (rather annoying) little voice, her pitch reaching alarming heights.

You see, I am a person driven by outcomes and as I result I often bypass the most interesting part of life- the journey.  This blog is one of the few things in life that I have launched into without any thought of what might become of it and currently that little voice is as panicked as a movie star who’s make-up artist has gone missing three hours before the Oscars.

Luckily I had a jalebi on hand to plug the little voice’s mouth and currently it is happily munching away on this soft, sugary sweet, so it should leave us alone for a while.  Speaking of sweets- and you’ll find I often am- I thought I’d kick off with an Indian sweet that caters to not only my raging sweet tooth, but also fulfils one of the basic premises of this blog, to expand my repertoire of Indian cooking.

Plus, I’m always trying to start with dessert but there are too many boring sensible people around me who insist I eat a ‘proper’ meal first.  Something about nutrition or whatever.  So since this is MY blog, I shall start with dessert.  And since my mum is one of my biggest cheerleaders, I will start with her Pista Kulfi, an Indian ice-cream.

DSC_0677

Mum’s kulfi is a fuss-free but moreish version and it’s a little lighter than some of the restaurant offerings I’ve tried, which is one of the things I like about it.  There is no churning, no fancy equipment, just a little bit of pistachio powdering and mixing.  Then you put it in the freezer and get some beauty sleep or watch three seasons of Grey’s Anatomy.

DSC_0017 - Copy
Mum’s Pista Kulfi
Get:
1 Can Evaporated Milk
1 Can Condensed Milk
300 ml Thickened Cream
90 grams Pistachio kernels (unsalted)
1/4 tsp Cardamom Powder or the insides of about 8 pods, powdered
Medium pinch of saffron

Make:
Grind nuts to a powder.  Mum tends to make a fine powder while I prefer a more coarse powder. Take your pick, it’ll be yum either way.  Use the grind function on your food processor or a mortar and pestle if you are a more patient person than I.

Blend together powdered Pistachio and all the other ingredients to a smooth consistency, working out any lumps. I like to use a hand held electric blender, but a good manual stir should work.

Pour this mixture into containers of your choice.  Popsicle moulds work quite well, or for a more sophisticated approach, pour into plastic or silicone moulds that will create shapes that you can tip out onto a plate.  Freeze for at least 8 hours or overnight.

Kulfi sets harder than ice cream and has been known to stubbornly cling to its mould.  Run the outside of the mould under hot water briefly to loosen and this will make serving much easier.

DSC_0025