Falling out of the sky and Chocolate Fudge

There are so many things in this world that we just trust, unquestioningly.  Whether it is based on knowledge, conditioning, or an element of religious faith, we rely on the predictability of certain events and functions that will keep us safe and get us through life.

DSC_0055

We trust that when we stop at a red light, the programming of the lights is such that they will never all turn green at once as that is the way the traffic functions, allowing everyone to get around safely.  Never once do we worry that one day something may go wrong with that computer that holds all the programming, leading to chaos on the road.

We are taught to cross the road when the little green man makes an appearance and we trust that when we do cross, the cars will stop as they should because, well, them’s the rules!

And my day job……well, that is a whole exercise in trust in itself.  On a day to day basis, I perform procedures on sometimes aggressive animals held by nurses who are thankfully highly capable and have our interests at heart.  I rely on this as well as the fact that they pride themselves in not letting us get hurt, an assurance that allows me to do my job to the best of my ability.

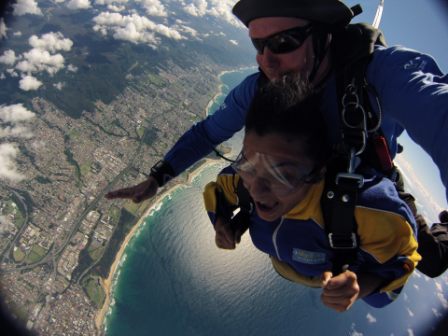
Two weeks ago, I took the ultimate leap of faith, trusting in many things that were well beyond my control.  I willingly jumped out of a plane at about 14,000 ft above the water and I did so with (mostly) unwavering faith that the professional skydiver strapped to my back knew exactly how to keep me alive.  That when he did pull the cord, the parachute would release and inflate as it should, allowing me to enjoy the view (oh that dazzling coastline!) while we floated gently down to land ungracefully on my butt on soft grass.
?????????????

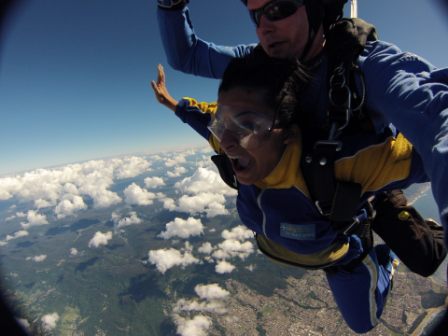
All those things did happen as they should.  But what I wasn’t quite prepared for was the incredible rush.  Those 45 seconds or so when we were plummeting towards the earth, cold wind whipping my face, freezing my eyeballs and the inside of my mouth which was grinning and screaming all at once.  Then the parachute went up and in the video, I can pinpoint the moment when I looked up to see that beautiful, billowing, colourful thing that would float me down safely.

?????????????

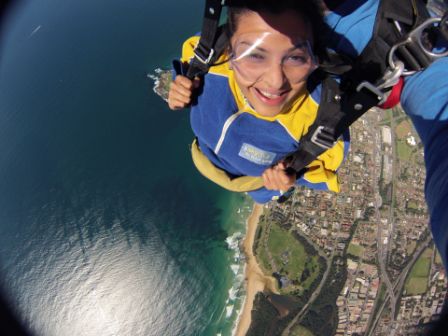
The sensation over the next few minutes can best be described as hovering.  That feeling of weightlessness is something I could never have imagined.  Suspended above the land and water on a stunningly clear day while slowly feasting my eyes on that impossibly blue water, the line of froth and the voluptuous coastline where it met the sand, is an experience that surpasses any I’ve ever had.  And when we landed, it felt like it was over all too soon, that it would’ve been lovely to hover just for a little longer if it weren’t for the party pooper that is the pull of gravity.

If you feel the urge to jump out of the sky from a moving plane, this is where I did it and I found the company and the staff to be very friendly, highly professional and most importantly, very capable of deploying a parachute at just the right time.

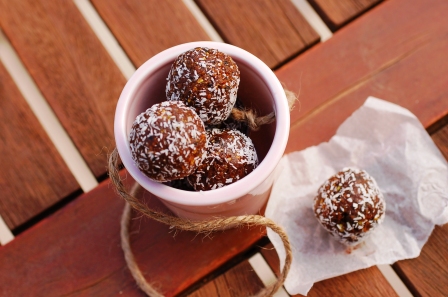
This fudge is something else you can completely trust in.  It is the simplest fudge recipe I’ve ever seen and it works, every time.  It is my go-to recipe if I’m time poor and required to bring a plate to a function.  I always take home an empty plate and many compliments.

DSC_0318

Okay, so technically it’s not proper fudge in that it doesn’t involve sweating over a bubbling vat of sugar and cream, vigorously stirring with one hand whilst trying to hold both the pan and the candy thermometer in the other hand.

But somehow I don’t think the fudge Gods will mind!

I can’t remember exactly where it came from but I’m pretty sure the original is a Nigella Lawson Recipe.

DSC_0367

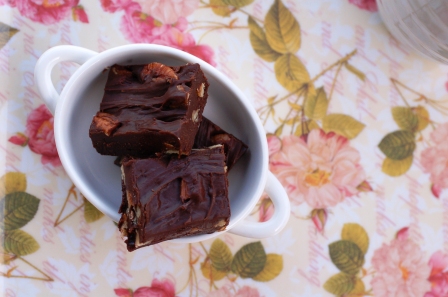
Simple Chocolate Fudge

Get:

300g decent to good quality dark chocolate (or a combination of dark and milk)
30g butter
1 tin sweetened condensed milk
1/4 tsp vanilla extract

Add ins (optional):

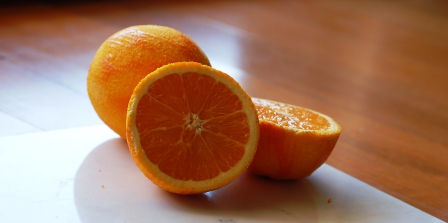
Finely grated zest of 1 orange
1/2 tsp cinnamon powder
1/3-1/2 cup nuts, preferably roasted
1/3 cup white chocolate chips
Anything else you think may work!

Make:

Line a baking tray with grease-proof paper.

In the top bowl of a double boiler, place chocolate, butter, condensed milk and any aromatics that you are using.  Stir over medium heat until chocolate and butter melt and the whole thing combines to a smooth mixture.

Take top bowl off the heat and stir in any other add-ins (nuts, chocolate chips, etc).

Pour mixture into paper-lined tray and refrigerate for at least 4 hours.

When set, cut into squares or diamonds with a sharp knife.

Serve to thunderous applause.

Notes:

To create a double boiler, you need a saucepan half full of water and another dry saucepan/pot that sits on top of the first one without actually touching the water.  You put the chocolate etc in the top pan to melt it gently without burning it.

DSC_0355

Click The Month: March 2013

DSC_0806

In a month that started with me getting a year older, greyer, creakier but hopefully somewhat wiser, I managed to quite literally take a leap of faith when I did my very first sky dive!  An incredible experience needless to say and once I had looked up to assure myself the parachute had managed to inflate itself, I could then get on with having the time of my life.

?????????????

We celebrated safe landings and birthdays with a purely decadent meal at the Sailors Club, a meal that ended with what could be two of the best desserts I can remember having.

tuna main edited 20130319_150640

In between that and a trip to Adelaide, I managed to squeeze in a little me time, a dose of hubby time and a dash of Cookie time. Me time included finally starting to read a new book, How to be a Woman by Caitlin Moran which I heard about through this blog.

20130319_182938 20130319_183056

20130329_085456 20130329_092203

March was given it’s marching orders with Easter, more cake and far too much chocolate for a sane human being.  Here’s to a less sugary but just as much fun April……..

20130305_082309

Sunshine and Cake

DSC_0606

Sydney has put on quite the show lately.  Stunningly beautiful days have been in abundance.  Those sorts of days when you wake up to sunshine pouring in through the gaps between the blinds and the window frames.  An impatient sort of sunshine that wants to wake you up so that it can show off its brilliance to you.

DSC_0002

Then you look outside and the sky is a seemingly impossible shade of blue, clear and unbroken.

Or better yet, the expanse of azzure is occasionally interrupted by the perfectly pillowy cloud.  Sweet little puffs of white that have no intention of doing anything silly like raining down on the perfect earth.

DSC_0017

Why then, did I feel the urge to bake what would possibly be considered a wintery cake?  Was it that I saw it in Sunday Life Magazine and couldn’t take my mind off it?  Or maybe because when I was sorting out the paper for recycling, I stumbled across that very same issue and just so happened to open it right to that very page?  Or perhaps because I thought of a way to involve oranges, which surely are the closest thing there is to liquid sunshine?

DSC_0040

This is no delicate creation, this cake.  It has a moist, dense crumb that says I am cake, hear me roar!  It holds its own, almost unapologetically and would be able to support a nice, thick layer of icing if you felt that way inclined.

I went for an orange and cardamom syrup instead.  Orange and cardamom, they are old buddies.  Tiny little fragrant cardamom makes an impact on big bumbling orange like no other.

DSC_0045

So enjoy the sunshine, and for those of you who don’t have any, perhaps this cake will help?

Oh, and Happy Easter!

DSC_0057   DSC_0081

Orange and Almond Yoghurt Cake with Orange and Cardamom Syrup

Cake modified slightly from Bill Granger’s recipe in Sunday Life, March 10 2013

Syrup modified from The Patterned Plate

Get:

4 eggs
1 1/2- 2 cups caster sugar
1 1/2 cups full-fat greek yoghurt
1 tsp vanilla extract
Zest of 2 oranges, finely grated
2 cups plain flour
1 cup almond meal
3 tsp baking powder

For the syrup & topping:
Juice of 2 oranges
1 cup icing sugar
The insides of 6 cardamom pods, ground to a coarse powder
1/3 cup flaked almonds, lightly toasted

Make:

Preheat the oven to 170 C.  Grease and flour a 20cm square baking tin.

Whisk the eggs and caster sugar in a large bowl with an electric beater until thick and well blended (or if you are lucky enough to have a stand mixer, you can use that and know that I’m incredibly jealous).

In a seperate bowl, combine the yoghurt, vanilla and orange zest.  Fold gently into the egg mixture.  In another bowl, sift the flour, almond meal and baking powder and combine.  Add bit by bit to the wet ingredients and fold through gently.  Try to add the dry ingredients around the sides of the mixture rather than right into the middle to preserve the lightness of the batter.

Pour into the cake tin and place in the middle shelf of the oven.  Bake for 35-40 mins or until a knife or skewer passed into the middle of the cake comes out clean.

While the cake is baking, combine the sugar, orange juice and cardamom in a small saucepan and place over medium heat.  Stir until the sugar dissolves, then allow to boil on low heat for 3 or 4 mins.

When the cake is baked, pierce it all over the top with a fork.  When the cake is still hot and in the tin, pour the syrup evenly over the top and sides of it.  Allow the cake to cool in the tin and absorb the syrup.  Sprinkle flaked almonds over the top.

Serve alongside tea or warmed with a dollop of cream or ice-cream (or both).

DSC_0088

Date-me-you-nut Truffles

I saw these gorgeous looking Date Truffles on Prerna Singh’s equally gorgeous blog, Indian Simmer, some time ago.  I finally got around to making them, then wondered why it took me so long as they are oh so easy and rewarding.  Rich and chewy, sweet without being sickening, it is a damm good thing that these babies are actually quite healthy.

DSC_0743

The first batch I made ended up as gifts to friends and family in Adelaide, in colourful little jars along with dark chocolate truffles (it’s all about balance, I say!).

The second batch was sent to a friend who is soon undertaking the painful and soul-destroying task of moving house.  She declared it to be a fabulous ‘packing snack’, which I fervently hope meant ‘a great thing to snack on while packing’ as opposed to ‘a great snack to use as packing material’.

DSC_0786

Part 2 of the second batch made a wonderful pre-skydiving snack (yes, you heard right and more on that later).  It certainly was a much needed energy hit after rising  at an unearthly hour to drive ninety minutes to take the leap.

The third batch- and yes, I have indeed made 3 batches in the space of 2 weeks- is sitting comfortably in our fridge waiting to be gobbled.

So here goes…..the basic recipe is much the same as the original, but being me I couldn’t help but throw in a few spices.

DSC_0739

Date-me-you-nut Truffles

Makes 14-16

Modified slightly from Cocoa Covered Pistachio Date Truffles on Indian Simmer

Get:

1 tbsp unsalted butter

500g Pitted Dates
The insides of 4-6 cardamom pods, ground to a powder
1/2 tsp cinnamon powder
Dash of vanilla extract (optional)
1/2 cup shelled nuts (pistachios, macadamias, hazelnuts, pecans, almonds all work well)
About 1/2 cup dessicated coconut

Make:

In a non-stick saucepan, melt butter. Add dates, spices and vanilla and cook on medium heat until the dates soften and start to soften and go a little gooey (about 10 mins).

Place date mixture into a food processor and allow to cool a little. Process to a thick paste.  Use the pulse setting.  It may be hard for the blades to move through the mixture, but do not add any water.

Add nuts.  If using almonds or hazelnuts, I prefer to roast them in a 170-180 C oven for 7-10 mins.  Process the nuts into the date mixture so that the nuts are chopped finely but not powdered (you should still be able to distinguish the nut pieces).

If the mixture is very hot, allow to cool further. Pinch off small amounts and form into balls, rolling them between clean hands.  I like to make the truffles about 3 cm in diameter.

Place dessicated coconut in a small food-safe plastic bag (such as a snap-lock sandwich bag).  Throw in truffles 3-4 at a time, hold the bag closed and shake around so that the truffles are coated in coconut.  Place the coconut covered truffles in the fridge for at least a couple of hours.

Other options are to coat the truffles  in cocoa powder, as specified in the original recipe, or in crushed nuts.

Gift or gobble as appropriate.

DSC_0742

Weekly Photo Challenge: Future Tense

Weekly Photo Challenge: Future TenseDSC_0686

Tiny hands that will one day become bigger, stronger hands to re-shape the world for the better…….
This is my interpretation for The Daily Post Weekly Photo Challenge: Future Tense.

Black Pepper Chicken Fry

I am a shameless cookbook hoarder.  This in itself would not be a problem except that I seldom use cookbooks.  I tend to be more of an intuitive cook and will occasionally do a Google search or look to my favourite blogs for recipes.  But those lovely, expensive, glossy cookbooks?  Sadly neglected.

My cookbooks are even strategically positioned close to the kitchen for convenience.  From your basic $5 pasta bible bought at the discount table in a shopping centre to spectacular hardbacks written by celebrity chefs with photography that is almost as delicious as the recipes themselves.  From Madhur Jaffery to Masterchef, it’s all there on that shelf, in pristine condition and waiting to be used.

DSC_0221

Oh yes, there are the days when the mood takes me that I flip through a few of them looking for inspiration.  Eventually I may even find a recipe that I want to (sort of) follow, and if I’m feeling really diligent, the dish might even make its’ way onto the stove or the oven and then onto a plate. But mostly I just like to have these books.

Recently, I broke my self-imposed cookbook buying ban by purchasing one that I had been stalking coveting for quite some time.  Tasting India by Aussie Chef Christine Manfield is truly a work of art and full of totally cook-able recipes.  Manfield manages to take the reader with her on a journey around India, celebrating its mind-boggling diversity, its hospitable people and most importantly, its incredible cuisine.  The smears of masala that have already appeared on some of the pages attest to the fact that this is one cookbook that I will be using again and again, and for more than just its decorative value.

DSC_0596

The Black Pepper Chicken Fry is a dish that I have already made several times.  The long simmer allows the chicken to be oh so tender and nicely coated with the pepper-based masala.  You first get a little hit of pepper, followed by the lovely chicken that falls apart obligingly in your mouth.

DSC_0586

Black Pepper Chicken Fry

Feeds about 4, takes about 60-80 mins to make

Adapted from Tasting India, Christine Manfield, p.250.

Get:

Spice mix:

1 1/2 tsp cumin seeds
1 1/2 tsp coriander seeds
1/2 tbsp black peppercorns
3-4 dried red chilies
The insides of 2 cardamom pods
1/2 tsp cinnamon powder

Other ingredients:
1 tbsp vegetable oil
1 tsp cumin seeds
1 tsp mustard seeds
8-10 curry leaves
4 medium cloves garlic, peeled and finely grated
1 1/2 inch piece fresh ginger, finely grated
1 large white onion, finely diced
2 ripe tomatoes, finely diced
1 kg chicken thigh fillets cut into 1 inch pieces
Salt
Water

 Make:

Place the spice mix ingredients in a small pan over a low heat. Roast until they are browning slightly and fragrant.  Powder using a mortar and pestle or spice grinder.

Heat the oil in a large non-stick saucepan over medium heat.  Add cumin and mustard seeds and stir until popping.  Add the spice mix and stir for a minute or so.  Throw in the curry leaves and cover to protect yourself from the hot oil flying everywhere.  Add the ginger and garlic and stir for about 2 mins.  Add the onion and cook until softened, then add the tomato and cook for a further 5-7 mins.  Season with the salt and stir.

Add the chicken pieces and stir until they are coated with the other ingredients. Cook for about 5 mins until the chicken starts to colour.  Add 1 1/2 cups water, cover and simmer on low-medium heat for 30-40 minutes or until most of the liquid has been absorbed. Stir every 5 mins or so.  About halfway through the process, taste and add more salt if necessary.

Serve with your favourite Indian bread or steamed rice.

Notes:

Yes, it does seem like a lot of water…..but it works….trust me on this one.

DSC_0592

OSP @ The Pot, Adelaide

What happens when One Small Pot falls into The Pot? Why, a very happy blogger of course!  Yes folks, I’m back from my Adelaide holiday and the very first thing I have to tell you about is this gorgeous little food and wine bar on King William Road in the upmarket suburb of Hyde park.  My friend B, who is positively a walking talking Good Food Guide to Adelaide took me there for a long, lazy lunch and a long overdue gossip catch-up session.

20130308_143023

Perched on little bar stools at this airy, too-cool-for-school establishment, we sipped (too much) wine and unceremoniously devoured plate after  plate of pure heaven.  Around us, the place buzzed with chatty lunchers while sunshine poured through the big windows and danced across the decor which managed to be at once classic and eclectic.  A wall of wine bottles above the bar and a concise and carefully chosen wine menu made it clear that this was a wine bar not to be messed with.  And on the adjacent wall was a specials board that consisted of the daily offerings scribbled on sheets of brown paper, lest those expensive wines decided to take themselves too seriously.

20130308_143013

The food menu seemed to focus on smaller tapas-style share plates, but there were also a selection of bigger plates and desserts.  B and I started with the sashimi small plate, which was an oh-so-delicate introduction to the meal and really got the gastric juices flowing with its’ delightful acidity.

The scallops with pea puree and pork crackling were a slightly more substantial follow-up act.  The tender, melty scallops went down far too easily with the lovely Rosé I was drinking.

Next up were two of the best dishes of the line-up: the Corn and Coriander Fritters with Chilli Jam, and a special that was a soft boiled egg in light batter, deep fried.  Those fritters hit the spot like no other.  Despite being deep fried, they remained light and succumbed beautifully to the fork and the mouth.

Right: Corn and coriander frittersLeft: THAT egg!
Right: Corn and coriander fritters
Left: THAT egg!

Just when we thought it couldn’t possibly get any better, they brought out the egg.

That egg…….I have dreams about that egg!  Soft boiled, then deep fried in its’ crispy coat, it was served with an Asian garnish that I would be willing to give my left pinkie toe for.  That creamy, soft egg coats the inside of your mouth just enough to enhance those sweet salty tangy Asian flavours that insist on dancing gleefully over your tongue. Bliss!

Egg edited

Starting to fill up, we tucked into some duck spring rolls wrapped in iceberg lettuce and dipped into a gorgeous zingy sauce that may just have been one of the best spring rolls I’ve eaten outside of Asia.

With a little more chit-chat to be had and just a small space left in our bellies, we went for one of the bigger plates, the Blue Swimmer Crab with Chilli and Tomato Hand Cut Pappardelle.  This pasta was divine, silky and freshly made on the premises, the perfect filler for that last spot of tummy space.

20130308_143344             20130308_142947

The wait staff added to the wonderful experience and our very friendly, bubbly waitress really took it upon herself to help us with our choices.

This was a decadent lunch, a bit of a splurge but oh so worth it!  Smaller plates were between $10-$20 and most of the bigger plates were between $20-$40.  Pot buns were around $10 each.  There were also options of a cheese plate, sides and amazing looking desserts, which we did not have a smidgeon of room for.  They also do a tasting plate for $65.

Next time, I’ll be back for the breakfasts, which sounded yum, and I’ll definitely leaving room for dessert!

The Pot is at 160 King William Rd., Hyde Park.  You can give them a buzz on (08) 8373 2044.

The Tale of Gilbert (Watermelon, Mint and Ginger Sorbet)

There was once a friendly watermelon called Gilbert.  When Gilbert was a young boy-melon, he found himself on a shelf in a fruit shop surrounded by equally juicy watermelons.

Gilbert longed to leave the fruit shop and find a loving home.  Being a rather amicable melon, Gilbert one day struck up a conversation with one of the fruit shop’s customers, a veterinarian and a watermelon enthusiast.
DSC_0572

Gilbert was overjoyed and looked forward to his destiny of being sliced and devoured on a hot summers day.  He found his place on the dining table and awaited his opportunity to show off his refreshing, lush qualities.

But alas, the veterinarian became far too lazy busy to undertake the onerous task of watermelon dissection and Gilbert was left neglected and wondering whether he would ever be given a chance to fulfill his fate.

For days Gilbert sat dejected on the table that no-one used, emitting dramatic sighs that no-one seemed to hear.  He watched his keeper rush to work in the morning in her surgical scrubs.  He waited all day for her, sure that she would be missing him too.

He saw her return every evening with a spark of hope that perhaps today would be the day, only to be disappointed.  And so he waited, his crisp red flesh aching with longing to be devoured although his tough green armour gave nothing away.

He observed her as she cooked and ate her meals without a glance towards where he sat.  He watched TV with her, patiently.

(It must be said that while he rather enjoyed ‘How I met your mother’, he found ‘My Kitchen Rules’ really quite offensive- although really, haven’t we all at times?)

He waited and waited until one day the veterinarian who usually walked past him unseeing, stopped and finally looked straight at him!

DSC_0553

And before he knew it, Gilbert was in quarters.  A quarter was cubed and devoured fresh, another quarter was turned into sorbet and the rest was juiced.  Most importantly, all of him was thoroughly enjoyed and Gilbert finally, finally, met his destiny……….

DSC_0570

Watermelon, Mint and Ginger Sorbet

Modified from Australian Good Taste Magazine, Jan 2006, via taste.com.au

Get:

2 cups water
3/4 cup caster sugar
1 inch piece fresh ginger, finely grated
Small handful mint leaves, finely chopped
1kg Gilbert or other watermelon flesh roughly chopped
1 egg white

Make:

Place water, sugar, ginger and mint in a saucepan and stir over low heat for a few mins until the sugar dissolves.  Increase heat and bring to t boil, boiling for 5-10 mins until the mixture thickens to a thin syrupy consistency.

Blend watermelon in a blender or food processor until pureed.  Strain the puree through a fine sieve into an airtight container suitable for freezing.  Discard the pulp or use in smoothies.  Alternatively you can use a juicer to extract the juice. You should have around 600ml of juice.

Add sugar syrup to the watermelon juice and stir to mix.  Place the lid on the container and place it in the freezer for at least 5-6 hours.

Using a fork to break up the sorbet, transfer it to a food processor or blender and whizz until the sorbet has a 7-11 slushie texture.  Return the sorbet to the container and place it back in the freezer for a further 5-6 hours.  Blend again to a slushie consistency and return to the freezer for another 5-6 hours.  Place the sorbet in the blender with an egg white and whizz again until it is a soft, smooth consistency.  Place back in the freezer and freeze for another 5-6 hours.

Scoop into bowls and enjoy.

Notes:

The original recipe called for 2 egg whites but I choose to just add one as I was worried about it being too slimy.  I was happy with the texture I ended up with.

The original recipe called for a cup of sugar but I reduced it to 3/4 in the interest of health.  After tasting it, I felt I could have actually decreased it further, to 1/2 cup.  If you like a sweeter sorbet, stick to 3/4 cup or even use a whole cup of sugar.

This recipe is really not as time consuming as it seems, however you should start making it 36-48 hours before you need to serve it.  I made it one evening, left it in the freezer overnight, then blended it up the next morning, again the next evening and did the final blend with the egg white the following morning.

DSC_0575

Weekly Photo Challenge: Lost in the Details

This smooth little guy was hiding among the sandy grooves on a beach in Newcastle, UK.  This is my interpretation of the weekly photo challenge ‘lost in the details’ by The Daily Post.

Its been a busy but lovely week for me.  Officially a year older but none the wiser.

Now off to steamy Adelaide where the weather report promises something akin to a sauna.  As always, I go in peace bearing chocolate and am super excited to hang out with family and dear friends in that charming city.

Regular programming will resume next week.  In the meantime enjoy the weekend and don’t forget the sunscreen and the champagne just barely in that order of priority.

Click the Month: February 2013

You know, I’m not very good at the balance thing.  Like physically or metaphorically.  But strangely Feb has been a very balanced month.  The perfect blend of activity and good honest work.  Of relaxation and action.

We started with a trip into the city to visit the Sydney Harbour Rubber Ducky.  Anyone who dares to tell me that this ducky wasn’t a damm cute visitor to our city will be subjected to me gushing in an annoyingly high pitched voice about the quackster.  Ok so strictly speaking this was in January but hey….technicalities!

20130120_212804

I then found myself in a macaron class where we made chocolate macarons……what could be better?

I’ve previously had 2 macaron-fails but perhaps I’ll conquer this beast one day after all…..

DSC_0137 (2)DSC_0154 (2)

DSC_0142

DSC_0160

Then there were Chinese New year Festivities where we celebrated by eating ourselves silly.

DSC_0304 editedDSC_0308 edited

DSC_0375 - CopyDSC_0323 edited

And finally, Tropfest, the annual short film festival that blew me away with the calibre of films in the final sixteen.  Some people are so clever!

20130217_211338

Most importantly, Feb 2013 was my very first month of blogging and I loved it even more than I thought I would.  Time to March on…… I look forward to a trip interstate to see my gorgeous and totally squishable neice, my birthday and lots more amazing eats.

How was February for you?  Let me know in the comments section…….

DSC_0370 - Copy